Showing posts with label milk. Show all posts

Tuesday, April 5, 2016

Cheddar Apple Bread

     Every now and then I come across a recipe that doesn't seem right. I mean, it looks good in theory, but something is off about it. This bread recipe was a perfect example. It looked great on paper. I followed most of the instructions. Then I was staring at a mixing bowl full of what amounted to dust. There was no liquid to turn it into dough. I figured maybe because I used dried apples instead of fresh. Then I realized grated apples still wouldn't produce enough liquid to make a dough. I called over The Wife for a consult. She agreed the recipe was wonky. We made an executive decision, and based on other recipes, added some yogurt and milk. The end result was fantastic. A bread that's good and crusty on the outside, but soft on the inside. Toast up a big slab of this and slather it with butter and you've got yourself a winner. I suggest making it using my suggestions, but feel free to try the original recipe. Let me know if you have any success. As always, notes and changes are in blue.

Cheddar Apple Bread
originally Old English Cheese & Apple Loaf
via The Art of Bread
Ingredients
  • 1 teaspoon oil, to grease pan (we just used nonstick cooking spray)
  • 3-1/2 cups unbleached flour (regular white flour, right?)
  • 1 tablespoon baking powder
  • 1/2 teaspoon salt
  • 4 tablespoons unsalted butter
  • 4 apples, peeled, cored and grated (we used about 2 cups dried apples, chopped)
  • 4 ounces cheddar cheese, grated
  • 2 eggs, beaten
  • 1 cup plain yogurt
  • 1/2 cup milk
  • rolled oats, to sprinkle (totally forgot about this)
Directions
  1. Preheat oven to 350F (180C, Gasmark), grease a 9x5x3" baking pan.
  2. Sift flour, baking powder and salt together in a large bowl. Rub butter into the flour mixture quickly with your fingertips until the mixture resembles the texture of coarse breadcrumbs (using your fingertips? How about one of those dough cutters? Why make things harder and messier than it needs to be?)
  3. Stir in the apples and cheese into the flour mixture. Add the beaten eggs until evenly blended (ok, if you have skipped my optional steps, you may find yourself staring at a bowl of clumpy and mostly dry flour. This was my WTF moment. Something very important seemed to be missing from the recipe. Like something to make it into a dough. The fact that the next step refers to "spooning the batter" indicates something the consistency of dried Play-Doh was not what I was looking for. Just go ahead and mix in that milk and yogurt now.) Mix until evenly blended.
  4. Spoon the batter into the pan (see? I told you. "Spoon." You'd be better off with a broom and dustpan if you don't add some liquid) Sprinkle with oats (I was so pissed about this recipe seemingly missing ingredients that I totally forgot about the oats.)
  5. Bake for 1-1/2 to 2 hours (we went for about 1-3/4 hours) until golden brown and well-risen. Turn out on a wire rack to cool.
Good Times!

Tuesday, January 20, 2015

Ham and Pea Soup

     Peas are a bit of an oddity with The Wife. Normally, she'll pick the peas out of most anything she's eating and wouldn't eat them as a side dish. However, if I make ham and pea soup, she goes batshit crazy over it and will eat it with gusto. This particular recipe is super simple and can be pressure canned for later use. Just remember to consult The National Center for Home Food Preservation to make sure you don't accidentally poison anyone. As always, notes are in blue.

Ham and Pea Soup
adapted from Better Homes and Gardens Home Canning Cookbook
Ingredients (Yields 4 pints)

  • 5 cups frozen green peas (you can use fresh if you'd like)
  • 2 cups finely chopped ham 
  • 3/4 cup celery
  • 1 teaspoon salt (Use the full teaspoon if your ham isn't salty. We dropped it to 1/4 teaspoon since our ham was super salty)
  • 1/2 teaspoon black pepper
  • 1/2 teaspoon dried marjoram
Directions
  1. Add 3-1/2 cups water, peas, ham, onion, celery and seasonings in a 4-6 quart pot. Bring to boil and reduce to simmer. Simmer, covered for about 20-30 minutes.
  2. Blend until smooth (If you've got steady hands, you can do it in batches in a blender. We used our immersion blender since I'm likely to spill everywhere trying to transfer scalding hot soup)
  3. If you plan on eating this right away, stop here. If you plan on canning this for later use, carry on:
    Heat soup back to the boil Ladle hod soup into hot jars, leaving 1/2 inch headspace. Secure lids and process in a pressure canner at 10 pounds pressure. 60 minutes for pints and 75 minutes for quarts. 
  4. Before serving and pressure canned food, make sure to boil it at least 10 minutes before you try to eat it.
    Optional: If you're not a fan of thick soups, thin this out with 1/2 cup of milk per pint when you go to serve. 
Good times!

Tuesday, May 13, 2014

Bacon Pecan Sweet Rolls

     It began one morning when I asked The Wife if she wanted bacon for breakfast. She replied that if we did that, we'd have a bunch left over and what would we do with it? The conversation quickly degenerated into a discussion of bacon-related ideas. This recipe is the culmination of those ideas. We never did have bacon for breakfast. I think I had a bagel and lox and she had grits and fried eggs. Anyways, I found a breakfast roll recipe in my trusty copy of Taste of Home: Everyday Light Meals and promptly cannibalized it. The result was well beyond our expectations. These rolls are phenomenally good and frighteningly large. We generally have to split one. Good luck not eating the whole pan. As always, any notes are in blue.

Bacon Pecan Sweet Rolls
Ingredients

  • 1 package (.25 ounce) active dry yeast
  • 1/2 cup warm water (110-115F, 43-46C)
  • 2 cups warm milk (110-115F, 43-46C)
  • 1 teaspoon salt
  • 1 cup whole wheat flour
  • 6 cups all purpose flour
  • 1 cup brown sugar, separated into one 1/2 cup and two 1/4 cup measures
  • 1/2 cup maple syrup, separated into two 1/4 cup measures
  • 1 teaspoon vanilla extract
  • 1-1/2 cup pecans
  • 12 ounces applewood smoked bacon
For Icing
  • 1 cup confectioner's sugar
  • 4 teaspoons milk
  • 1 tablespoon of crumbled bacon and pecans (you'll see where they get crumbled down in the instructions. Remain calm)
Directions
  1. Line two baking sheets with foil. Spray with nonstick cooking spray. 
  2. On one sheet, lay out the bacon in strips. Sprinkle evenly with one of the 1/4 cups of brown sugar
  3. On the other pan, spread the pecans in a single layer. Sprinkle evenly with the other 1/4 cup of brown sugar.
  4. Put the pans in an oven preheated to 350F (180C, Gasmark 4). (things get a bit tricky here. You're going to want to make sure the bacon is getting crispy and the sugar caramelized, without burning the sugar or the nuts. You're going to just have to check in every 5 minutes or so. After 10 minutes, the nuts were as caramelized as they were going to get without burning.The bacon went another 5-10 minutes. If you smell smoke, you fucked up and burned everything. At that point, just stop and fix yourself a drink) When done, remove from oven and allow to cool.
  5. Crumble the bacon and crush the nuts (You could do this by hand if you prefer large pieces. I put mine in a small blender and pulsed it until there were small pieces and the nuts were starting to turn to dust). Reserve 1 tablespoon of this mixture for later use.
  6. In a mixing bowl, dissolve yeast in warm water. Stir in warm milk, salt, whole wheat flour, 1/4 cup maple syrup, vanilla extract and 3 cups of flour. Beat until smooth (I used the Kitchenaid with a dough hook for this step) Add in enough of the remaining flour to form a soft dough (the syrup makes this dough super sticky. I added a full 3 extra cups of flour before the dough was workable) Knead dough 6-8 minutes, until smooth and elastic. Cover and let rise in a warm place until doubled, about 1-1/4 hours.
  7. Punch dough down. Turn onto a floured surface and knead a few more times. Roll into an 18 inch square. Spread bacon and pecan mixture to within 1/2 inch of the edges. Do the same with the remaining 1/2 cup of brown sugar. Evenly pour the other 1/4 cup of maple syrup over the rest (why the hell not? At this point, you might as well just turn in your pancreas) Roll up jelly-roll style. Pinch seam to seal. Cut into 12 pieces. Place in a 13"x9"x2" baking dish coated with nonstick cooking spray. Cover and let rise, about 30 minutes (I suggest covering it loosely with some plastic wrap coated with nonstick cooking spray, then lay a towel over the whole thing. If you put the towel right on top, you're going to get the towel stuck to the rolls. Don't ask me how I know this)
    It took The Wife and I both to roll this thing up
    because the damned thing was sticking to the counter.
  8. Bake at 350F (180C, Gasmark 4) for 30 minutes or until lightly browned (cooking times may vary.) Cool on a wire rack for 30 minutes.
  9. For the glaze, combine confectioner's sugar, reserved bacon/pecan mix and 4 teaspoons of milk. Stir until sugar has dissolved (you may need to add more milk to keep this from being the consistency of Spackle) Pour evenly over the tops of the rolls. 
Good times!

Wednesday, April 30, 2014

Pumpkin Pie Pudding

     I'm sure if you checked your cabinets right now, you would find a can of pumpkin lurking about. Go ahead and check. I'll wait.

     You found one, didn't you? If not, you just didn't look hard enough. I assure you, it's in there. The point of this exercise is to find that can and be rid of it in the simplest way possible that doesn't involve just throwing it in the trash. With a couple more ingredients, you can chuck it all in the slow cooker and have pumpkin pie pudding! All right, it's not really that exciting, but it does taste exactly like the filling of a pumpkin pie. This shouldn't be a shocker because if you check the ingredients, that's basically what you have thrown in the slow cooker. Stop complaining and cover it with whipped cream. As always, any notes or changes are in blue.


Pumpkin Pie Pudding
via Fix It and Forget It Lightly
Ingredients

  • 15-ounce can pumpkin
  • 12-ounce can evaporated skim milk (just used regular evaporated milk. I can't stand skim)
  • 3/4 cup Splenda (calories or tumors...hmm. I went with 3/4 cup granulated sugar instead)
  • 1/2 cup low-fat buttermilk baking mix (didn't have the low-fat variety. Just used regular buttermilk mix)
  • 2 eggs, beaten or 6 egg whites (I don't feel like storing a half dozen egg yolks and I'm certainly just not going to shitcan them. I went with the 2 egg option)
  • 2 teaspoons pumpkin pie spice
  • 1 teaspoon lemon zest (I was feeling lazy and didn't want to zest a lemon that I actually had on hand. I used dried lemon peel from a jar instead)
Directions
  1. Spray slow-cooker with non-stick cooking spray (this inside)
  2. Combine all ingredients in slow cooker. Stir until lumps disappear.
  3. Cover. Cook on LOW 3 hours.
  4. Serve warm or cold.
Good times!

Sunday, April 13, 2014

Vegetable Uber Quiche

     Ah, the much-maligned quiche.  Is it macho? It makes no difference to me. It uses a lot of eggs, and that's what really matters. I'm a big fan of anything that uses lots of eggs. The only thing that keeps me from making quiche with any regularity is the crust. That's why I love the idea of a crustless quiche. Granted, a crustless quiche is very much like a breakfast casserole. I guess that's another win. This particular quiche is loaded with all sorts of veggies. So many, that I have dubbed it an "Uber-Quiche." I'd like to think that all the veggies cancel out the eggs and cheese. As far as I'm concerned, eating this is like eating celery. With cheese. And a bunch of eggs. Whatever. It's delicious and I plan on making it again. Feel free to mess with the veggies used. If you're making it a point to do exactly what I say every time, you're accepting a fair amount of risk. As always, any notes are in blue.


Vegetable Uber-Quiche
Ingredients
  • 9 eggs
  • 1 cup milk
  • 1 heaping cup shredded cheddar-jack cheese
  • 1/2 pound butternut squash, peeled and cut into 1/2-inch cubes
  • 8 ounces button mushrooms, chopped
  • 1/2 medium red onion, chopped
  • 1 cup kale, spines removed
  • 1 lb potatoes, cut into 1/2-inch cubes
  • 1 yellow bell pepper, chopped
  • 1 tablespoon Greektown seasoning (available from The Spice House. If you don't have it available, it uses: salt, garlic powder, Tellicherry black pepper, onion powder, oregano and lemon peel)
Directions
  1. Preheat oven to 375F (190C, Gasmark 5)
  2. Spray a 9x13 inch baking dish with nonstick cooking spray.
  3. In a large bowl, mix all the vegetables to ensure an even distribution. Pour the vegetables into the baking dish and spread them in an even layer.
  4. In another bowl, whisk the eggs, milk and cheese (make sure to take the eggs out of the shells. That's very important). Pour mixture over vegetables in baking dish.
  5. Bake for 1 hour or until eggs are completely set.
Good times!

Tuesday, March 4, 2014

Chocolate Chip Banana Muffins

     I am a sucker for deals. One of my favorite deals is the sack of ripe bananas at the grocery store. They will pack nearly 3 pounds of ripe bananas into a sack and charge you one dollar. How can I walk past that? Most of the time we end up dehydrating them for banana chips. Sometimes they end up in banana bread. This time they ended up in muffins with chocolate chips. The recipe for these muffins came from my much abused copy of Taste of Home Everyday Light Meals. These muffins came out great. They were moist with a great banana flavor. These will serve as a great quick breakfast during the work week. As always, any notes or changes are in blue.


Chocolate Chip Banana Muffins 
via Taste of Home Everyday Light Meals
Ingredients
  • 3/4 cup all-purpose flour
  • 3/4 cup whole wheat flour
  • 1/2 cup wheat bran (this is on the master list of Shit That Is Never In My Pantry. I substituted with 1/2 cup additional whole wheat flour)
  • 1/2 cup packed brown sugar
  • 3/4 teaspoon baking powder (am I the only one who repeats "baking powder, baking powder" to themselves as they walk to the pantry, then come back to the counter with baking soda anyway?)
  • 1/2 teaspoon salt
  • 2 eggs, lightly beaten
  • 1/4 cup fat-free milk (you might as well just use water at that point. I used 2%)
  • 1-1/3 cup (2-3 medium sized) mashed ripe bananas 
  • 1/3 cup unsweetened applesauce (we used our own homemade applesauce, which is sweetened. I see no harm in sweetened applesauce here unless you have a dietary concern about the additional sugar)
  • 1 teaspoon vanilla extract
  • 1/2 cup miniature chocolate chips (we used an additional 1/4 cup, but did not add it to the batter. We stuffed those chips in our faces as we made these muffins)
  • 1/3 cup chopped pecans (omitted. We're not huge fans of nutty breads or muffins)
Directions
  1. Preheat oven to 375F (190C, Gasmark 5)
  2. In a large bowl, combine the first seven ingredients (don't think I didn't consider being an asshole and listing the ingredients out of order up top just to screw things up. I didn't. Or did I?)
  3. In another bowl, combine the egg and milk; stir in the bananas, applesauce and vanilla. Stir into dry ingredients until moistened. Stir in chocolate chips. 
  4. Coat muffin pans with nonstick cooking spray; fill 3/4 full with batter. Sprinkle with pecans (if using pecans. Otherwise just jam another handful of chocolate chips into your mouth)
  5. Bake for 18-22 minutes or until a toothpick comes out clean (this time ours finished in 20 minutes. Cooking times may vary). Cool for 5 minutes before removing from pan to a wire rack.
Good times!

Thursday, February 6, 2014

Slow Cooker Breakfast Concoction

     It is said that breakfast is the most important meal of the day. I know that The Wife and I make it a point to try to have something for breakfast every day. This can be challenging for us during the week. Normally we end up having toast or a piece of fruit. During the winter, it's nice to have something warm and filling. That's what lead to this recipe. It looks like absolute crap, but it smells and tastes great. There's plenty of good stuff in there to keep you running until lunch. If you don't feel like making my apples, you can get away with regular sliced apples and just add more apple juice to replace the syrup. Other notes are, as always, in blue.


Slow Cooker Breakfast Concoction
Ingredients
  • 2 cups granola cereal of your choice
  • 1 cup old fashioned oats
  • 2 cups Spiked Apples
  • 1/4 cup syrup from the apples
  • 4 tablespoons butter
  • 1/2 cup golden raisins (it's not a big deal if you use non-golden, I just liked the uniform color of the dish)
  • 1 cup milk
  • 1/2 cup apple juice
Directions
  1. Spray slow cooker (the inside, not the outside. This is a critical distinction) with nonstick cooking spray. 
  2. Load all ingredients into slow cooker and stir to mix.
  3. Cook on LOW for 5 hours. Check it and stir it occasionally. If it starts to scorch, add more apple juice or milk.
It looked better BEFORE I cooked it! At least it tasted good!
Good Times!

Sunday, January 19, 2014

Braided Butternut Squash Bread

     It's a good thing The Wife is really good at braiding bread. Her challah is supreme. This time we used her preternatural braiding abilities to make a braided butternut squash bread. I found the original recipe at Allrecipes. We wound up making this bread because we've had a surplus of frozen butternut squash and have been on a crusade to find fun ways to use it. This is certainly a great way to use butternut squash. After the bread came out of the oven, we just stood there like morons, vacantly shoving hot bread in our mouths until we were through half a loaf. As always, any notes or changes are in blue.

Braided Butternut Squash Bread
via Allrecipes.com
Ingredients
  • 1 butternut squash, peeled, seeded and cubed (I always wonder why we have to be told to peel a butternut squash. Do you think there's anybody out there who just can't get enough butternut squash peel?)
  • 1 (0.25 ounce) package active dry yeast
  • 2 tablespoons warm (110F) water
  • 1/3 cup warm (110F) milk
  • 1/4 cup butter, softened
  • 2 eggs
  • 3 tablespoons brown sugar (we used 4 tablespoons. You could probably do 5 or 6 if you wanted a really sweet bread)
  • 1/4 teaspoon salt (we followed a suggestion to go with 3/4 teaspoon salt to bring out the butternut squash flavor)
  • 3 cups all-purpose flour (the dough is totally unworkable with this much flour. It's almost still liquid. We wound up using 4-1/2 cups flour)
  • 1 tablespoon water
Directions
  1. In a large saucepan, cover cubed squash with water. Bring water to a boil and cook until tender, about 15-20 minutes. Let cool and mash. Reserve 1 cup for use and freeze the remainder for later use (or just tell me I only needed 1 cup of boiled, mashed squash so I didn't have to cook all of it! What if I didn't want all that extra mashed squash? Why doesn't anybody consider my feelings? THIS IS WHY I DRINK)
  2. In a small bowl, dissolve yeast in warm water (2 tablespoons of water). Let stand until creamy, about 10 minutes (this is the first time I've ever seen yeast described as "creamy." I'm not sure I'm comfortable with it)
  3. In a large bowl (I used the Kitchenaid for this, so I just used the mixing bowl) combine the yeast mixture with milk, butter, 1 cup mashed squash, 1 egg, brown sugar, salt and 2 cups of the flour; stir well to combine. Stir in remaining flour, 1/2 cup at a time (I used 1/4 cup at a time just to be spiteful), beating well after each addition. When the dough has pulled together, turn it out onto a lightly floured surface and knead until smooth and elastic, about 8 minutes (I just used the dough hook on the mixer for this. I don't have time for needless manual labor)
  4. Lightly oil a large bowl; place dough in bowl and turn to coat with oil. Cover with a damp cloth and let rise in a warm place until doubled in volume, about 1 hour. 
  5. Deflate the dough ("Deflate?" It makes it sound like you're working with an air mattress. When I work with dough, I "punch it down." It's what Chuck Norris would do)
    Told you so.
  6. This section describes how to cut the dough and get it braided. I consider it a Pain In The Ass (PITA) and will not waste the time or space typing it. Instead, I'm going to just link you the YouTube video the wife used to learn. It obviously works. You're going to want to split the dough in half first. You're looking to make 2 loaves here. Once you figure out the braiding, cover the loaves and let rise for another 30 minutes on a greased baking sheet.
  7. In a small bowl, beat together remaining egg and 1 tablespoon water. Brush loaves with egg wash. Bake for 20-25 minutes at 350F (we went with 25 minutes and the bread came out great)
Good times!

Thursday, December 19, 2013

Bourbon Pear Cake

     The bundt cake strikes me as a quintessential middle-class food. I have lost count of the times I've seen bundt cakes at gatherings. My family was notorious for using the bundt cake pan for all sorts of terrifying Jell-O molds involving layers and suspended fruits.  It was almost unavoidable that I would eventually buy and use a bundt cake pan.  One of the first things I made was a Bourbon Pear Cake. I think I got the recipe from Relish.com, but can't find it there anymore. If anybody locates the original source, please let me know so I can give proper credit. I liked this recipe because it incorporated booze. However, I can't get myself to cook with high-end liquor, that stuff is for drinking! Unfortunately, I didn't have any bottom-shelf booze on hand so I had to use the workhorse in my bar, Jim Beam. This is just a good looking cake and is moist and flavorful. I always feel like such a pompous ass when I say stuff like that. Hmm.. CAKE SQUISHY AND TASTE GOOD. There. Much better. As always, any notes or changes are in blue.

Bourbon Pear Cake
Ingredients
  • 3 eggs 
  • 2 cups sugar 
  • 1 1/2 cups vegetable oil 
  • 3 cups all-purpose flour 
  • 2 teaspoons ground cinnamon 
  • 2 tablespoons bourbon (I'm pretty sure some form of honey bourbon would be really good here)
  • 1 teaspoon salt 
  • 1 teaspoon baking soda 
  • 1 1/2 cups pears - peeled, cored and chopped (there's nothing stopping you from using apples instead)
  • 1 teaspoon vanilla extract 
  • 1 1/4 cups confectioners' sugar 
  • 2 tablespoons milk 
Directions
  1. In a mixing bowl, beat eggs on medium speed. Gradually add sugar and oil; beat thoroughly. 
  2. Combine flour, cinnamon, salt and baking soda; add to egg mixture and mix well. 
  3. Stir in pears, bourbon and vanilla. (The batter will be stiff. Notice how I took the moral high ground and didn't make a joke here.) 
  4. Spoon into a greased and floured 9-in. Bundt-cake pan. 
  5. Bake at 350F for 60-65 minutes or until a toothpick inserted comes out clean (obviously, you'll want to stick the toothpick into the actual cake and not the hole in the center). Let cool in pan 10 minutes before inverting onto a serving plate. 
  6. In a small bowl, combine the confectioners' sugar and milk; beat until smooth. Drizzle over warm cake. Cool completely.
"Miss Moneypenny, fetch me another slice of that fantastic cake. I'm too shitfaced to get it myself."
Good times! 

Friday, November 8, 2013

Slow Cooker Caramel Apple Pie Bread Pudding

     Bread pudding is one of those desserts that I love, but almost never make. Generally, I'll make a bread pudding one time during the holidays and then just pine away for it the rest of the year. I'm not sure why that is. Bread pudding is not particularly difficult to make. It will have to remain a mystery. I made this one because I had an empty slot in my 3 station slow cooker. I also had a loaf of Caramel Apple bread and nothing to do with it. I just changed up a recipe from Gooseberry Patch Super Fast Slow Cooking. It took WAY longer to cook than the recipe said, but ended up being a fine dessert. As always, any changes or notes are in blue.


Caramel Apple Pie Bread Pudding
via Gooseberry Patch Super Fast Slow Cooking
Ingredients

  • 3 eggs, beaten
  • 2 cups milk
  • 1/2 cup sugar (we used 1/4 cup white sugar, 1/4 cup brown)
  • 21 ounce can apple pie filling (we used a sugar-free pie filling)
  • 6-1/2 cups cinnamon-raisin bread, cubed (no cinnamon-raisin bread on hand. Went with a one pound loaf of Pepperidge Farms Caramel Apple Bread)
  • Optional: Whipped Cream (omitted)
Directions
  1. In a large bowl, whisk together eggs, milk and sugar. 
  2. Gently stir in pie filling and bread cubes; pour mixture into lightly greased slow cooker.
  3. Cover and cook on LOW setting for 3 hours, until a knife inserted near the center comes out clean (calling bullshit on this step. We went for three hours on LOW, then over another hour on HIGH, and that damned knife never came out clean. I just gave up and called it done)
  4. Let stand, uncovered, 30-45 minutes to cook slightly before serving. 
Good times!

Friday, September 27, 2013

Coconut Chicken Curry

     I think curries are wonderful during fall and winter. There's just something about a good curry on a cold day that makes everything a little bit better. I found this particular curry recipe in Taste of Home Slow Cooker. This recipe is very simple and was a huge hit. We took the leftover coconut milk and used it in cooking the rice. The result was a creamy curry with just a little bite. The garnishes really helped step this up from just another slow-cooker meal to something I'd be happy to serve to company. As always, changes and notes are in blue.

Coconut Chicken Curry
via Taste of Home Slow Cooker
Ingredients
  • 2 medium potatoes, peeled and cubed
  • 1 small onion, chopped
  • 4 boneless, skinless chicken breast halves (4 ounces each) (or just use 1 pound of boneless skinless chicken)
  • 1 cup light coconut milk (can't be bothered with light. We used regular)
  • 4 teaspoons curry powder
  • 1 garlic clove, minced
  • 1 teaspoon reduced-sodium chicken boullion granules (didn't have reduced sodium, used regular)
  • 1/4 teaspoon salt (omitted; there's enough sodium from the boullion)
  • 1/4 teaspoon black pepper
  • 2 cups hot cooked rice
  • 1/4 cup thinly sliced green onions
  • Raisins, flaked coconut, chopped unsalted peanuts, optional
Directions
  1. Place potatoes and onion in a 3-4 quart slow cooker (we used a 2.5 quart cooker. FIGHT THE POWER). In a large nonstick skillet coated with cooking spray, brown chicken on both sides. Transfer to slow cooker. 
  2. In a small bowl, combine coconut milk, curry, garlic, boullion, salt and pepper; pour over chicken.
  3. Cover and cook on LOW for 5 hours or until chicken is tender.
  4. Serve chicken and sauce with rice; sprinkle with green onions. Garnish with raisins, coconut and peanuts, if desired.
No, just regular curry.
Good times!


Wednesday, August 21, 2013

Too Damned Easy Chocolate Pudding Macaroon Pie

     Now that the school year is in full swing, time is of the essence during the week. When I get home, I need dinner to come together in less than an hour if at all possible. I need all the time I can get to focus on unwinding, smoking cigars and drinking bourbon in preparation for the next day. It is this time-consciousness that has caused me to start writing these "Too Damned Easy" recipes. Some of these recipes may seem ridiculous in their simplicity, but you'll thank me when you are able to put together a decent meal after work that doesn't take much time or effort. These are recipes that you should have all the ingredients for at any given time. Okay, maybe you won't have macaroons on hand. Get creative. Bust up whatever cookies are laying around. Throw some Cap'n Crunch in there. Get crazy. As always, any notes are in blue.

Too Damned Easy
Chocolate Pudding Macaroon Pie
Ingredients
  • 9" graham cracker pie crust (store bought. If you're making it from scratch here, you're missing the point of this recipe)
  • 10-12 macaroons of your favorite flavor, broken up into small bits (for whatever reason, I had a can of cappuccino macaroons, so that's what I used)
  •  1 box instant chocolate pudding
  • Milk for instant pudding
  • Whipped topping, optional (I had better not find out you made it from scratch. You'd better be busting out a container of Cool Whip. I would have used it, but I didn't have any in the house and I sure as hell wasn't making a special trip to the store for a throw-together dessert)
Directions
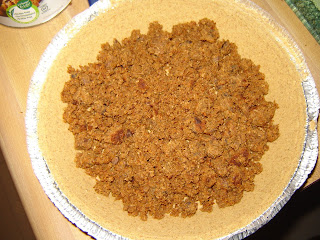
  1. Take broken-up macaroons and lay them in an even layer in the pie crust. 
    Like so.
    I assure you, no matter how much that looks like ground beef, it is actually cappuccino macaroons in there.
  2. Make the chocolate pudding according to the instructions on the box (this is where you double check that you're using INSTANT pudding or you're going to be sorely disappointed later when you have a bowl of chocolate macaroon soup)
  3. Pour the pudding into the pie crust, making sure to completely cover the macaroons.
  4. Refrigerate for at least an hour. Top with whipped topping when serving.
Good times!

Sunday, March 31, 2013

Monday Recipe: Oven Gratin Potatoes via Pol Martin

     You can't go wrong with potato dishes for a kitchen on a budget. There's just so many different ways to make them. They can be side dishes or the main dish. One of my favorite ways to have potatoes is as a gratin. It's a great side for just about any meat. This particular recipe comes from a Pol Martin cook book that I go to quite often. It's a fast and easy recipe that we doctor up with some melted mozzarella across the top.
Oven Gratin Potatoes
(vial Pol Martin's Supreme Cuisine)
Ingredients

  • 2 large potatoes, peeled and sliced, set in cold water
  • 1/4 teaspoon savory
  • 1/4 teaspoon cayenne pepper
  • 1/4 teaspoon white pepper
  • 1 tablespoon chopped fresh parsley
  • 1 clove garlic, peeled
  • 2 eggs, beaten
  • 3/4 cup milk
  • 1/2 cup heavy cream
  • 3/4 cup shredded mozzarella 
  • salt
  • butter
Directions
  1. Preheat oven to 350F.
  2. Drain potatoes and dry well. Place in bowl.
  3. Mix savory, cayenne, white pepper and parsley together. Add to potatoes and mix.
  4. Rub baking dish with garlic clove. Butter dish generously and arrange potato slices in layers. Season with salt, if desired.
  5. Mix eggs, milk and cream together. Pour over potatoes. Bake in oven for 40-50 minutes. Add shredded mozzarella during last 10-15 minutes of cooking. 
Good times!