Showing posts with label chocolate. Show all posts

Monday, March 10, 2014

Chocolate Peanut Butter Cookies

     I don't know why I don't bake cookies more often. Actually, I know exactly why: the wife and I tend to stand in the kitchen and stuff them mindlessly into our faces until we swell up like ticks. Fortunately, I've got my trusty copy of Taste of Home Everyday Light Meals to hook me up with 90 calorie cookies! If you like the chocolate/peanut butter combo, these are right up your alley. The peanut butter flavor really comes through. If you wanted to really do peanut butter overload, you could always swap in peanut butter chips! As always, notes and changes are in blue.

Chocolate Peanut Butter Cookies
via Taste of Home Everyday Light Meals
Ingredients

  • 1 cup chunky peanut butter (I used creamy. Fair warning, if you use natural peanut butter, the batter will be extremely oily. This is nothing to worry about; the cookies will come out fine)
  • 1/4 cup canola oil (I used corn oil)
  • 3/4 cup packed brown sugar
  • 1/2 cup white sugar
  • 2 eggs
  • 1 tablespoon vanilla extract
  • 1 cup all-purpose flour
  • 1/3 cup baking cocoa
  • 1 teaspoon baking soda
  • 1/2 teaspoon salt
  • 1/2 cup miniature chocolate chips (I used full sized and learned why I shouldn't. The cookies are pretty small. Full sized chips tend to just fall out when you're scooping the dough. Either make the cookies bigger or use the miniature chips).
Directions
  1. In a large mixing bowl, combine peanut butter and oil. Add brown sugar and white sugar; mix well. Add vanilla an eggs; mix well (I did all the mixing in the Kitchenaid).
  2. In  another bowl, combine flour, cocoa, baking soda and salt. Add to peanut butter mixture; mix until blended. Dough will be sticky (as I said, my dough was more oily than sticky). Stir in chocolate chips.
  3. Drop by rounded teaspoons 2 inches apart on ungreased baking sheets. Flatten slightly with a glass (I have made these cookies three times and only now have I noticed the part with the glass. Obviously, you can just skip that. No need to dirty a glass unless it's to put booze in it).
  4. Bake at 350F (180C, Gasmark 4) for 8-10 minutes or until set and tops are cracked (if you want a softer cookie, take them out at 8 minutes. If you prefer a crunchy cookie, go the full 10) Cool for 2 minutes before removing to wire racks (no fooling with this part. When the cookies come out, it's going to look like they're not done. They will be notably soft. They will firm up during the cooling).
Good times!

Monday, October 14, 2013

Chocolate Concoction

     Slow-cooker cook books often have recipes that are a bit sketchy health-wise. Often they are packed with sodium to the point of causing a cardiac event at the dinner table. Every now and then you come across a slow-cooker cook book that is full of hilariously unhealthy recipes. Gooseberry Patch Super Fast Slow Cooking is one of those books. Recipe after recipe is absolutely packed with salt and sugar. I love this book. Most of the meals will cause me to gain 4-7 pounds in water from a single meal. While this recipe is not packed with sodium, it is a fat and sugar bomb. If you're counting calories, you'll need a scientific calculator for this one. It is phenomenally rich; we can only eat about three forkfuls before we need a drink of water to move it along. As always, any notes and changes are in blue.

Chocolate Concoction
via Gooseberry Patch Super Fast Slow Cooking
Ingredients
  • 1 box 18.25 ounce devil's food cake mix
  • 16 ounce container sour cream (we tried to mitigate the damage of this dessert by using low fat sour cream)
  • 3.9 ounce package instant chocolate pudding mix (more damage control here by using sugar-free pudding mix)
  • 1-1/2 cup semi-sweet chocolate chips
  • 4 eggs, beaten
  • 1 cup water
  • Optional: French vanilla ice cream (if you're having ice cream with this, you might as well just go ahead and stab yourself in the pancreas)
Directions
  1. Beat all ingredients (except ice cream, if using) until smooth.
  2. Pour into a slow cooker that has been sprayed with non-stick vegetable spray.
  3. Cover and cook on LOW for 6-8 hours
  4. Serve with ice cream if you really hate yourself.
Good times!

Saturday, October 5, 2013

Marbled Chocolate Cheesecake Bars

     It's been a while since I've dug into my trusty copy of Taste of Home Every Day Light Meals for something other than a bread recipe. This particular dessert was very rich, closing in on a touch heavy. Don't get me wrong, it was damned good. Just have a glass of milk or bourbon or something to help it on its way. The recipe called for egg whites, but I wasn't feeling that and just used whole eggs. It seemed to work out fine. As always, any changes or notes are in blue.
Marbled Chocolate Cheesecake Bars
via Taste of Home Everyday Light Meals
Ingredients

  • 3/4 cup water
  • 1/3 cup butter
  • 1-1/2 squares (1-1/2 ounces) unsweetened chocolate (we used 2 ounces because I didn't feel like breaking the piece in half. I'm lazy like that)
  • 2 cups all-purpose flour
  • 1-1/2 cups packed brown sugar
  • 1 teaspoon baking soda
  • 1/2 teaspoon salt
  • 1 egg
  • 1 egg white (I didn't really want a bunch of leftover yolks, I just omitted this)
  • 1/2 cup reduced fat sour cream (we used Greek yogurt)
Cream cheese mixture:
  • 1 package (8 ounces) reduced fat cream cheese (as always, we went with Neufchatel)
  • 1/3 cup sugar
  • 1 egg white (didn't feel like separating eggs, we just used another entire egg)
  • 1 tablespoon vanilla extract
  • 1 cup (6 ounces) miniature semi-sweet chocolate chips
Directions
  1. In a small saucepan, combine water, butter and chocolate. Cook and stir over low heat until melted; stir until smooth. Allow to cool.
  2. In a large mixing bowl, combine the flour, brown sugar, baking soda and salt. Add egg, egg white (if using) and sour cream. Beat on low speed until just combined (I used the Kitchenaid, any electric mixer will do. You can do it by hand if you're feeling particularly industrious). Stir in chocolate mixture until smooth.
  3. In another mixing bowl, beat cream cheese, sugar, egg white (or just egg if you're hardcore like me) and vanilla; set aside.
  4. Spread chocolate batter into a 15"x10"x1" baking pan coated with non-stick cooking spray. Drop the cream cheese mixture by tablespoonfuls (that doesn't sound right. Tablespoonsful? This is going to bother me) over batter. Cut through batter with a knife to swirl (Protip: read the recipe all the way through. I generally do not. Which is why I ended with a nice layer of cream cheese right across the top of the cake. It still tasted good, though). Sprinkle with chocolate chips.
  5. Bake at 375F for 20-25 minutes (we went 25 minutes) or until a toothpick inserted near the center comes out clean. Cool on a wire rack.
Good times!

Wednesday, August 21, 2013

Too Damned Easy Chocolate Pudding Macaroon Pie

     Now that the school year is in full swing, time is of the essence during the week. When I get home, I need dinner to come together in less than an hour if at all possible. I need all the time I can get to focus on unwinding, smoking cigars and drinking bourbon in preparation for the next day. It is this time-consciousness that has caused me to start writing these "Too Damned Easy" recipes. Some of these recipes may seem ridiculous in their simplicity, but you'll thank me when you are able to put together a decent meal after work that doesn't take much time or effort. These are recipes that you should have all the ingredients for at any given time. Okay, maybe you won't have macaroons on hand. Get creative. Bust up whatever cookies are laying around. Throw some Cap'n Crunch in there. Get crazy. As always, any notes are in blue.

Too Damned Easy
Chocolate Pudding Macaroon Pie
Ingredients
  • 9" graham cracker pie crust (store bought. If you're making it from scratch here, you're missing the point of this recipe)
  • 10-12 macaroons of your favorite flavor, broken up into small bits (for whatever reason, I had a can of cappuccino macaroons, so that's what I used)
  •  1 box instant chocolate pudding
  • Milk for instant pudding
  • Whipped topping, optional (I had better not find out you made it from scratch. You'd better be busting out a container of Cool Whip. I would have used it, but I didn't have any in the house and I sure as hell wasn't making a special trip to the store for a throw-together dessert)
Directions
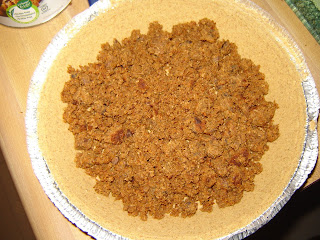
  1. Take broken-up macaroons and lay them in an even layer in the pie crust. 
    Like so.
    I assure you, no matter how much that looks like ground beef, it is actually cappuccino macaroons in there.
  2. Make the chocolate pudding according to the instructions on the box (this is where you double check that you're using INSTANT pudding or you're going to be sorely disappointed later when you have a bowl of chocolate macaroon soup)
  3. Pour the pudding into the pie crust, making sure to completely cover the macaroons.
  4. Refrigerate for at least an hour. Top with whipped topping when serving.
Good times!

Wednesday, July 31, 2013

Banana Chocolate Cake

     Well, I still haven't run out of baking recipes in the Taste of Home Everyday Light Meals cookbook.  We wound up picking this recipe because the local market was selling entire bunches of bananas for 49 cents. They were in moderately sad shape and usable mostly for cooking. We took the couple good ones and used them with blueberries in a honking big bowl of corn flakes for breakfast. But I digress. It just so happened we had everything in the house for this cake. We even had the powdered milk, which had been hiding in a cabinet for about five years.  No harm done. This particular cake was a big hit. It is really good heated up with a big dollop of ice cream on it. As always, and changes or notes will be in blue.

Banana Chocolate Cake
via Taste of Home Everyday Light Meals
Ingredients

  • Sugar substitute equivalent to 3/4 cup sugar (DECIDE: Cancer or Diabetes? We went with diabetes and used 3/4 cup of real sugar)
  • 1/3 cup packed brown sugar
  • 1/3 cup butter, softened
  • 2 eggs
  • 2 teaspoons vanilla extract
  • 2 medium ripe bananas, mashed
  • 1/2 cup water
  • 1-1/3 cups all-purpose flour
  • 1/2 cup nonfat dry milk powder
  • 3 tablespoons baking cocoa
  • 1 teaspoon baking powder
  • 1/2 teaspoon baking soda
  • 1/2 teaspoon salt
  • 3/4 teaspoon confectioner's sugar
Directions
  1. In a large mixing bowl, beat the butter and sugar substitute (or actual sugar), brown sugar and butter on medium speed for 3 minutes (I wasn't aware I had actual speed settings other than "hurried" or "sedentary." I'm guessing the recipe assumes we have a mixer for this step, which fortunately I do.)
  2. Add eggs and vanilla; mix well. Add bananas and water; mix well. 
  3. In another bowl, combine flour, milk powder, cocoa, baking powder, baking soda, and salt. Add to sugar mixture, beating just until blended.
  4. Pour into a 9" square baking pan coated with nonstick cooking spray (as I am writing this I just realized I didn't do that. I used a bundt cake pan. I did so because there was a picture of a different chocolate cake from a bundt cake pan on the opposite page. Whatever, the cake came out fine), bake at 375F for 23-28 minutes (As always, ours took longer; closer to 40 minutes. Just use the original times and keep an eye on it. Cooking times will vary), until a toothpick inserted near the center comes out clean and the edges of the cake are just starting to pull away from the sides of the pan.
  5. Cool on a wire rack. Dust with confectioner's sugar (fun trick for easy dusting: put the sugar into a fine mesh strainer. Hold the strainer about 6-8" above the cake and give the edge of the strainer a tap with a spoon. Just go over the whole cake doing this).
GENTLEMEN, BEHOLD,
Good times!

Friday, July 19, 2013

Tiramisu Parfaits

     I really need to start posting more dessert recipes. Dessert is the final challenge of the meal! For my father-in-law's birthday, the wife and I cooked him Italian pinwheel rolls, linguine with white clam sauce, escalope of chicken, and zucchini boats. He made a herculean effort to get through dinner, finishing off a big helping of everything. Then came dessert. Like a champ, he powered through it, leaving nothing but a napkin stuffed into the glass. It's subtle signs like that which let you know a recipe is a good one! This particular recipe is another winner from Taste of Home Everyday Light Meals. As always, notes and changes are in blue.

Tiramisu Parfaits
via Taste of Home Everyday Light Meals

Ingredients
  • 4-1/2 teaspoons instant coffee granules
  • 1/3 cup boiling water
  • 2 cups cold fat-free milk (2% for me, same as always)
  • 2 packages (1 ounce each) sugar-free instant vanilla pudding mix
  • 4 ounces fat-free cream cheese
  • 1 package (3 ounces) ladyfingers, split and cubed (could not find the soft kind ANYWHERE. We used half a package of the cookie-style ladyfingers. It was about 3.5 ounces.)
  • 2 cups fat-free whipped topping (we used an entire tub of Cool-Whip. That's like 2 cups, right?)
  • 2 tablespoons miniature chocolate chips (not only were the chips not mini, I didn't measure them either. I just sprinkled them completely at will)
  • 1 teaspoon baking cocoa (again, I didn't measure. I just eyeballed it)
Directions
  1. Dissolve coffee in boiling water; cool to room temperature.
  2. In a large bowl, whisk milk and pudding mixes for 2 minutes.
  3. In a larger mixing bowl, beat cream cheese until smooth (you're also going to want to make sure the cream cheese isn't cold. It needs to be a bit soft for this to work) Gradually fold in the pudding. (this recipe doesn't mention that the cream cheese does not easily incorporate into the pudding. It sort of breaks up into little balls. I had to put this all in the Kitchenaid with the whisk attachment and whisk the crap out of it for 2-3 minutes. It eventually blended smoothly)
  4. Place ladyfinger cubes in a bowl; add coffee and toss to coat evenly. Let stand for 5 minutes. Divide half of the ladyfinger cubes among five (may vary depending on size of glasses) parfait glasses or serving dishes. Top with half of the pudding mixture, 1 cup of whipped topping and 1 tablespoon of chocolate chips. Repeat layers.
  5. Cover and refrigerate for 8 hours or overnight. Just before serving, dust with cocoa.
Good times!

Saturday, March 23, 2013

Erica's "Best Ever" Brownies aka Chocolate Pancreas Destroyers

  A while back I ranted a bit on calling recipes "Best Ever." I feel that if you're going to do that, you'd better have your research done. You'd better be damned sure that no better recipe exists on this planet, in all of recorded history, or I will call you out on it. One of my friends from Way Back threw down the gauntlet. She sang the praises of her brownies. "Best Ever," she crowed proudly. I told her to put her money where her mouth is and send me the recipe.

Come at me, bro.

The verdict? Well, "Best Ever" is subjective. What may be the best ever for me might not be the best ever for you. I will say this. These are some of the best damned brownies I've had in a long, long time. A little bit of a crunch on the outside gives way to a chewy, alarmingly rich center.

Erica's "Best Ever" Brownies
aka
Chocolate Pancreas Destroyers

Ingredients
  • 4 oz. Bakers's unsweetened chocolate
  • 2 sticks butter (salted) or margarine (you might as well just use butter at this point. If you're making these, you're probably not watching fat and calorie intake)
  • 4 cups sugar
  • 4 eggs
  • 2 cups all purpose flour
  • 1 tsp real vanilla extract or other flavoring
  • 1 12 ounce package semi-sweet chocolate morsels or other flavor if desired
Directions
  1. Pre-heat oven to °350F
  2. Spray a 8x10 pan (glass/Pyrex is recommended) with cooking spray or butter and dust with flour
  3. Melt baker's chocolate in a double boiler OR melt butter and chocolate in a microwavable bowl stirring frequently to prevent burning. Melt till completely smooth and combined
  4. Add sugar and mix thoroughly
  5. In a separate bowl beat eggs well
  6. Add eggs to chocolate mixture tempering to prevent scrambled eggs
  7. Add flour in small batches till well combined and there are no streaks or lumps of flour
  8. Pour complete batter into pan evenly
  9. Take chocolate morsels and cover the top of the batter evenly
  10. Bake at °350 for 35 minutes or until the edges just pull away and a toothpick comes out of the center still with moist crumbs

Notes: These, for whatever reason, took me a bit longer than the recipe called for. I cooked them for closer to 50 minutes. It's quite possible I goofed somewhere, but no harm seemed to be done. The result was the outside pieces had a bit of a crunch to the outside. The wife loves a brownie with a crunchy outside, so it was a win. Try the recipe as-is, then see where you end up on cooking time. Under-cooked is much easier to fix than over.

Good times!

Thursday, February 21, 2013

Arguably My Favorite Restaurant Memory

     Everybody should have at least one outstanding restaurant story. It could be a meal, a location, a particular group of people that made that story happen. What's important is that it did happen and provides endless smiles at the memory.  Those who were in on this particular story will remember it fondly. The names will be changed to protect the innocent. Details are as accurate as I can remember, but it's been a dozen or so years.
     It was a fairly large group. If I recall correctly, it was myself and six or seven other people. We were going to dinner at Cucina Bella in Chicago. Somehow one of the group had arranged for us to have the "kitchen table."  What this meant was we had a large table in the actual kitchen of the restaurant. We would have a first hand view of the cooking and would be completely at the chef's mercy for our menu. Whatever he felt like cooking for us is what we would be eating.
     Here's the problem. Apart from dessert, I don't remember what we ate (more on that later). I remember heat and noise, and loud voices. I remember clanging cookware and the rattle of plates. Mostly I remember laughter. There are a number of reasons why I can't remember what I ate. It was chaotic in there. Plates came and went from our table at an alarming rate. I was watching the chef and his staff at work. We were laughing with each other and everyone else. We had a lot to drink.
     This drinking played a large role in the evening. We didn't get out of hand or stupid, not by any stretch of the imagination. However, we did have A LOT to drink. I know the girls had three or four bottles of wine. I know we all went through probably a half dozen bottles of Sambuca, easy. We were pouring shots for the waitstaff and kitchen staff. It was a complete blast.
Had someone lit a match around us after all that Sambuca
it would have been a literal blast.
     I do remember dessert. It was a bunch of red, seedless grapes encased in frozen dark chocolate and dusted with powdered sugar. It was simple and wonderful. The same of which could not be said for the check.
     The check was placed at the table and I don't recall who was the first to look at it, but I do recall the response:
There's a good chance this is what they were wearing.
     The bill was over $800. Keep in mind that this was in the early 1990's so adjusted for inflation, it was like  a $1252 bill in today's dollars. We were looking at just shy of $100 each with tip. Naturally, nobody had more than fifty or sixty bucks each. My buddy's girlfriend did, however, have a credit card which we promptly shanghaied and used to pay the tab. We then proceeded to find the nearest ATM and get the needed cash to reimburse her. We also needed to reload our wallets to go to, if I remember correctly, Club Octagon. That portion of the trip would lead to the Great Scotch and Water Argument. That's a story for another time.
     In the end, was it worth nearly one hundred bucks for a meal that I don't even remember? I believe it was. Sometimes a meal isn't just about the food you eat. It's about where you eat it and the people you eat it with. 

Good times!

Saturday, December 15, 2012

Middle Class Bartending: Days 6-8

     Well, Hanukkah is over, and so is the holiday party I just threw. I probably should have taken pictures of the spread, but I started drinking about 2:30pm and it sort of went downhill from there. By rough estimates, my guests consumed somewhere in the area of five gallons of assorted alcohol. A good time was had by all.  So, it appears I still owe you three themed drink recipes.  One of the traditions of Hanukkah in my home was the eating of chocolate coins. Horribly crappy chocolate wrapped in gold foil. Here's an update:

Just like this, except you end up shitfaced.

Hanukkah Gelt

Ingredients
  • 2 parts Godiva chocolate liquer
  • 1 part Goldschlager
  • Shaved chocolate
Directions
  1. Shake ingredients with ice in shaker
  2. Strain into martini glass
  3. Garnish with shaved chocolate
     Moving on to #7, I end up digging into the Old Testament. We are bound for Canaan, the land of milk and honey.
WRONG CANAAN, DUMMY.

Canaan Special

Ingredients

  • 2 parts Rumchata
  • 1 part honey whiskey
  • Apple wedge for garnish
Directions
  1. Shake Rumchata and whiskey in shaker with ice
  2. Strain into a martini glass
  3. Garnish with apple wedge
     And to finish off the eight days of drinking, I figure I have done horrifying damage to my body. In honor of damage for the sake of damage, my last drink is named after a famous villainess from Jewish folklore: Lilith.
Yes, but more evil and less laugh track.
Lilith's Kiss

Ingredients
  • 2 parts Berentzen Apel
  • 1 part DeKuyper Hot Damn!
  • Atomic Fireball candy
Directions
  1. Shake Apel and Hot Damn! in shaker with ice.
  2. Strain into martini glass
  3. Drop Atomic Fireball in glass and give a light stir
Good times!