Showing posts with label sugar. Show all posts

Friday, August 5, 2016

Mulberry Jam

     There is great debate around here as to the standing of the mulberry tree. Many see it as a weed. And you know what?  They're totally right. Left unchecked, you can watch mulberries inexorably take over your yard. We have the damned things poking out from about every bush in our yard. They even grow out of rocks. Not even joking. They're next to impossible to kill once they get established. Then, there's the fruiting mulberries. These aren't so bad. I mean, ok, they're bad. They're just as invasive and if the birds get to the berries before you do, everything in the area is covered in purple shit. So I think what we can take away from this discussion is that mulberries are the worst thing ever. That's why I collect like ten pounds of berries each season. As awful as the trees may be, the berries are actually pretty good. They have a nice color and a mild sweetness. I decided to make them into jam this year. I'm going to come out and admit I think I did something wrong. I'm thinking I used either too much sugar, too much pectin, or possibly both. This stuff is thick.
Also useful for caulking doors and windows,
if you don't mind the ants.

As far as jam (jelly? conserve? I can't tell that shit apart) goes, it's quite tasty, but a little tough to work with. It helps to warm it up a bit before you use it. It's great on a bagel with a schmear of cream cheese, or even over some vanilla ice cream. Give it a try and mess around with the pectin and sugar and let me know what you come up with. As always, notes are in blue.

Mulberry Jam
(yields: 7 half pint jars)
Ingredients

  • 4 cups mulberries
  • 7 cups sugar
  • 1 box (1.75 ounce) powdered pectin

Directions
  1. Run fruit through a food mill. 
  2. Take the milled fruit and resulting juice into a stainless steel pot
  3. Add pectin, stir and bring to a rolling boil on high heat
  4. Add the sugar. Bring back to a rolling boil and boil EXACTLY one minute (this is straight off the Sure-Jel instructions and they are not kidding. I've screwed this up and ended with quarts of cinnamon-apple syrup. Not with this recipe, mind you. We're using mulberries here. If we started with mulberries and ended with cinnamon-apple, we'd be dealing with some sort of alchemy.) 
    Wrong alchemy
  5. Watch in horror as the entire mixture foams up over the top of the pot and makes a huge fucking mess of the stove top (alternatively, stir constantly and be ready to adjust the heat to prevent foaming)
  6. Get the pot off the heat and start getting it into half pint jars. This stuff will start setting fairly quick. 
  7. Seal the lids and process in a boiling water bath for five minutes (as always, check with the National Center for Home Food Preparation to ensure you're not accidentally poisoning anyone)
  8. After five minutes, remove jars to a wire rack and wait for the satisfying "thunk" that means they're sealed. Store in a cool dark place for up to a year or until you're too afraid to open it.
  9. Reflect on how "Mulberry Jam" would be an awesome name for a funk band.
Good Times


Tuesday, September 29, 2015

Spud's Choice Hot Noggin Sauce

     First, a couple clarifications. We did NOT give any hot sauce to our The Spud. Also, for those who like to needlessly panic, that's a sweet red banana pepper on her noggin'. We know better than to handle our little tater with hot peppery hands. To review: No Spuds were harmed in the making of this sauce. This particular sauce came about as an attempt to use up surplus peppers. I chose only red colored peppers since that was what I had the most of. I ended up with what can best be described as a sriracha variant. The sauce starts sweet and a bit garlicky, then you get a serious punch of heat that quickly levels off before slowly fading. Much like sriracha, I see this being a multipurpose sauce, topping everything from eggs to meats. As always, notes and changes are in blue.

Spud's Choice
Hot Noggin Sauce
Ingredients
(yields just shy of 3 half pint jars)
  • 1 cup cayenne peppers, stemmed and roughly chopped
  • 1 cup red jalapeno or Serrano peppers, stemmed and roughly chopped
  • 1 cup bird or Thai peppers, stemmed and roughly chopped
  • 1 cup red banana peppers, stemmed and roughly chopped
  • 12 cloves garlic
  • 1/2 cup white vinegar
  • 3 tablespoons sugar
  • 3 teaspoons seasoning salt
Directions
  1. Load peppers and garlic into a food processor. Blend until a thick paste (the peppers, not you)
  2. Dump the peppers into a nonreactive pot. Add the remaining ingredients and stir to incorporate.
  3. Place on medium-high heat and bring to a boil, reduce to simmer and simmer for 5 minutes, stirring regularly.
  4. If you plan to use the sauce right away, you're done. It will keep in the fridge for a couple weeks. If you plan to can the sauce, proceed to the next step.
  5. Load sauce into 1/2 pint jars, leaving about 1/4" headspace. Seal with a 2 piece lid. Place in boiling water bath for 12 minutes. Remove to wire rack to cool. As always, make sure to refer to the National Center for Home Food Preservation for useful tips on how not to accidentally poison your friends and family.
Good times!

Thursday, July 30, 2015

Peanut Butter Cap'N Crunch Cookies

     The other day I had a weird existential moment. The dog was barking, The Spud was screaming and I was slowly losing my mind. For whatever reason, the sanest thing to do was not head for the liquor cabinet, but to the kitchen. With total mindlessness, I just started baking cookies. No clue why. I didn't even want cookies. It just seemed like the right thing to do. It was like an out of body experience. I was barely aware of what I was doing. I grabbed a cookbook to check how much flour and sugar I'd need and then I went to work.  I started to get strange looks from The Wife when I grabbed a box of Cap'n Crunch. The end result of this transcendental experience was a batch of really tasty peanut butter cookies with a sweet crunch. Totally worth it. As always, notes are in blue.


Ingredients
  • 1 cup creamy peanut butter
  • 1/4 cup vegetable oil
  • 3/4 cup packed brown sugar
  • 1/4 cup white sugar
  • 2 eggs
  • 1 tablespoon vanilla extract
  • 1 cup all-purpose flour
  • 1 teaspoon baking soda
  • 1/2 teaspoon salt
  • 1 cup Cap'n Crunch cereal (Peanut Butter Crunch would really step it up. I'd stay away from Crunch Berries for this recipe, though)
Directions
  1. Preheat oven to 350F (180C, Gasmark4)
  2. In a mixing bowl, combine peanut butter and oil. Add sugars and mix.
  3. Add eggs and vanilla. Mix some more.
  4. Add flour, baking powder and salt. Mix some more.
  5. Add Cap'n Crunch. Mix until incorporated.
  6. On 2 two ungreased baking sheets (if you have a silpat mat, I'd recommend using it here. If these cookies stick at all, you're going to be screwed), drop tablespoons of the dough about 2" apart on the sheets. (The dough will be oily. Don't panic, that's normal.)
  7. Bake for 10-12 minutes or until the tops look like they're cracking. Cool for a couple of minutes before transferring to a wire rack. (BE SUPER CAREFUL WHEN TRANSFERRING THE COOKIES! Until they finish cooling, they are unstable at a molecular level. Not even joking. Rough handling will cause them to totally fall apart. Once they're totally cooled, everything will set and solid.)
Good times!

Sunday, January 25, 2015

Hearty Slow Cooker Breakfast Sludge

     Before we go any further, let me make one thing very clear: this recipe looks like shit. Literally. It looks like something scraped out of a diaper. At second glance it also resembles fake vomit. Possibly real vomit. However, it smells wonderful and tastes great. On a cold day, you can't go wrong with a steaming bowl of this stuff. It's hearty and warm and filling. Maybe just close your eyes while you eat it.
Hearty Slow Cooker
Breakfast Sludge
Ingredients

  • 3 cups oats, uncooked
  • 1/4 cup powdered sugar
  • 1/4 teaspoon salt
  • 3 very ripe bananas, sliced
  • 1/4 cup raisins
  • 1/4 cup peanut butter (chunky or creamy as you desire. We used creamy)
  • 21 ounce can banana cream pie filling
  • 6 cups water
  • 1 teaspoon almond extract
Directions
  1. Coat a slow cooker (at least 2 quart) with nonstick cooking spray (coat the inside of the slow cooker. The bowl specifically. Don't spray all over the outside. Unless you want to)
  2. Chuck all the ingredients in there and stir it up.
  3. Cover and cook on LOW for 6-8 hours (just stop cooking when it's at a consistency you like. Make sure to stir it every few hours to make sure it doesn't fuse to the pot).
Good times!

Sunday, September 7, 2014

Peach Bourbon Applesauce

     There's really not a whole lot to making applesauce. It's pretty much just apples and sugar. It's not really missing anything. Except booze. Everything is better with booze. I took a basic recipe from The Better Homes and Gardens Home Canning Cook Book and added a fantastic peach liquor. The booze cooks out but leaves behind a subtle peach flavor in the applesauce that is just wonderful. If you want the original recipe, just leave out the booze. Canned, this will hold for around a year on the shelf. We like to make a gallon at a time and just put it aside in quart jars. It's nice to get a taste of summer in the middle of winter. As always, notes are in blue.

Peach Bourbon Applesauce
adapted from Better Homes and Gardens Home Canning Cook Book 
Ingredients

  • 6-7 pounds apples (use whatever type you like. We just stole ours from our neighbor's apple trees)
  • 2 cups white sugar
  • 1/2 cup Benchmark Peach Whiskey
Directions
  1. Wash, quarter and core apples. Combine apples, 4 cups of water and color keeper. Bring to a boil; reduce to simmer for about 15 minutes or until apples are tender.
  2. Press apples through food mill (if you have a KitchenAid with a food mill attachment, this part is wonderfully easy. If you're using a manual food mill, this recipe qualifies as a Pain In The Ass)
  3. Put milled apples in a large pot with the sugar and booze. Cook over low heat until sugar dissolves. Bring to a boil, stirring to prevent scorching or sticking. Taste and add sugar or more booze as needed. 
  4. If you plan on eating a gallon of applesauce on the spot, you can skip this and the next step. Pack into hot jars, leaving 1/4-inch headspace. 
  5. Process for 10 minutes in a boiling water bath (as always, defer to the National Center for Home Food Preservation to make sure you are canning correctly)
Good times!

Monday, June 23, 2014

Shaker Bread

     I hope I never develop a gluten intolerance, because I love bread dearly. I love baking bread. I imagine The Wife, in large part, stays with me because I regularly bake bread. We could easily just sit and stuff our faces with hot buttered bread. This particular bread, a "Shaker Daily Loaf," comes out of one of my old Frugal Gourmet cookbooks. It's a simple, yeasty bread that toasts well and has a great crust. This would be a rock solid PB&J bread. As always, notes or changes are in blue.


Shaker Bread
via The Frugal Gourmet Cooks American
Ingredients

  • 2 packages fast-acting dry yeast
  • 1/4 cup warm water
  • 1-3/4 cup milk
  • 3 tablespoons butter
  • 2 tablespoons sugar
  • 2 teaspoons salt
  • 5 cups all-purpose flour
  • Soft butter for greasing the bowl and top of dough, about 2 tablespoons (or if you're like me and counting calories, just use non-stick cooking spray instead)
Directions
  1. Dissolve the yeast in warm water in a large mixing bowl. Warm the milk and melt the 3 tablespoons of butter in it. Stir in the sugar and salt and allow to cool to lukewarm. Add this to the yeast bowl along with 3 cups of the flour. Beat until smooth (I used the KitchenAid since I am too lazy to do the beating/mixing by hand)
  2. Add the remaining flour and knead on a floured surface until smooth and elastic, about 10 minutes (3-4 minutes on the KitchenAid if you're using the dough hook)
  3. Place the dough on a plastic counter and butter the top of the dough with half of the remaining butter. Cover the dough with a very large stainless steel bowl and allow to rise until double in bulk (let it rise for about an hour. That should double it. As for the plastic counter nonsense, I just took the dough out of the mixing bowl, sprayed the bowl with nonstick cooking spray and rolled the dough in it and then left it in the bowl with a towel over the top.)
  4. After the dough has risen, punch down and shape into two loaves for loaf pans (spray the pans with nonstick cooking spray). Again brush the top of the dough and allow to rise until doubled in bulk (this will be about 30 minutes. I skipped the butter brush and just put a little cooking spray on the tops of the loaves)
  5. Bake at 400F (200C, Gasmark 6) for 30 minutes (this took exactly 30 minutes for us. Cooking times may vary)
Good Times!

Wednesday, April 30, 2014

Pumpkin Pie Pudding

     I'm sure if you checked your cabinets right now, you would find a can of pumpkin lurking about. Go ahead and check. I'll wait.

     You found one, didn't you? If not, you just didn't look hard enough. I assure you, it's in there. The point of this exercise is to find that can and be rid of it in the simplest way possible that doesn't involve just throwing it in the trash. With a couple more ingredients, you can chuck it all in the slow cooker and have pumpkin pie pudding! All right, it's not really that exciting, but it does taste exactly like the filling of a pumpkin pie. This shouldn't be a shocker because if you check the ingredients, that's basically what you have thrown in the slow cooker. Stop complaining and cover it with whipped cream. As always, any notes or changes are in blue.


Pumpkin Pie Pudding
via Fix It and Forget It Lightly
Ingredients

  • 15-ounce can pumpkin
  • 12-ounce can evaporated skim milk (just used regular evaporated milk. I can't stand skim)
  • 3/4 cup Splenda (calories or tumors...hmm. I went with 3/4 cup granulated sugar instead)
  • 1/2 cup low-fat buttermilk baking mix (didn't have the low-fat variety. Just used regular buttermilk mix)
  • 2 eggs, beaten or 6 egg whites (I don't feel like storing a half dozen egg yolks and I'm certainly just not going to shitcan them. I went with the 2 egg option)
  • 2 teaspoons pumpkin pie spice
  • 1 teaspoon lemon zest (I was feeling lazy and didn't want to zest a lemon that I actually had on hand. I used dried lemon peel from a jar instead)
Directions
  1. Spray slow-cooker with non-stick cooking spray (this inside)
  2. Combine all ingredients in slow cooker. Stir until lumps disappear.
  3. Cover. Cook on LOW 3 hours.
  4. Serve warm or cold.
Good times!

Sunday, April 6, 2014

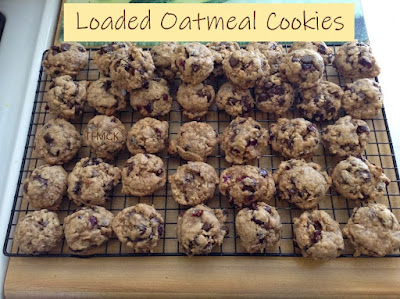
Loaded Oatmeal Cookies

     Sometimes you find recipes in odd places. This particular recipe came by way of a book I found at a garage sale last fall. When I dropped fifty cents on Southern Recipes and Legends, I didn't expect to find any real gems. Mostly I thought the legends would be fun to read. Once you get past the shaky editing, you start to find some recipes that are genuine winners. A particularly good one was for Bonnie Doone Plantation Thanksgiving Cookies. That's a hell of a mouthful to say. The cookies are also a hell of a mouthful. They are packed with all sorts of goodies. There's chocolate, oats, cranberries, raisins, walnuts (if you want them). I wound up renaming them Loaded Oatmeal Cookies. They are super easy to make and the recipe yields over 3 dozen cookies. As always, any notes and changes are in blue.

Loaded Oatmeal Cookies
aka Bonnie Doone Plantation Thanksgiving Cookies
via Southern Recipes and Legends by Nancy Rhyne

Ingredients
  • 2 cups all-purpose flour
  • 3/4 cup granulated sugar
  • 3/4 cup brown sugar
  • 1 teaspoon baking powder
  • 1 teaspoon vanilla extract
  • 1 egg
  • 2-1/2 cups rolled oats
  • 1 cup raisins
  • 2 cups cranberries, pitted and mashed slightly (we substituted 1 cup of craisins)
  • 1 cup chocolate chips
  • 1 cup melted butter
  • 1 cup chopped walnuts (omitted)
Directions
  1. Preheat oven to 375F (190F, Gasmark 5)
  2. Combine all ingredients (I certainly hope you have a Kitchenaid or something similar, because this batter will be stiff. Mixing it by hand is going to be a chore). 
  3. Drop by teaspoon (I assure you, you don't want to do this. Go by tablespoons. You'll still end up with 40 or so cookies) onto a greased cookie sheet. 
  4. Bake for 10-12 minutes (this is pretty accurate. Do not go by the consistency of the tops of the cookies; they will be very soft right out of the oven. Lift one up and check the bottom. If it's golden brown, it's done. The cookie will set up once it cools off).
Good times!


Tuesday, April 1, 2014

Double Banana Cake

     My first foray into layer cakes was for The Wife's birthday a couple years ago. I found the recipe in an issue of Bon Appetit and figured I'd give it a whirl. I would consider it a fair first effort. The thing looked pretty rough and weighed a damned ton. However, it tasted fantastic. There's just something about a layer cake that impresses me. I'd like to think that it all started with some guy saying, "I like cake so damned much, I'm going to just start stacking them on each other and frosting the whole thing. Pancreas be damned!" Fair warning, I consider all layer cakes to be PITAs, so be ready to put in some work. As always, notes and changes are in blue.

Double Banana Cake
via Bon Appetit
Ingredients

Cake
  • 1 1/2 cups (3 sticks) unsalted butter plus more for pans, room temperature (since I never have actual butter on hand, margarine was used)
  • 3 3/4 cups all-purpose flour
  • 1 1/2 teaspoons baking soda
  • 1 1/4 teaspoons kosher salt
  • 2 1/4 cups sugar
  • 6 large eggs
  • 3 cups coarsely mashed very ripe bananas (about 6 large)
  • 3/4 cup sour cream
Frosting
  • 1 cup (2 sticks) unsalted butter, room temperature (still using margarine)
  • 4 cups powdered sugar (good lord, I hope you have a strong pancreas)
  • 1/2 cup heavy cream
  • 1 teaspoon vanilla extract
  • 1/2 teaspoon kosher salt
  • 2 ripe but not mushy bananas, cut crosswise into 1/8-inch slices
Directions

Cake
  1. Preheat oven to 325°. Butter two 8"-diameter cake pans with sides 2" high. Line bottoms of pans with parchment paper rounds (I left my parchment square shaped. I didn't have a compass handy and didn't feel the difference in shape would alter the flavor). Whisk flour, baking soda, and salt in a large bowl. Using an electric mixer, beat 1 1/2 cups butter and sugar in another large bowl until light and fluffy, 2–3 minutes. Add eggs one at a time, beating to blend between additions. With mixer on low, gradually beat in flour mixture, scraping sides of bowl. Mix in bananas, then sour cream. Divide batter between pans.
  2. Bake cakes until a tester inserted into the center comes out clean, 50–55 minutes. Let cool for 20 minutes in pans on wire racks.
  3. Invert cakes onto wire racks; let cool completely. Remove parchment. Using a serrated knife, trim off rounded tops (Nope. I went ahead and stacked those sumbitches as is).
Frosting
  1. Using an electric mixer, beat first 5 ingredients in a large bowl until light and fluffy, 6–7 minutes.
  2. Place 1 cake on a plate. Spread 1 cup frosting over. Arrange banana slices on top. Top with second cake. Spread a thin layer of frosting over top and sides of cake; chill for 30 minutes. Spread remaining frosting over top and sides of cakes (Protip: Maybe wait a while for the cakes to cool off before putting on the frosting. I didn't, which explains why my cake looks like it has eczema).
Here's an alternate cake recipe if you prefer rhubarb
Good times!

Monday, March 10, 2014

Chocolate Peanut Butter Cookies

     I don't know why I don't bake cookies more often. Actually, I know exactly why: the wife and I tend to stand in the kitchen and stuff them mindlessly into our faces until we swell up like ticks. Fortunately, I've got my trusty copy of Taste of Home Everyday Light Meals to hook me up with 90 calorie cookies! If you like the chocolate/peanut butter combo, these are right up your alley. The peanut butter flavor really comes through. If you wanted to really do peanut butter overload, you could always swap in peanut butter chips! As always, notes and changes are in blue.

Chocolate Peanut Butter Cookies
via Taste of Home Everyday Light Meals
Ingredients

  • 1 cup chunky peanut butter (I used creamy. Fair warning, if you use natural peanut butter, the batter will be extremely oily. This is nothing to worry about; the cookies will come out fine)
  • 1/4 cup canola oil (I used corn oil)
  • 3/4 cup packed brown sugar
  • 1/2 cup white sugar
  • 2 eggs
  • 1 tablespoon vanilla extract
  • 1 cup all-purpose flour
  • 1/3 cup baking cocoa
  • 1 teaspoon baking soda
  • 1/2 teaspoon salt
  • 1/2 cup miniature chocolate chips (I used full sized and learned why I shouldn't. The cookies are pretty small. Full sized chips tend to just fall out when you're scooping the dough. Either make the cookies bigger or use the miniature chips).
Directions
  1. In a large mixing bowl, combine peanut butter and oil. Add brown sugar and white sugar; mix well. Add vanilla an eggs; mix well (I did all the mixing in the Kitchenaid).
  2. In  another bowl, combine flour, cocoa, baking soda and salt. Add to peanut butter mixture; mix until blended. Dough will be sticky (as I said, my dough was more oily than sticky). Stir in chocolate chips.
  3. Drop by rounded teaspoons 2 inches apart on ungreased baking sheets. Flatten slightly with a glass (I have made these cookies three times and only now have I noticed the part with the glass. Obviously, you can just skip that. No need to dirty a glass unless it's to put booze in it).
  4. Bake at 350F (180C, Gasmark 4) for 8-10 minutes or until set and tops are cracked (if you want a softer cookie, take them out at 8 minutes. If you prefer a crunchy cookie, go the full 10) Cool for 2 minutes before removing to wire racks (no fooling with this part. When the cookies come out, it's going to look like they're not done. They will be notably soft. They will firm up during the cooling).
Good times!

Thursday, January 16, 2014

Spiked Apples

     We rustic types love to preserve our own food. Fortunately for us, our in-laws both have access to apple trees. Each year, they bring us somewhere around eighty pounds of apples over the course of the season. One of our favorite ways to process them is to can them in syrup and booze. The original formula came out of the Better Homes and Gardens Home Canning Cookbook. We found it was great fun to use bourbon or other liquor in place of some of the liquid in these recipes. If you don't want to use booze, just swap water back in. Depending on the booze, the flavor will change dramatically. With regular bourbon, the apples are sweet and mellow. When I use an herbal liquor like Elisir M.P. Roux, the herbals really come through in the apples. No matter how you make them, they're great. We use them in cakes, on pancakes, over vanilla ice cream or just straight out of the jar! Since this recipe does involve boiling water canning, as always, please refer to the National Center for Home Food Preservation for tips on how to prevent giving everyone the green apple splatters. As always, any notes or changes are in blue.


Spiked Apples
Ingredients

  • 3 pounds of apples for each quart you intend to make
  • 3 cups sugar
  • 3 cups water
  • 1 cup booze (pick your favorite. I use Jim Beam for my bourbon apples and Elisir M.P. Roux for my herbal elixir apples. I imagine cinnamon or honey whiskey would be outstanding, too).
  • 6-8 whole cloves per quart
Directions
  1. Prepare a boiling water canner. Load your empty jars in while the water is boiling so they will be hot and clean when you go to use them.
  2. Wash, peel and core the apples. (Cut the apples however you want. I use small apples which I cut into wedges) Load them in a bowl with some color keeper so they don't brown.
  3. In a large pot, add liquid and sugar. Stir over medium heat until sugar dissolves. Bring syrup to boil.
  4. Add apples to syrup and boil for 5 minutes.
  5. Lower heat on the apples to a simmer and load the hot apples into the jars (yes, take the jars out of the canner and empty the water first, you goof. If I find out anybody was trying to fill the jars while they were still in the canner, I'm going to be very upset). Add the cloves to the jar. Cover with hot syrup, leaving about 1/2 inch of headspace. Secure with a clean lid and ring. Load into the canner. 
  6. Process for 20 minutes (20 minutes is fine for either pints or quarts)
  7. Remove jars to a wire rack with about 1" between them. Wait a while until you hear the satisfying thunk of the jar sealing. If you don't hear it after a few hours, you can either run it through another water bath and try again or just put them in the fridge for immediate devouring.
Good times!


Monday, December 23, 2013

Bourbon Fruit Cake

     Can any holiday dessert be more recognizable than the ubiquitous fruitcake? No, of course not. That was a rhetorical question. Ubiquitous means you'll find it everywhere. That was a quiz. Did you pass? I hope so, because this is going to be on the final exam. This particular recipe was adapted from a recipe for Kentucky Bourbon Cake I found on About.com's Southern Food section around five years ago. In all fairness, this is not a true fruitcake as we know it. It is not the consistency of blacktop. It is not cloyingly sweet with terrifying unidentifiable bits of detritus suspended within. The original recipe did call for candied cherries and nuts, but I quickly put an end to that nonsense. I want cake. I don't want to be losing fillings and digging things out of my molars all night. This recipe does have a lot going for it. This cake is actually fluffy. It cooks well in any number of different shapes. It's good with icing. It will, however, make your Kitchenaid howl like a damned soul while mixing it. This recipe will fill a 5 quart mixing bowl frighteningly close to the top. It's worth it. When I tell somebody I'm serving fruitcake, they flinch. Then they eat it. Complaints cease. As always, any notes and changes are in blue.

Bourbon Fruit Cake
via About.com 
Ingredients
  • 8 ounces red candied cherries, halved (I omitted all the candied cherries and used a jar of drained maraschino cherries)
  • 8 ounces green candied cherries, halved (omitted)
  • 8 ounces seedless raisins or chopped dates (I'm married so I shouldn't have dates. I used golden raisins)
  • 2 cups bourbon (I went with Jim Beam)
  • 1 1/2 cups (3 sticks) butter, room temperature
  • 2 cups granulated sugar
  • 1 cup firmly packed light brown sugar
  • 6 large eggs, separated
  • 5 cups all-purpose flour
  • 2 cups chopped pecans (omitted)
  • 2 teaspoons ground nutmeg
  • 1 teaspoon baking powder
Directions
  1. In a medium bowl, combine the cherries, raisins, and bourbon; cover and let soak overnight. 
  2. Preheat the oven to 275°F.
  3. In a large bowl, cream the butter and sugars with an electric mixer until light and fluffy; add the egg yolks and beat well. Stir in the soaked fruit with bourbon. In a small bowl, combine 1/2 cup of the flour with the pecans; set aside. Add the remaining flour, nutmeg, and baking powder to the creamed mixture and blend well. In a bowl, beat the egg whites with an electric mixer until stiff peaks form; gently fold into the cake batter. Sprinkle the floured pecans over batter and fold in gently.
  4. Grease and flour a 10-inch tube pan and line the bottom with greased waxed paper. (I have made this recipe several times and have never used a tube pan or waxed paper. I've used loaf pans, cake pans, bundt pans). Pour the batter into the pan; bake at 275° for 3 to 3 1/2 hours, or until a wooden pick or cake tester inserted in center comes out clean (this does, in fact, take every bit of 3-1/2 hours if you're using a large pan)
  5. Cool the cake. Turn cake out of the pan, peel off waxed paper (which I did not use), and store in a tightly covered container for several days (this recipe makes me think that you're not supposed to eat the cake. Just store it for several days and then shitcan it. Look, if this lasts more than seven days in your house, you must have cooked it wrong. It's awesome).
Good times!

Thursday, December 19, 2013

Bourbon Pear Cake

     The bundt cake strikes me as a quintessential middle-class food. I have lost count of the times I've seen bundt cakes at gatherings. My family was notorious for using the bundt cake pan for all sorts of terrifying Jell-O molds involving layers and suspended fruits.  It was almost unavoidable that I would eventually buy and use a bundt cake pan.  One of the first things I made was a Bourbon Pear Cake. I think I got the recipe from Relish.com, but can't find it there anymore. If anybody locates the original source, please let me know so I can give proper credit. I liked this recipe because it incorporated booze. However, I can't get myself to cook with high-end liquor, that stuff is for drinking! Unfortunately, I didn't have any bottom-shelf booze on hand so I had to use the workhorse in my bar, Jim Beam. This is just a good looking cake and is moist and flavorful. I always feel like such a pompous ass when I say stuff like that. Hmm.. CAKE SQUISHY AND TASTE GOOD. There. Much better. As always, any notes or changes are in blue.

Bourbon Pear Cake
Ingredients
  • 3 eggs 
  • 2 cups sugar 
  • 1 1/2 cups vegetable oil 
  • 3 cups all-purpose flour 
  • 2 teaspoons ground cinnamon 
  • 2 tablespoons bourbon (I'm pretty sure some form of honey bourbon would be really good here)
  • 1 teaspoon salt 
  • 1 teaspoon baking soda 
  • 1 1/2 cups pears - peeled, cored and chopped (there's nothing stopping you from using apples instead)
  • 1 teaspoon vanilla extract 
  • 1 1/4 cups confectioners' sugar 
  • 2 tablespoons milk 
Directions
  1. In a mixing bowl, beat eggs on medium speed. Gradually add sugar and oil; beat thoroughly. 
  2. Combine flour, cinnamon, salt and baking soda; add to egg mixture and mix well. 
  3. Stir in pears, bourbon and vanilla. (The batter will be stiff. Notice how I took the moral high ground and didn't make a joke here.) 
  4. Spoon into a greased and floured 9-in. Bundt-cake pan. 
  5. Bake at 350F for 60-65 minutes or until a toothpick inserted comes out clean (obviously, you'll want to stick the toothpick into the actual cake and not the hole in the center). Let cool in pan 10 minutes before inverting onto a serving plate. 
  6. In a small bowl, combine the confectioners' sugar and milk; beat until smooth. Drizzle over warm cake. Cool completely.
"Miss Moneypenny, fetch me another slice of that fantastic cake. I'm too shitfaced to get it myself."
Good times! 

Saturday, December 14, 2013

Tomato and Roasted Pepper Chutney

     Over the summer, chutneys became one of our go-to ways to process surplus veggies. If you were following us this summer, you'll know we were absolutely laden down with bell peppers and tomatoes. Whenever we have crazy amounts of produce to use, we usually end up consulting Preserve It! This book has a few wonderful chutney recipes. Fair warning, making chutney does qualify as a PITA (Pain In The Ass). It's time consuming and requires a fair amount of attention. The result is totally worth it, though. This stuff is great on crackers with cream cheese or brie. It's also good on bagels. If you do decide to process this for long term storage, I once again recommend consulting the National Center for Home Food Preparation for information on how not to accidentally make someone's anus fall out. As always, notes and changes are in blue.
Tomato and Roasted Pepper Chutney
via Preserve It!
Ingredients

  • 1 red bell pepper
  • 1 orange bell pepper (no orange peppers on hand. We just used another red pepper)
  • 1 yellow bell pepper
  • 3 lb. ripe tomatoes, plunged into boiling water for 1 minute and then peeled
  • 2 onions, coarsely chopped
  • 2-1/4 cups granulated sugar
  • 2 cups white wine vinegar
Directions
  1. Preheat the oven to 400F. Place the peppers on a baking sheet and cook for about 25-30 minutes, until they begin to char slightly. Remove from the oven, put in a plastic bag and leave to cool.
  2. Remove the pepper stems, skins and seeds (we core, stem, seed and slice the peppers before actually cooking them. It just seems more logical. Also, peeling the peppers has never failed to be a total Pain In The Ass). Coarsely chop the tomatoes. Transfer the peeled tomatoes, roasted peppers and onions to a food processor; pulse briefly until chopped but not mushy.
  3. Transfer the mixture to a preserving pan (couldn't even tell you what that is)  or a large, heavy-bottomed, stainless steel saucepan (I do have one of those!) with the sugar and vinegar. Cook over low heat, stirring continuously, until the sugar has dissolved. Bring to a boil, then reduce to a simmer and cook for about 1 to 1-1/2 hours, stirring occasionally, until it starts to thicken and turn sticky (try to read that last bit again without snickering). You may need to increase the heat a little toward the end of cooking, but stir continuously so the chutney doesn't stick to the bottom of the pan. 
  4. Ladle into warm, sterilized, half-pint jars, leaving about 1/4" head space, and making sure there are no air gaps. Cover and seal with a two part lid. Process in a boiling water bath for 12 minutes (If you want to do pint jars, boil for 15-16 minutes. You can thank me now for changing this step from the cookbook. The book says to process in the water bath, THEN put on the lids. I assure you, that won't work unless you're some sort of sorcerer). Store in a cool, dark place. Allow the flavors to mature for 1 month. Refrigerate after opening.  
Good times!

Wednesday, December 4, 2013

Lentil Bread

     It's been a while since I've tried a new bread recipe. I've been leaning pretty heavily on that Sally Lunn recipe. I've been wanting to try this recipe, but I never had lentils on hand. This is a great sandwich bread. It has a nice, sturdy crust and a soft inside. You can just get a hint of the lentil taste in the bread. I don't think you'll want to make French Toast with this bread; this is more of a straight up sandwich bread. Give it a try and see what you think. As always, notes and changes are in blue.

Lentil Bread
via Taste of Home Everyday Light Meals
Ingredients
  • 3/4 cup lentils, rinsed
  • 1-1/2 cups water
  • 4-1/2 teaspoons finely chopped onion (you're going to be running this through a food processor, you don't need to chop finely. Work smarter, not harder)
  • 1 garlic clove, minced (again, food processor. I just threw the damned thing in whole)
  • 2 packages (.25 ounce each) active dry yeast
  • 1 cup warm water (110-115F)
  • 1/4 cup olive oil
  • 1/4 cup sugar
  • 1 tablespoon grated Parmesan cheese
  • 1 tablespoon salt
  • 1 cup whole wheat flour
  • 6 to 7 cups bread flour (I hope that's the same thing as all-purpose flour, because that's what I used)
Directions
  1. In a saucepan, combine lentils, water, onion and garlic; bring to a boil. Reduce heat; cover and simmer for about 30 minutes or until lentils are tender. Cool slightly. Transfer mixture to a blender or a food processor. Cover and process until smooth. Cool to 110-115F.
  2. In a mixing bowl dissolve yeast in warm water. Add the milk, lentil mixture, oil, sugar, Parmesan cheese, salt, whole wheat flour and 3 cups bread flour. Beat until smooth. Stir in enough remaining flour to form a soft dough (I wound up using about 6-1/2 cups)
  3. Turn onto a floured surface (do it. The dough will be a bit sticky). Knead until smooth and elastic, about 6-8 minutes (as always, I let the Kitchenaid do the hard work. Feel free to do it by hand if you're the industrious type)
  4. Place in a bowl coated with nonstick cooking spray, turning once to coat top. Cover and let rise in a warm place until doubled, about 1 hour.
  5. Punch dough down. Turn onto a lightly floured surface. Divide into thirds; shape into loaves. Place in three greased 9"x5"x3" loaf pans. Cover and let rise until doubled, about 30-40 minutes. 
  6. Bake at 375F for 35-45 minutes or until golden brown (mine took about an hour!). Remove from pans to wire racks to cool. 
Good times!

Wednesday, October 23, 2013

Far Breton

     Every now and then it's fun to put together a recipe that really looks like it took a ton of work. This dessert from Pol Martin's Supreme Cuisine is one of those recipes. This is a really fancy looking baked custard that has never failed to impress every time I've served it. The thing is, Far Breton is super easy to make. If you have a Kitchenaid or electric mixer, it's almost embarassingly easy. I've even managed to buy a sifter so the dusting of sugar doesn't look like absolute shit anymore! As always, notes or changes are in blue.
Far Breton
via Pol Martin's Supreme Cuisine
Ingredients
  • 4 large eggs
  • 1/2 cup granulated sugar
  • 1 cup all purpose flour
  • 3 tablespoons rum
  • 1/4 cup marmalade
  • 1/2 cup sultana raisins (those of us that don't poop money call sultanas "golden raisins")
  • 2 cups milk
  • Pinch salt
  • Icing sugar (I hope that confectioner's sugar is the same thing, because that's what I used)
Directions
  1. Preheat oven to 350F. Butter a baking dish (about 12"x8"x2") 
  2. Place eggs and sugar in bowl; beat together. Add flour and salt; beat to incorporate.
  3. Add rum (make sure to have a little rum yourself. You know, for quality assurance), marmalade and raisins; beat well. Pour in milk and beat to incorporate.
  4. Pour batter into baking dish and bake 50-55 minutes or until golden brown. Let cool in baking dish and serve cold. 
  5. Cut into squares and sprinkle with icing sugar (use some form of sifter or it will end up looking like mine. That's what happens when you just grab a fistful and throw it). Serve with maple syrup, if desired (We desired it)
Good times!

Monday, September 16, 2013

Sriracha Sauce via Hot Sauce!

     We have just been pepper fabulous all season in the garden. The cayenne came up late, but boy howdy did they make up for lost time. Naturally, we turned to the book Hot Sauce! for a recipe to burn through the inventory. Since Sriracha is one of my favorite sauces, we figured we would pull the recipe from the book to try. With a little doctoring we came up with a sauce that I feel is superior to Huy Fong Sriracha. That's a big claim, but I'm sticking to it. The recipe below is showing double the amount listed in the cookbook. We found out the hard way that even though the book says their measurements yield one cup, we called bullshit. We needed to double off everything to come up with a half pint. One warning, if you choose cayenne peppers it will be a Colossal Pain In The Ass to seed them; wear gloves unless you're a fan of screaming a lot. As always, any notes or changes are in blue.


Sriracha
via Hot Sauce!

Ingredients
(this recipe will yield 1/2 pint of sauce)

  • 2 cups assorted fresh red chiles (habanero, jalapeno, serrano, and/or cayenne), stemmed, seeded and chopped (we use cayenne. If you choose cayenne, you're in for some work. Seeding them is fairly labor intensive. Make sure you wear some rubber gloves)
  • 6-8 garlic cloves, chopped
  • 4 tablespoons white wine vinegar
  • 2 teaspoons sugar, plus more as needed (we used 3 teaspoons total)
  • 1-2 teaspoons salt, plus more as needed (we used 2-1/2 teaspoons total)
Directions
  1. Add all of the ingredients to a food processor and pulse until blended. Taste and adjust the amount of salt or sugar if needed (we felt it was needed. The adjustments are listed in the ingredients section)
    For added fun, leave the access chute open when you do this
    and see who can stay in the kitchen the longest!
  2. Transfer the mixture to a saucepan and simmer over medium heat for 5 minutes, or until the sauce loses its raw vegetable smell.
  3. Let cool, then pour into a bottle (we bottled it hot since we planned on water bath canning for long term storage. We processed half pint jars for 15 minute. As always, please consult the National Center for Home Food Preservation for more information. I won't be held responsible for you poisoning yourself)
Good times!

Thursday, September 5, 2013

Sparkling Basil Lemonade via BHG

     The Wife found a punch bowl and set of cups at a garage sale years ago and it has sat quietly in a cabinet since the day of purchase. On several occasions she has threatened to use it, but never had until now. We were having a party for our 10th wedding anniversary and she was determined to find a way to use the punch bowl. She searched around and found a recipe from Better Homes and Gardens. The original recipe called for jalapeno slices, but she figured that might be a little off-putting for our guests so she made an executive decision to replace them with lemon slices. It was the right decision. The basil and lemon made for a refreshing and delicious drink that benefited greatly from the addition of vodka! She did a double batch and we were only left with maybe a pint after the party. This recipe will definitely be made again. As always, any changes and notes are in blue.
Sparkling Basil Lemonade
via Better Homes and Gardens
Ingredients
  • 4 cups water
  • 3 cups sugar
  • 2 cups fresh basil leaves (about 1-1/2 ounces) (we used a combo of lemon basil and regular basil)
  • 2 1 liter bottlesclub soda, chilled
  • 2 cups lemon juice (we used bottled lemon juice)
  • Ice cubes
  • 1 fresh jalapeno chile pepper, sliced* (omitted, replaced with thin lemon slices)
  • Fresh basil leaves
  • Vodka
Directions
  1. For basil syrup, in a large saucepan combine water, sugar, and basil. Bring to boiling over medium-high heat. Reduce heat. Simmer, uncovered, for 20 minutes. Strain syrup and discard leaves. Cover and chill syrup for 2 to 24 hours (totally forgot how long the syrup needed to chill. It got thrown in the freezer for about an hour)
  2. For lemonade, in a very large punch bowl combine chilled syrup, club soda, and lemon juice. Serve over ice and garnish with jalapeno slices (lemon slices in our case) and fresh basil leaves.
Good times!

Wednesday, August 7, 2013

Tomato and Hot Pepper Jam

     We are currently experiencing a glut of tomatoes. That's fine, because it's one of our favorite things to can. In the past we've canned sauce, chili tomatoes, chutney and preserves from tomatoes. This time we decided to try our hand at jam! We pulled this recipe from Preserve It! The jam came out a touch savory; the heat from the cayenne and the Italian herbs gave it a nice flavor. You could certainly omit the peppers (if you're ok with being lame) and mess around with the herb choice and come up with a flavor that suits you. As always, notes and changes are in blue.
Tomato and Hot Pepper Jam
via Preserve It!
Ingredients

  • 1-1/8 lb tomatoes, plunged into boiling water for 1 minute and then peeled and coarsely chopped
  • 1 teaspoon crushed red chile pepper (we took 4 fresh cayenne peppers and pasted them in the food processor)
  • 1 teaspoon dried mixed herbs (we went with an Italian seasoning blend)
  • Juice of 1 lemon
  • Pinch of salt
  • 1-1/4 cup granulated sugar
Directions
  1. Add all the ingredients except the sugar to a preserving pan or a large heavy bottomed sauce pan (I just used a stainless steel pot). Bring to a boil and simmer gently for about 8 minutes or until the tomatoes break down and soften (it almost sounds like an interrogation)
  2. Add all the sugar and heat gently, stirring until the sugar has dissolved. Turn up the heat and bring to a boil. When jam reaches a rolling boil, cook for 10-15 minutes or until it starts to thicken and become glossy and reaches the setting point. Stir occasionally to keep the jam from sticking or burning (if you haven't done this before, leaving this on the boil for this long will give you an anxiety attack. Just stir it regularly, it won't boil over). Remove the pan from the heat while you test for a set
  3. Ladle the jam into warm sterilized mason jars, leaving 1/4" headspace (this recipe yielded a bit over a half pint. Too much for a half pint jar, not enough for a full pint. We canned a half pint and put the rest in a container in the fridge for immediate use). If you are canning for long term storage, seal the canning jar and process in a boiling water bath for 5 minutes (again, if you're unfamiliar with this process, check with the National Center for Home Food Preservation for more information)
Good times!


Wednesday, July 3, 2013

Raisin Breakfast Pretzels

     Eventually the cover is going to fall off my Taste of Home: Everyday Light Meals cookbook. I just can't get enough of the great baking recipes in here. I've been eyeballing a Cranberry Breakfast Pretzel recipe for some time, but had been skipping it because it was a bit labor intensive. I'm glad I finally made it. These are a great quick breakfast, clocking in at only 170 calories a piece. The wife and I were in the process of spreading some cream cheese on these when we realized that this recipe would also make a decent bagel! I think we may do that next time. As always, I'll give you the original recipe with any changes or notes in blue.

Raisin Pretzels
originally Cranberry Breakfast Pretzels
via Taste of Home Everyday Light Meals
Ingredients
  • 3/4 cup dried cranberries (I used an equal amount of raisins. You could probably substitute just about any dried fruit you'd like)
  • 1/2 cup unsweetened apple sauce (I used an equal amount of my highly sweetened Bourbon Apple Butter)
  • 2 tablespoons of sugar, divided
  • 1 package (.25 ounce) active dry yeast
  • 1 cup warm milk (110-115F)
  • 1-1/2 teaspoon salt
  • 3-1/2 to 4 cups all purpose flour 
  • 2 quarts water
Topping:
  • 1 egg white, beaten
  • 1/2 teaspoon ground cinnamon
  • 1 tablespoon sugar
Directions
  1. In a food processor or blender, place the dried cranberries (raisins), applesauce (apple butter), and 1 tablespoon sugar; cover and process until finely chopped (I just went berserk and let it go until it was a paste.) Set aside.
  2. In a mixing bowl, dissolve the yeast in warm milk. Add remaining sugar; let stand for 5 minutes.
  3. Add the fruit mixture, oil, salt and enough flour to form a soft dough (I used the full 4 cups. The dough is still a bit sticky)Turn out onto a lightly floured surface; knead until smooth and elastic, about 6-8 minutes (being lazy, I used the Kitchenaid with the dough hook for 7 minutes). Place in a bowl coated with nonstick cooking spray, turning once to coat the top. Cover and let rise in a warm place until doubled, about 90 minutes.
  4. Punch dough down. Turn onto a floured surface. Divide dough into 15 balls. Roll each ball into a 14" rope and form into a pretzel shape. (A great video showing the process can be found on YouTube from Pastry Chef Online, please note how her pretzels actually look like pretzels whereas mine are more "reminiscent" of pretzels.)
  5. In a large saucepan, bring water to a boil. Drop pretzels, one at a time, into water; boil for 10 seconds on each side. Remove with a slotted spoon; drain on paper towels.
  6. Place pretzels on baking sheets coated with nonstick cooking spray. Cover and let rise in a warm place until puffy, about 25 minutes. 
  7. Brush pretzels with egg white. Combine sugar and cinnamon; sprinkle over tops of pretzels. Bake at 375F for 12-14 minutes or until golden brown (mine took 20 minutes. Cooking times may vary)
  8. Serve with honey or cream cheese if desired
Good times!