Showing posts with label cinnamon. Show all posts

Saturday, November 15, 2014

Cinnamon Raisin Sweet Rolls

     Let me come out and warn you right off the bat that this recipe is a P.I.T.A. There's a bunch of steps, and rolling and brushing and separating and dividing. It also takes like 3 hours start to finish including rising time. I will also tell you these things are the bomb-diggety, yo. They are just wonderful. They are soft and chewy and gooey and frosted and wonderful. I mean holy shit, wow, are they good. They just are a colossal pain in the ass to make. Totally worth it, though. As always, notes and changes are in blue.

Cinnamon Sweet Rolls
via Taste of Home Everyday Light Meals
Ingredients

  • 2 medium potatoes, peeled and diced
  • 1 package (.25 oz) active dry yeast
  • 1/2 teaspoon plus 1/4 cup sugar, divided (I realized that I have no recollection of including the 1/4 cup sugar. I did not realize it until I re-read the recipe. That tells me it probably wasn't necessary. Or maybe it was and I just forgot. Who knows.)
  • 1/2 cup evaporated milk
  • 1/4 cup honey
  • 3 tablespoons canola oil (omitted)
  • 1 teaspoon salt
  • 1/2 teaspoon butter flavoring (omitted)
  • 4 tablespoons butter/margarine only if you're following my changes
  • 5 cups all-purpose flour
  • 2 egg whites, lightly beaten, divided
  • 1-1/4 cups packed brown sugar
  • 1/2 cup raisins
  • 2 teaspoons ground cinnamon
  • For Glaze
  • 1-1/2 cups confectioners' sugar
  • 3 tablespoons milk
  • 1/2 teaspoon vanilla extract
Directions
  1. In a saucepan, cook potatoes in 1-1/2 cups water until very tender. Drain, reserving 3/4 cup of cooking liquid. Mash potatoes; set aside 1 cup (if you have extra, find some use for it. My suggestion is loading it on a spoon and unceremoniously launching it at your spouse)
  2. In a mixing bowl, dissolve yeast in warm reserved liquid. Add 1/2 teaspoon sugar; let stand for 5 minutes
  3. Add the milk, honey, oil (if using), salt, butter flavoring (or butter), sugar, 2 cups flour (screwed up again here. I totally didn't add any flour in this step. I added it all at once later. No harm done as far as I can tell), and potatoes. Beat until smooth. Stir in enough remaining flour to form a soft dough. Turn out onto a floured surface and knead until smooth and elastic, 6-8 minutes (or just throw the dough hook on the KitchenAid and let it do the work). Place in a bowl coated with non-stick cooking spray, turning once to coat. Cover and let rise in a warm place until doubled, about 90 minutes.
  4. Punch dough down. Turn onto a lightly floured surface. Roll into an 18"x13" rectangle (my rectangle was 20"x14" because I'm a total badass). Brush with some of the egg whites.
  5. Combine brown sugar, raisins and cinnamon; sprinkle over dough to within one inch of the edges. Roll up jelly-style, starting with the long side. Pinch seam to seal. Cut into 18 slices (we ended up with 16 slices because I didn't feel like measuring. I just started cutting shit in half). Place cut side down (technically if you're slicing dough, everything except the ends is cut on both sides) in two 9" square baking pans (I willfully ignored this and used to regular baking sheet which resulted in these wonderful round rolls). Brush with remaining egg white, Cover and let rise until doubled, about 30 minutes.
  6. Bake at 350F (180C, Gasmark 4) for 20-25 minutes or until golden brown (we went 23 minutes and were very pleased). Cool on a wire rack.
  7. Combine glaze ingredients and drizzle over cooled rolls. 
Good times!

Sunday, March 2, 2014

Banana Bread

     You just can't beat a well made banana bread. What a noble bread. Selflessly using bananas that would otherwise be thrown away, banana bread is perfect any time of day. This particular recipe comes by way of The Wife. She says she got the recipe from one of those "1,000,000 Recipes of Which Maybe 12 Are Any Good" CD-Roms. This is, indeed, a good recipe. The bread is moist and delicious. You could probably get away with adding some nuts to this recipe, but we're not much for nutty breads. Do what you want; we're not here to judge. As always, any notes are in blue.

Banana Bread

Ingredients

  • 1/2 cup butter, softened
  • 1/2 cup white sugar
  • 1/4 cup brown sugar
  • 1 egg
  • 2 cups flour
  • 1/2 teaspoon baking soda
  • 2 teaspoons baking powder
  • 1/4 teaspoon salt
  • 1 teaspoon cinnamon
  • 1 cup (2 medium over-ripe) mashed bananas
  • 1 tablespoon milk
  • For topping: 1/2 teaspoon cinnamon, 2 teaspoons white sugar
Directions
  1. Preheat oven to 350F (180C, Gasmark 4). Spray a 9x5" loaf pan with non-stick cooking spray.
  2. Beat butter with sugars until light and fluffy (if you don't have a Kitchenaid or electric mixer, this will be a PITA). Add egg and beat well. 
  3. In a large bowl, mix flour with baking soda, baking powder, salt, and cinnamon. In another bowl, mix banana with milk.
  4. Add half the banana mixture to the butter mixture, mixing until smooth; add half the flour mixture and mix until smooth. Repeat process with second half of the banana and flour mixtures. 
  5. Pour batter into loaf pan. In a small bowl (just use the bowl you used for the flour. No sense in dirtying a third bowl), mix the 1/2 teaspoon cinnamon with 2 teaspoons white sugar; sprinkle over top of batter. 
  6. Bake at 350F (180C, Gasmark 4) for 60 minutes, or until a toothpick inserted near the center comes out clean (cooking times will vary). Remove immediately to a wire rack to cool. 
Good times!

Saturday, January 11, 2014

Cranberry Bread Pudding

     Ever since I had bread pudding at the buffet at the Golden Nugget in Las Vegas some twenty years ago, I've been a huge fan. Of bread pudding, I mean. Don't get me wrong, I enjoyed the Golden Nugget immensely. They comped me and my dad to a fabulous breakfast after I put in 17 hours at a $3 blackjack table. They also told me I hold the casino record for smallest marker ever taken at $7. I also hold the fastest repayment of a marker at less than ten minutes from borrow to payback. My buddy Dave and I had a bender and came back from Glitter Gulch at 4AM and wound up hitting $750 on the Double Diamonds machine right before we went back to our rooms. Man, those were some good times. I have to get back there again sometime soon. Anyways, this is bread pudding with cranberries and I can't remember where the original recipe came from. Let me know if you know. Regardless, it's good and you should make some. As always, any notes or changes are in blue.

Cranberry Bread Pudding
Ingredients
  • Cooking spray for greasing pan
  • 1 (1-pound) loaf artisan white bread, cubed (I hope that Pepperidge Farms Cranberry bread counts as artisan, because I can get it for 99 cents a loaf at my local grocery store and that's what I use)
  • 2 teaspoons ground cinnamon
  • 1 ½ cup dried cranberries (I prefer to call them craisins)
  • 4 cups milk
  • ¾ cup granulated sugar
  • 2 tablespoons corn syrup
  • 1 tablespoon vanilla extract
  • 7 eggs, slightly beaten
Directions
  1. Preheat oven 325F
  2. Grease 13x9” baking dish. Place bread in pan and sprinkle with cinnamon and cranberries
  3. Combine milk, sugar and corn syrup in a saucepan. Heat over medium heat until small bubbles form around edge of pan. Remove from heat and stir in vanilla
  4. Slowly pour hot milk mixture over eggs, whisking constantly (please make sure the mixture isn't too hot or you're going to end up cooking the eggs on the spot). Pour mixture over bread and cover with foil
  5. Place pan on rimmed baking sheet in oven. Pour water onto baking sheet to create a water bath (PROTIP: Don't be a schmuck and try to put the water in the sheet first, then carry it to the oven. I guarantee it won't end well). Bake 30-45 minutes until custard has just set. Test by inserting knife into center to be sure custard is thoroughly cooked.
Good times!

Saturday, November 30, 2013

Kugel (Noodle Pudding)

     There are certain things that I always associate with my childhood. Hot Wheels. Saturday morning cartoons. Getting hit in the face with a ball because you've played outside until it's too damned dark to see anymore. If there's a food I connect with my childhood, it's kugel. If you're from a Jewish family, you know what a kugel is. If not, I'll explain. It's basically a baked noodle pudding. They can be sweet or savory, depending on the ingredients. This particular recipe is from my grandmother on my father's side, and is most certainly of the sweet variety. When I was little, she would make kugel most times I came to visit. To this day, it's one of my favorite recipes. It's pretty versatile. I've served at a side, a dessert and occasionally for breakfast. You can serve it hot or cold. As always, notes are in blue.

Kugel
Ingredients

  • 1 lb wide egg noodles
  • 1 lb small-curd cottage cheese
  • 3 medium eggs
  • 1/2 cup butter (1 stick), cut into small pieces
  • 3 tablespoons confectioner's sugar (no clue as to why my grandmother used confectioner's sugar. I guess it incorporates easier. There's really nothing stopping you from using regular white sugar. Now that I think of it, brown sugar might be pretty good in this)
  • 1 can (20 ounces) crushed pineapple, drained (I save the juice in a container in the fridge. It comes in handy for cocktails later!)
  • 6 ounces golden raisins
  • 1-2 teaspoons cinnamon (I generally just eyeball measure the cinnamon, so that's why there is some range on the measurement. Use more or less depending on how much you like cinnamon)
  • Corn Flakes/Frosted Flakes (If you like sweet, give Frosted Flakes a try. I've done it before and it was pretty good. Or you could go crazy and toss a layer of Cinnamon Toast Crunch over the top!)
Directions
  1. Cook noodles to just shy of done. 
  2. Mix all ingredients except corn flakes in a large bowl.
  3. Spread into a greased baking dish (around 15"x10"x2")
  4. Cook at 375F until top gets crispy (about 30 minutes, give or take). Sprinkle corn flakes over top and bake an additional 5 minutes.
Good Times!

Friday, November 8, 2013

Slow Cooker Caramel Apple Pie Bread Pudding

     Bread pudding is one of those desserts that I love, but almost never make. Generally, I'll make a bread pudding one time during the holidays and then just pine away for it the rest of the year. I'm not sure why that is. Bread pudding is not particularly difficult to make. It will have to remain a mystery. I made this one because I had an empty slot in my 3 station slow cooker. I also had a loaf of Caramel Apple bread and nothing to do with it. I just changed up a recipe from Gooseberry Patch Super Fast Slow Cooking. It took WAY longer to cook than the recipe said, but ended up being a fine dessert. As always, any changes or notes are in blue.


Caramel Apple Pie Bread Pudding
via Gooseberry Patch Super Fast Slow Cooking
Ingredients

  • 3 eggs, beaten
  • 2 cups milk
  • 1/2 cup sugar (we used 1/4 cup white sugar, 1/4 cup brown)
  • 21 ounce can apple pie filling (we used a sugar-free pie filling)
  • 6-1/2 cups cinnamon-raisin bread, cubed (no cinnamon-raisin bread on hand. Went with a one pound loaf of Pepperidge Farms Caramel Apple Bread)
  • Optional: Whipped Cream (omitted)
Directions
  1. In a large bowl, whisk together eggs, milk and sugar. 
  2. Gently stir in pie filling and bread cubes; pour mixture into lightly greased slow cooker.
  3. Cover and cook on LOW setting for 3 hours, until a knife inserted near the center comes out clean (calling bullshit on this step. We went for three hours on LOW, then over another hour on HIGH, and that damned knife never came out clean. I just gave up and called it done)
  4. Let stand, uncovered, 30-45 minutes to cook slightly before serving. 
Good times!

Friday, September 20, 2013

Too Damned Easy Bourbon Apple Butter

     My in-laws both have access to a fairly large collection of apple trees. This means that each fall we find ourselves in the possession of 40-60 pounds of apples. One of our go-to methods of working those apples is to render them into apple butter. Years ago I found a recipe online for how to do it and have tweaked it out for my own use. For the life of me I can't recall where I got this. If anybody knows, let me know and I'll give credit for the inspiration where credit is due. This variation uses brown sugar and bourbon and gives a sweet and mellow taste. About 35 medium apples will yield a little over 4 pints of apple butter. These can be processed in a boiling water bath for long term storage. If you are doing pint jars, give them 15 minutes in the bath. (Once again, please defer to the National Center for Home Food Preservation for clear instructions) As always, any notes are in blue.
Too Damned Easy
Bourbon Apple Butter
 Ingredients
per 10 apples

  • 10 medium apples peeled, cored and thickly sliced*
  • 5 teaspoons ground cinnamon
  • 1 cup brown sugar
  • 1 cup water 
  • 1/4 cup bourbon 
Directions
  1. Load the apples in a large pot over medium heat. Add cinnamon, water, bourbon, and sugar. Cook until the apples get soft.
  2. Use an immersion blender to blitz the apples until they are the desired consistency (if you don't have a hand blender, you're going to have to mash the apples up by hand. Good luck)
  3. Load the sauce into a large slow-cooker (if you're like me and used 30+ apples, you're going to need at least a 5 quart slow-cooker). Prop the lid slightly off the cooker to allow steam to escape.  Cook on low overnight. 
    In the morning, you'll wake up to something like this.
    The same thing applies if you ate Taco Bell.
*NOTE: If you have a food mill, you can do this a lot quicker. When I used a mill I simply quartered the apples and boiled them for about 10 minutes. I then loaded them in the mill and basically made applesauce. If you do it this way the directions will change. Just load the milled apples into the slow cooker and mix in the remaining ingredients. You will need to cut the amount of water you use by half if you do it this way. Don't cut the bourbon. NEVER CUT THE BOURBON.

If there is an easier way to do something, I will certainly use that method.
Good times!

Sunday, August 18, 2013

She Simmers Caribbean-Style Sauce via Hot Sauce!

     Apparently I need to visit the Caribbean at some point. So many wonderful sauces come out of that area! This particular riff on the style is out of the Hot Sauce! cookbook. I love this sauce so much. There is so much going on here, flavor-wise. It is reminiscent of a jerk sauce, but to me has a fun mix of flavors. The best way I can explain it is everything in here is fighting to get noticed. Imagine a bar-room brawl and all the spices are slapping each other around. Then the habanero busts in the front door and starts breaking chairs over everyone and throwing them out windows. It's just like that, but in your mouth. As always, notes and changes are in blue.


She Simmers
via Hot Sauce!
Ingredients

  • 6 fresh red, yellow, or orange habanero chiles (I used mostly red and one orange. They were also frozen from last season. As long as they were fresh at one time you should be fine)
  • 1/2 cup freshly squeezed orange juice (for all of the freshly squeezed juices, you can more than likely get away with bottled, but the flavor will not be quite the same. The main reason I did the freshly squeezed was because my aunt Ruthie bought us an electric reamer for our wedding. As much as that sounds like a marital aid, it's not. Just Google "orange reamer" and settle down, you pervert)
  • 1/2 cup distilled white vinegar
  • 2 tablespoons freshly squeezed lemon juice
  • 2 tablespoons freshly squeezed lime juice
  • 1 teaspoon salt
  • 2 teaspoons freshly ground black pepper (I will tell you right now, grinding them by hand is a Colossal Pain In The Ass. Next time I'll just use the coffee bean grinder. I just have to remember to clean it out or the wife will be Righteously Pissed when she goes to make coffee)
  • 4 garlic cloves, minced
  • 2 tablespoons minced fresh ginger
  • 1 tablespoon curry powder
  • 1 teaspoon ground allspice
  • 1/2 teaspoon ground or freshly grated nutmeg (I went with the ground)
  • 1/2 teaspoon ground cinnamon
Directions
  1. Stem and seed the habaneros, reserving the seeds. Combine the chiles and all of the remaining ingredients in a blender and puree until silky. Taste and add a sprinkling of the seeds if you want to ratchet up the heat (be careful when you're doing this. It doesn't take too many seeds to change the heat level from "pleasant burn" to "OH MY GOD, THIS WILL EVENTUALLY REACH MY SPHINCTER.")
  2. Pour into bottles. (I processed mine in a half pint jar for 15 minutes in a boiling water bath for long term storage. As always, please read up on canning at the National Center for Home Food Preservation before attempting canning. This sauce can tear up your insides just fine without the help of harmful bacteria.)
Good times!

Sunday, August 4, 2013

The Wife's Zucchini Bread

     Like I've told you before, my wife doesn't do much of the cooking in the house. We have an agreement where I do most of the cooking and she cleans up the wreckage. She does, however, have a few recipes in her repertoire.  They are all very good. Her zucchini bread is one of my all-time favorites. She got the recipe from the One Million of the World's Best Recipes CD-ROM. You know what? I'm calling bullshit on that CD. How can there be more than one of the "World's Best" anything? The CD should have one recipe. Even if it was the "World's Best" of each type of food I still can't believe there are a million distinctly different categories of food. I think a more accurate title would have been "One Million Really Good Recipes and Lots of Okay Ones."
Sorry, I seem to have gotten off track.
     Anyway, this bread is fantastic. The wife leaves out the walnuts from this recipe and I think that's a really good call. The bread is such a wonderfully soft consistency, I think the crunchiness of the walnuts would throw it off. As always, any notes or changes are in blue.

The Wife's Zucchini Bread
Ingredients
  • 3 eggs
  • 3 cups all-purpose flour
  • 1 cup vegetable oil (we substituted 1/2 cup apple butter in for 1/2 cup of oil. Applesauce would work, too)
  • 2 cups white sugar
  • 2 cups grated zucchini
  • 2 teaspoons vanilla extract
  • 3 teaspoons ground cinnamon
  • 1 teaspoon baking soda
  • 1/4 teaspoon baking powder
  • 1 teaspoon salt
  • 1/2 cup chopped walnuts (omitted)
Directions
  1. Preheat oven to 325F. Grease and flour two 8"x4" loaf pans
  2. In a large bowl, beat eggs until light and frothy.
  3. Mix in oil (and apple butter if you're using it) and sugar.
  4. In another bowl, combine flour, cinnamon, baking soda, baking powder, salt and nuts (seriously, leave the nuts out. It's so much better. Or don't. I'll never know). Stir into the egg mixture.
  5. Divide batter into prepared pans. Bake for 60-70 minutes, or until done (ours took 75 minutes. Fairly close for once!)
Good times!

Sunday, July 21, 2013

Skillet Apple Brownie via All Recipes

     I have mixed emotions about All Recipes. It's kind of like the YouTube of recipe sites. People put their best efforts into creating something, then the people in the comments ruthlessly dismantle the person who posted. Some of the comments are just downright mean. However, there are some fairly good recipes lurking about. I actually subscribed to the All Recipes magazine to allow the recipes to be pre-screened for me. That's how I found this recipe. This was a very dense and rich dessert and would benefit greatly from a nice vanilla ice cream melting across the top. As always, any notes and changes are in blue.

Skillet Apple Brownie
via All Recipes
Ingredients
  • 1 cup all-purpose flour
  • 1/2 cup white sugar
  • 1/2 cup brown sugar
  • 1/4 teaspoon salt
  • 2 teaspoons ground cinnamon
  • 1 teaspoon ground nutmeg (I used 1/2 teaspoon)
  • 1/2 teaspoon ground cloves (omitted)
  • 2 eggs, lightly beaten
  • 1 teaspoon vanilla extract (I substituted a tablespoon of French Vanilla syrup from Java & Co.)
  • 1/2 cup plus 1 tablespoon melted butter
  • 2 cups apples, peeled, cored and chopped (I used a pint of my home canned apples in bourbon and clove)
  • 1/2 cup chopped pecans (No pecans in the house. I substituted chopped walnuts)
Directions
  1. Preheat oven to 350F. Place an 8-9" cast iron skillet in oven to preheat.
  2. Whisk together flour, white sugar, brown sugar, salt, cinnamon, nutmeg and cloves (if used) in a bowl; set aside.
  3. Beat together eggs, vanilla extract (or syrup), 1/2 cup of melted butter in a mixing bowl. (I used the Kitchenaid. Eventually Kitchenaid has to give me a sponsorship)
  4. Toss apples and nuts in flour mixture, then stir into egg mixture until combined (again, the Kitchenaid was used to combine the dry and wet ingredients. ARE YOU LISTENING, KITCHENAID?)
  5. Add remaining 1 tablespoon butter to hot skillet, coating pan evenly. Pour batter into pan and place in oven. Bake until sides are dry and a toothpick inserted in the center comes out clean, about 40 minutes (as always mine took a bit longer, closer to 50 minutes. Cooking times may vary)
  6. Cool in skillet 20 minutes before removing to slice (as you can see from the picture, I left it in the pan to slice. Rebel to the end, that's me)
Good times!

Friday, July 12, 2013

Raisin Pumpkin Walnut Bread


     As always, last Sunday was all about baking. As I am nothing, if not predictable, I pinched another recipe from Taste of Home Everyday Light Meals. This bread could not be more simple to prepare. I did think the recipe seemed to be missing something so I took it upon myself to chuck some raisins in there. In the end, we ended up with a nice rich bread that is suitable for dessert! It's also good in the morning with a schmear of cream cheese. As always, any changes or notes will be in blue.


Raisin Pumpkin Walnut Bread
via Taste of Home Everyday Light Meals

Ingredients
  • 1 cup whole wheat flour
  • 1 cup sugar
  • 2/3 cup all-purpose flour
  • 1 teaspoon baking soda
  • 1 teaspoon ground cinnamon
  • 1/2 teaspoon baking powder
  • 1/2 teaspoon salt
  • 1/2 teaspoon ground cloves
  • 1 cup canned pumpkin
  • 1/2 cup egg substitute (we substituted 2 large eggs)
  • 1/3 cup water
  • 1/4 cup canola oil (we used corn oil)
  • 1/2 cup chopped walnuts
  • 1/2 cup raisins
Directions
  1. In a bowl, combine the first eight ingredients. 
  2. In another bowl, combine the pumpkin, egg substitute (or 2 large eggs), water and oil. Mix well. Stir into dry ingredients just until moistened. Fold in walnuts. (I'll be honest here. I just loaded the first 8 ingredients into the Kitchenaid mixer bowl and gave them a quick stir. Then I just dumped everything else in and used the beater blade at power level 2 until it was all mixed up. I live on the edge.)
  3. Spoon into a 9x5x3" baking dish coated with non-stick cooking spray. Bake at 350F for 60-65 minutes or until a toothpick inserted near the center comes out clean (ours took 65 minutes on the button). Cool for 15 minutes before removing from pan to a wire rack.
Good times!

Wednesday, July 3, 2013

Raisin Breakfast Pretzels

     Eventually the cover is going to fall off my Taste of Home: Everyday Light Meals cookbook. I just can't get enough of the great baking recipes in here. I've been eyeballing a Cranberry Breakfast Pretzel recipe for some time, but had been skipping it because it was a bit labor intensive. I'm glad I finally made it. These are a great quick breakfast, clocking in at only 170 calories a piece. The wife and I were in the process of spreading some cream cheese on these when we realized that this recipe would also make a decent bagel! I think we may do that next time. As always, I'll give you the original recipe with any changes or notes in blue.

Raisin Pretzels
originally Cranberry Breakfast Pretzels
via Taste of Home Everyday Light Meals
Ingredients
  • 3/4 cup dried cranberries (I used an equal amount of raisins. You could probably substitute just about any dried fruit you'd like)
  • 1/2 cup unsweetened apple sauce (I used an equal amount of my highly sweetened Bourbon Apple Butter)
  • 2 tablespoons of sugar, divided
  • 1 package (.25 ounce) active dry yeast
  • 1 cup warm milk (110-115F)
  • 1-1/2 teaspoon salt
  • 3-1/2 to 4 cups all purpose flour 
  • 2 quarts water
Topping:
  • 1 egg white, beaten
  • 1/2 teaspoon ground cinnamon
  • 1 tablespoon sugar
Directions
  1. In a food processor or blender, place the dried cranberries (raisins), applesauce (apple butter), and 1 tablespoon sugar; cover and process until finely chopped (I just went berserk and let it go until it was a paste.) Set aside.
  2. In a mixing bowl, dissolve the yeast in warm milk. Add remaining sugar; let stand for 5 minutes.
  3. Add the fruit mixture, oil, salt and enough flour to form a soft dough (I used the full 4 cups. The dough is still a bit sticky)Turn out onto a lightly floured surface; knead until smooth and elastic, about 6-8 minutes (being lazy, I used the Kitchenaid with the dough hook for 7 minutes). Place in a bowl coated with nonstick cooking spray, turning once to coat the top. Cover and let rise in a warm place until doubled, about 90 minutes.
  4. Punch dough down. Turn onto a floured surface. Divide dough into 15 balls. Roll each ball into a 14" rope and form into a pretzel shape. (A great video showing the process can be found on YouTube from Pastry Chef Online, please note how her pretzels actually look like pretzels whereas mine are more "reminiscent" of pretzels.)
  5. In a large saucepan, bring water to a boil. Drop pretzels, one at a time, into water; boil for 10 seconds on each side. Remove with a slotted spoon; drain on paper towels.
  6. Place pretzels on baking sheets coated with nonstick cooking spray. Cover and let rise in a warm place until puffy, about 25 minutes. 
  7. Brush pretzels with egg white. Combine sugar and cinnamon; sprinkle over tops of pretzels. Bake at 375F for 12-14 minutes or until golden brown (mine took 20 minutes. Cooking times may vary)
  8. Serve with honey or cream cheese if desired
Good times!


Wednesday, June 12, 2013

Cran-Apple Tea Ring

     There's a pretty good chance that if I'm baking, the recipe was pinched from Taste of Home Everyday Light Meals. Their baking recipes have been excellent every time. I figure, why mess with success?  Fair warning, this particular recipe is a bit labor intensive, but worth it. The end result is extremely impressive looking. As always, any substitutions and/or notes are in blue.
Cran-Apple Tea Ring
via Taste of Home Everyday Light Meals

Ingredients
  • 1 package (1/4 ounce) active dry yeast
  • 1/4 cup warm water (110-115F)
  • 1/2 cup warm fat-free milk (110-115F) (we used 2%. Don't judge me harshly)
  • 1 egg
  • 2 tablespoons butter, softened
  • 1 tablespoon grated orange peel (I'm pretty sure they mean fresh. We used the dried stuff from a jar)
  • 1 teaspoon salt
  • 3 tablespoons plus 1/2 cup sugar, divided
  • 2-3/4 to 3-1/4 cups all purpose flour (we ended up using the full 3-1/4 cups)
  • 1 cup thinly sliced, peeled apple
  • 1 cup dried cranberries (we didn't have enough cranberries, so we used 1/2 cup cranberries and 1/2 cup raisins)
  • 1/2 cup chopped walnuts, toasted (I found out you can toast nuts in the microwave. Put them in a single layer and nuke them on HIGH for 1 minute at a time. Eventually you'll smell the tell-tale aroma of roasting nuts. Don't be an imbecile like me and then go to remove the plate with your bare hand unless you're a big fan of burning yourself)
  • 1-1/2 teaspoons ground cinnamon
  • 1 egg white
  • 1 tablespoon water
  • 1/2 cup confectioners' sugar
  • 1 tablespoon orange juice
Directions
  1. In a large mixing bowl, dissolve yeast in warm water. Add milk, egg, butter, orange peel, salt, 3 tablespoons sugar and 1 cup flour; beat until smooth. Stir in enough remaining flour to form a soft dough (like I said, I ended up using the maximum suggested amount)
  2. Turn dough out onto a floured surface; knead until smooth and elastic, about 6-8 minutes (as always, I let the trusty Kitchenaid and dough hook take care of this step. I took this time to enjoy a cup of coffee and contemplate my place in the universe). Place in a bowl coated with nonstick cooking spray; turn once to coat top of dough. Cover and let rise in a warm place for 1 hour.
  3. In a bowl, toss the apple, cranberries, walnuts, cinnamon and remaining sugar; set aside.
  4. Punch dough down; turn onto a lightly floured surface. Roll into a 20"x10" rectangle. Combine egg white and water mixture; chill 3 tablespoons. Brush remaining mixture over dough. Spoon fruit mixture to within 1" of edges.
    You should be looking at something like this at this point.
    Roll up jelly-roll style, starting with long side; seal ends. (I let the wife handle the rolling portion. I was fairly sure I would screw up horribly if I tried to roll this thing).
  5. Place seam side down on a 15"x10"x1" baking pan coated with nonstick cooking spray; pinch ends to form a ring. With scissors, cut from outside edge two-thirds of the way toward the center of the ring at 1" intervals. Separate strips slightly; twist so filling shows (we didn't exactly do this by the book. The wife took a super sharp paring knife and slit the dough and just pulled the cuts apart a bit. The whole scissors and twisting was getting too involved for us). Cover and let rise until doubled, about 40 minutes.
  6. Brush with reserved egg white mixture. Bake at 375 for 20-25 minutes or until golden brown. Cover with foil during the last 10 minutes. (For once, it actually took close to within the suggested cooking time to bake something! We had this done in about 30 minutes). Remove to wire rack to cool. 
  7. Combine confectioners' sugar and orange juice; drizzle over ring (the icing came out way more translucent than the photo in the book. Maybe next time I'll add more confectioners' sugar. I also considered topping this with coarse grain sugar and hitting it with the kitchen torch next time. It would be nice to use that torch for something besides lighting my cigars). 
Good times!


Wednesday, February 6, 2013

Product Review: Inbru

     Inbru Coffee Flavors
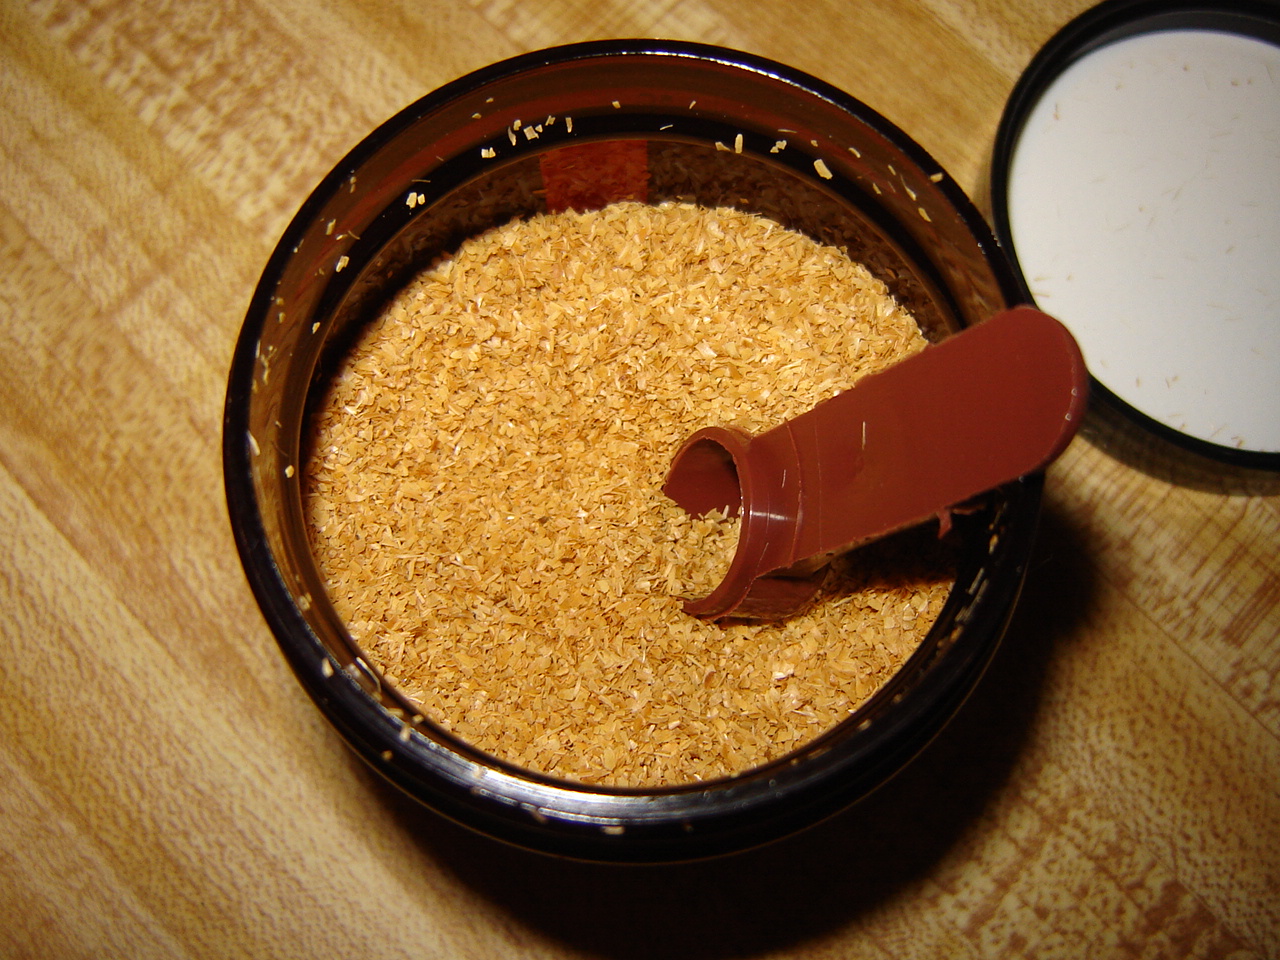
     Last week I received a sampler from Inbru. What is Inbru? Inbru is something you add to your coffee grounds to change up the flavor. It's made from rice hulls, so it's sugar, gluten, and carb free. We drink a tremendous amount of coffee in our house, so the opportunity to change the flavor of a basic coffee whenever we feel  like it is really nice. We received a box with four flavors to try. 
Nice, clean packaging. Let's start brewing!
     On opening the package, you know right away it's going to at least smell good. It's also going to be easy to use. Each container has it's own little measuring scoop. You just scoop out the correct measure for the amount of coffee you're making. You can even use Inbru in a Keurig if you have the mini-filter baskets. PROTIP: Don't add this directly to your brewed coffee! This has to go into a filter basket. It is not intended to dissolve! I mean, if you like crunchy coffee, I suppose you could try it.

Doesn't look like much, but WOW does it smell good!

     When you brew your coffee/tea with Inbru the first thing you're going to notice is the aroma. All of the Inbrus we tested smell wonderful as they brew.  I feared that given the strength of the aroma as the coffee brewed, the flavor would be overpowering. However, as the brewing finished, the smell leveled out. The flavor was notable, but not dominating, in each instance.

Inbru added to coffee grounds. Time to get  down to business.

Cinnamon-Hazelnut
Coffee Used: Harrah's Gourmet Blend
Let me preface by saying I'm not a fan of cinnamon or hazelnut flavored beverages. In the name of fairness, I'm only going to concern myself with the delivery of the flavors in question. The coffee we used is on the bold side, so the challenge would be to see if the flavor of the Inbru would come through. It does. You definitely get solid tones of cinnamon and hazelnut. They're not overpowering. The wife raved about this particular flavor and wound up drinking two cups black. I found that when I added some sweetener, the flavors really developed for me and resulted in a nice drink for a winter evening.

Butterscotch Drop
Coffee Used: Maxwell House Wake-Up Roast
I brought this flavor to work with me to try out on my co-workers. They're fairly particular about their coffee flavors, so I figured they would be brutally honest. The results were positive all around. The aroma as the coffee brewed was phenomenal. One co-worker came in and asked, "What is that blend? It smells really good."  Other reviews: "That's not bad at all. It's got a good taste to it." I loved this flavor. When a little sweetener and creamer was added, it moved into the realm of outstanding. The butterscotch flavor really came out with the sweetness and creaminess.

Raspberry Tart
I figured I'd switch things up here and try brewing it in some tea.
Tea Used: Hyson Green
This was tremendous. The aroma is lovely. No sweetener was needed. The raspberry flavor was a great accent to the green tea. I  don't know that this flavor will ever make it into a pot of coffee. I may just keep it as a tea enhancer.

Highlander Grogg
Coffee Used: Harrah's Gourmet Blend
This was going to be the real test. Highlander Grogg is the favorite flavor in our house. We almost always have a stock of Highland Grogg in the house. If the Inbru version wasn't up to snuff, we'd know immediately.   Highland Grogg has a distinctive aroma. When the coffee started brewing, the Inbru was spot on. The smell was identical to the $15/lb coffee we occasionally treat ourselves to. The taste? Blown away. There was no discernible difference between the coffee house Highland Grogg and the Inbru-converted coffee.

The Verdict
Inbru certainly is a good value. For $6.95 you get a jar that will make about 5-6 pots of coffee, depending on how much or little flavor you want. You can use any coffee you want. The flavors we tested were wonderful. What it says on the label is what you're going to smell and taste. We also discovered it works well with tea, but you'll have to use a tea ball or filter. Not a big issue. We have also been told it can be used in baking, which is truly awesome. I will certainly have to try it. You should try it too. Don't be a dope. Do it now.

Good times!

Wednesday, November 21, 2012

Middle Class Bartending: Pumpkin Cocktails

     The holiday season is fast approaching, and that can mean only one thing: Heavy Drinking. There is going to be a lot of interaction with all sorts of relatives and friends and booze can make that interaction go smoothly. At the very least you won't remember if it didn't. In honor of the arrival of fall, I present to you two pumpkin themed cocktails that are very popular in my home.

Pumpkin Nog
Ingredients
  • 1.5 parts Vanilla Vodka
  • .5 parts Pumpkin Schnapps
  • 2 parts Pumpkin Liqueur
  • Nutmeg (optional)
Directions
  1. Pour all ingredients into a cocktail shaker with ice
  2. Shake and drain into an Old Fashioned glass
  3. Float a small dusting of ground nutmeg on the surface (optional)
The VanPelt*
Ingredients
  • 1 part Vanilla Vodka
  • 1 part Pumpkin Schnapps
  • Cinnamon (optional)
Directions
  1. Pour all ingredients into a cocktail shaker with ice
  2. Shake and drain into a martini glass
  3. Float a very small dusting of of cinnamon on the surface (optional)
*I absolutely refuse to tag the suffix "-tini" onto any cocktail. No, I can't tag it on "Martini" because then it would be "Martinitini." If you are drinking some neon drink with a slab of fruit hanging off of it, and a cutesy name and "-tini" slapped on to it, you likely belong to a demographic I do not.

Good times!

Middle aged, single and desperate? That's what I'm talking about!

Good times!