Showing posts with label better homes and gardens. Show all posts

Sunday, August 14, 2016

Applesauce Cheddar Quick Bread

     We eat an alarming amount of bread in this house. The Wife loves her bread. The Spud really, really likes her bread. I certainly enjoy bread. We embrace gluten lovingly and with all our beings. We love it enough that we eventually started using the hashtag #sundaysareforbaking. That makes it serious. I think. Maybe not. This particular bread is from an ancient canning book that still gets a lot of mileage in our house. It's a great quick bread. If you make your own applesauce, which we do, it's even better. The timing on the bread is a little iffy. It took us way longer to bake than the book called for. This is a fantastic breakfast bread, spread with a little sweet butter or marmalade. Perhaps top it with my Mulberry Jam? I imagine it would make a dynamite peanut butter and jelly sandwich, too. As always, notes and changes are in blue.

Applesauce Cheddar Quick Bread
via BH&G Home Canning Cook Book
Ingredients

  • 1/2 cup butter
  • 2/3 cups sugar
  • 2 eggs
  • 2 cups all-purpose flour
  • 1 teaspoon baking soda
  • 1/2 teaspoon salt
  • 1 cup applesauce (why not try my Peach Bourbon Applesauce!)
  • 3/4 cup shredded Cheddar cheese
  • 1/2 cup chopped walnuts (omitted. The Wife is not a huge fan of nuts in her bread.)
Directions
  1. Cream butter and sugar until light and fluffy (maybe I'm not doing this for long enough, because I have never been able to achieve light and fluffy consistency. I always end up with something on par with cake frosting)
  2. Add eggs, beat well.
  3. In a separate bowl, stir together flour, soda and salt. Add to the creamed butter mix. Stir in the applesauce, cheese and nuts (if using)
  4. Turn into a greased loaf pan (what am I, a wizard? I never got a Hogwarts letter so I'm not really up on my Transfiguration and Polymorph spells. How about I just dump the mixture into a loaf pan?)
  5. Bake at 350F (180C, Gasmark 4) for 50-55 minutes (fair warning, this may take way longer than the stated time. It took me closer to 75-90 minutes. Just run it for the 55, then check it with a knife. If it comes out clean, you're fine. If it comes out wet, you're not done. If it comes out covered in blood and ichor, your oven is possessed.) Cool 10 minutes in the pan. Remove to finish cooling on a wire rack.
Add caption

Tuesday, January 20, 2015

Ham and Pea Soup

     Peas are a bit of an oddity with The Wife. Normally, she'll pick the peas out of most anything she's eating and wouldn't eat them as a side dish. However, if I make ham and pea soup, she goes batshit crazy over it and will eat it with gusto. This particular recipe is super simple and can be pressure canned for later use. Just remember to consult The National Center for Home Food Preservation to make sure you don't accidentally poison anyone. As always, notes are in blue.

Ham and Pea Soup
adapted from Better Homes and Gardens Home Canning Cookbook
Ingredients (Yields 4 pints)

  • 5 cups frozen green peas (you can use fresh if you'd like)
  • 2 cups finely chopped ham 
  • 3/4 cup celery
  • 1 teaspoon salt (Use the full teaspoon if your ham isn't salty. We dropped it to 1/4 teaspoon since our ham was super salty)
  • 1/2 teaspoon black pepper
  • 1/2 teaspoon dried marjoram
Directions
  1. Add 3-1/2 cups water, peas, ham, onion, celery and seasonings in a 4-6 quart pot. Bring to boil and reduce to simmer. Simmer, covered for about 20-30 minutes.
  2. Blend until smooth (If you've got steady hands, you can do it in batches in a blender. We used our immersion blender since I'm likely to spill everywhere trying to transfer scalding hot soup)
  3. If you plan on eating this right away, stop here. If you plan on canning this for later use, carry on:
    Heat soup back to the boil Ladle hod soup into hot jars, leaving 1/2 inch headspace. Secure lids and process in a pressure canner at 10 pounds pressure. 60 minutes for pints and 75 minutes for quarts. 
  4. Before serving and pressure canned food, make sure to boil it at least 10 minutes before you try to eat it.
    Optional: If you're not a fan of thick soups, thin this out with 1/2 cup of milk per pint when you go to serve. 
Good times!

Saturday, January 10, 2015

Ham & Bean Soup

     I think I may no longer be completely terrified of pressure canning. I've done it a half-dozen or so times and haven't caused any notable damage. I haven't poisoned anybody yet, which is a real surprise. It's a good thing I'm comfortable with it, because it was a great way to use up some of the HUGE surplus of ham from the holidays. For not having many ingredients, this soup was surprisingly tasty. I have no regrets canning a gallon of it. You can serve this up right after it's done, or pressure can it for long term storage. Just be careful if you do. As always, notes and changes are in blue.

Ham and Bean Soup
via Better Homes and Gardens Home Canning Cook Book
Ingredients
  • 2 pounds dry navy beans (about 4 cups)
  • 1 meaty ham bone
  • 1 cup chopped ham
  • 1 cup chopped onion
  • 12 whole black peppercorns
  • 2 bay leaves
Directions
  1. Rinse beans. Add to 4 quarts water. Bring to a boil; reduce heat to simmer. Simmer for 2 minutes. Remove from heat and cover for one hour. 
  2. Add ham bone, ham, onion and one teaspoon salt (we omitted the salt because the ham we used was plenty salty on its own). Tie peppercorns and bay leaf in cheesecloth and add to mixture (or do like we did and load it into a tea ball and hang it in off the edge of the pot)
    Sometimes I'm so clever it hurts.
  3. Simmer, covered for 1 hour.
  4. After 1 hour, remove spice bag/ball and ham bone. Cut off meat and dice. Use about 1-1/2 cups meat. (Use more if you want. We didn't because the ham was so salty and it would have thrown off the flavor of the soup).
  5. If you plan on serving the soup, you're done. If you want the soup a bit thinner, cut it with about 1 cup of water per quart of soup. From here on out these steps are for pressure canning the soup. 
  6. Keep soup hot. Pack hot soup into hot jars, leaving 1 inch of headspace. Adjust lids. Process in a pressure canner at 10 pounds pressure. Process pints for 75 minutes, quarts for 90 minutes. This recipe will yield 4 quarts, but is easily halved. 
  7. Before serving from a processed can: add 1-1/2 cups water to each quart of soup. Boil, uncovered at least 10 minutes before tasting or serving. As always, it's a good idea to consult the fine folks at the National Center for Home Food Preservation for detailed information on pressure canning. Check the site especially if you've never pressure canned before. Not only can you accidentally poison everyone if you screw up, you can also burn the shit out of yourself or explode your kitchen. Remember, we're trained professionals working in a controlled environment. 

Thursday, September 11, 2014

Kosher Dill Pickles

     First off, let me make it clear that these pickles are not truly Kosher. Our house would never pass a Kosher certification. The six pound pork shoulder in the freezer pretty much locks that one up. We don't even grow the veggies right. According to Leviticus 19:19 and Deuteronomy 22:19, we screwed up since we grew our cucumbers in a field with a bunch of other seeds. So, semantics (or Semetics "I'll be here all week! Try the veal and tip your servers! Don't forget the 9:30 show is nothing like the 6:30 show; you can't bring your kids to the 9:30 show!") aside, these are just some tasty pickles to nosh on as you see fit. Eat them from the jar, use them in a potato salad, or slap them on a hot dog (WITHOUT KETCHUP. Please, I'm begging you, don't put ketchup on a hot dog). As always, notes and changes are in blue. 

Kosher Dill Pickles
via Better Homes and Gardens Home Canning Cook Book
Ingredients

  • 2-1/4 pounds 4-inch cucumbers (we just used whatever cucumbers we had on hand. No clue as to type. If they weren't 4 inches, we just cut them down to make sure they'd fit in a pint jar)
  • Fresh dill heads (LOL WUT? No clue as to what they're asking for. I, for one, refuse to decapitate an innocent dill. We used a teaspoon of dill weed in each pint jar)
  • Garlic cloves
  • Hot red peppers (we used whole dehydrated cayenne)
  • Pickling salt
  • 4 cups cider vinegar
Directions
  1. Wash cucumbers. Pack them in hot quart jars, leaving 1/2-inch headspace (we derail almost immediately. One, we used pint jars. Two, we used full sized cucumbers, so we cut ours into spears, then shortened them as needed to get them in pint jars. We did, however, wash them. I think.)
  2. To each quart, add 2 heads fresh dill, 1 clove garlic, 1 hot pepper and 1 tablespoon pickling salt
    (if you're doing it our way, you'll be adding to each pint, 1 teaspoon dill weed, 1 clove garlic, 1 dried cayenne and 1-1/2 teaspoons pickling salt)
  3. In a medium saucepan, combine vinegar and 3 quarts of water. Bring to a boil.
  4. Pour boiling liquid over cucumbers, leaving 1/2 inch headspace. Adjust lids.
  5. Process in boiling water bath (20 minutes for quarts, 15 for pints)
  6. Yields will depend on how committed you are to violently jamming cucumbers into the jars.
  7. As always, if you're not familiar with canning, go to the National Center for Home Food Preservation to avoid poisoning anyone.
Good times!

Sunday, September 7, 2014

Peach Bourbon Applesauce

     There's really not a whole lot to making applesauce. It's pretty much just apples and sugar. It's not really missing anything. Except booze. Everything is better with booze. I took a basic recipe from The Better Homes and Gardens Home Canning Cook Book and added a fantastic peach liquor. The booze cooks out but leaves behind a subtle peach flavor in the applesauce that is just wonderful. If you want the original recipe, just leave out the booze. Canned, this will hold for around a year on the shelf. We like to make a gallon at a time and just put it aside in quart jars. It's nice to get a taste of summer in the middle of winter. As always, notes are in blue.

Peach Bourbon Applesauce
adapted from Better Homes and Gardens Home Canning Cook Book 
Ingredients

  • 6-7 pounds apples (use whatever type you like. We just stole ours from our neighbor's apple trees)
  • 2 cups white sugar
  • 1/2 cup Benchmark Peach Whiskey
Directions
  1. Wash, quarter and core apples. Combine apples, 4 cups of water and color keeper. Bring to a boil; reduce to simmer for about 15 minutes or until apples are tender.
  2. Press apples through food mill (if you have a KitchenAid with a food mill attachment, this part is wonderfully easy. If you're using a manual food mill, this recipe qualifies as a Pain In The Ass)
  3. Put milled apples in a large pot with the sugar and booze. Cook over low heat until sugar dissolves. Bring to a boil, stirring to prevent scorching or sticking. Taste and add sugar or more booze as needed. 
  4. If you plan on eating a gallon of applesauce on the spot, you can skip this and the next step. Pack into hot jars, leaving 1/4-inch headspace. 
  5. Process for 10 minutes in a boiling water bath (as always, defer to the National Center for Home Food Preservation to make sure you are canning correctly)
Good times!

Tuesday, August 12, 2014

Cabbage Borsch

     As you may already know, we do a lot of canning in our house. We have a fairly abundant garden and are always looking for ways to preserve all those great foods until we really want to eat them. The freezer will only hold so much and there's only so many things that take well to dehydration. That leaves canning. We have exclusively done water bath canning largely due to the fact that I am a big baby and live in fear of leveling the kitchen in a pressure canning incident.

Terrifying.
     This summer, we finally gave in. We admitted that not everything should be pickled.


     We set up for pressure canning. Our first attempt was a cabbage soup out of a 41 year old cookbook. I figure if we made it safely through the initial danger of running the pressure canner, the worst that would happen is botulism when we ate the soup. It turned out that my fears were unfounded. At least the pressure canning fears. We still might get botulism when we eat the soup down the line. If you follow the instructions for your canner and in the link provided below, you might be able to keep insurance claims to a minimum. If you don't want to pressure can, simply stop after step 2, though you might want to cook the soup a bit longer. As always, notes and changes are in blue.

Cabbage Borsch
via Better Homes and Gardens Home Canning Cookbook
Ingredients
  • 5 pounds tomatoes
  • 8 cups coarsely shredded cabbage
  • 6 cups water
  • 2 cups chopped onion (The Wife just informed me we apparently forgot to add the onion. Whoops.)
  • 2 medium apples, peeled and cut into pieces (no specification was made as to type of apple. We used Red Delicious.)
  • 2 tablespoons beef bouillon granules (we used the cubes with a ratio of 2 for every 3 cups of water. Feel free to toy with the measures to get the salt fix you crave.)
  • 2 tablespoons sugar
  • 2 tablespoons lemon juice
  • 1 teaspoon salt
  • 1/8 teaspoon pepper
  • dried cayenne peppers (1 per pint jar)
Directions
  1. Wash, peel, remove stem end and cores and quarter tomatoes. Use a small spoon to scrape out excess seeds, if f desired (no, it was not desired. You already had us do everything other than declare allegiance to these damned tomatoes.)
  2. In a 4-6 quart kettle or Dutch oven, combine all ingredients (that includes the onions. Don't forget the onions like we did and live with the regret). Bring mixture to a boil. Boil, uncovered, for 5 minutes.
  3. Ladle soup into hot jars, leaving 1/2-inch headspace. Adjust lids. Process in pressure canner at 10 pounds. Process pints for 45 minutes, process quarts for 55 minutes. If you're a wuss like me, who is even afraid to open a tube of biscuit dough, you'll wisely spend this time outside behind the safety of a brick wall. IF YOU'RE GOING TO PRESSURE CAN, PLEASE VISIT THE NATIONAL CENTER FOR HOME FOOD PRESERVATION AND READ UP ON THE PROCESS. We don't want you inadvertently remodeling your kitchen or making a needless trip to the emergency room.
Soup's done!
Good times!

Thursday, September 5, 2013

Sparkling Basil Lemonade via BHG

     The Wife found a punch bowl and set of cups at a garage sale years ago and it has sat quietly in a cabinet since the day of purchase. On several occasions she has threatened to use it, but never had until now. We were having a party for our 10th wedding anniversary and she was determined to find a way to use the punch bowl. She searched around and found a recipe from Better Homes and Gardens. The original recipe called for jalapeno slices, but she figured that might be a little off-putting for our guests so she made an executive decision to replace them with lemon slices. It was the right decision. The basil and lemon made for a refreshing and delicious drink that benefited greatly from the addition of vodka! She did a double batch and we were only left with maybe a pint after the party. This recipe will definitely be made again. As always, any changes and notes are in blue.
Sparkling Basil Lemonade
via Better Homes and Gardens
Ingredients
  • 4 cups water
  • 3 cups sugar
  • 2 cups fresh basil leaves (about 1-1/2 ounces) (we used a combo of lemon basil and regular basil)
  • 2 1 liter bottlesclub soda, chilled
  • 2 cups lemon juice (we used bottled lemon juice)
  • Ice cubes
  • 1 fresh jalapeno chile pepper, sliced* (omitted, replaced with thin lemon slices)
  • Fresh basil leaves
  • Vodka
Directions
  1. For basil syrup, in a large saucepan combine water, sugar, and basil. Bring to boiling over medium-high heat. Reduce heat. Simmer, uncovered, for 20 minutes. Strain syrup and discard leaves. Cover and chill syrup for 2 to 24 hours (totally forgot how long the syrup needed to chill. It got thrown in the freezer for about an hour)
  2. For lemonade, in a very large punch bowl combine chilled syrup, club soda, and lemon juice. Serve over ice and garnish with jalapeno slices (lemon slices in our case) and fresh basil leaves.
Good times!

Friday, June 7, 2013

Ham and Cheddar Scones (via BHG)

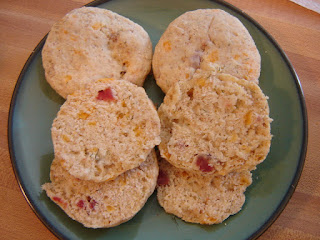
     I was minding my own business while the wife was paging through some old issues of Better Homes and Gardens. It's normally a source of great amusement to see the horrifying things people do to their homes in the name of decoration. These are not middle-class decorators. We generally just laugh at these people's homes and then look at the recipes. It was this particular recipe for scones from a two year old issue that caused the wife to ask me to make them. She loves baked goods. Fortunately, I had some ham in the fridge that needed to be used right away. The scones turned out great. I think with a bit of butter, or some cream cheese and a chutney, they'd be even better. Word of warning, keep working the dough. It's not going to want to stick together. Resist adding anything.

Ham and Cheddar Scones
(via Better Homes and Gardens)

Ingredients
  • 1 3/4 cups flour
  • 1/4 cup whole wheat flour
  • 2 teaspoons baking powder
  • 1 teaspoon sugar
  • 1/2 teaspoon baking soda
  • 1/4 teaspoon salt
  • 1/2 cup butter
  • 1/2 cup shredded sharp cheddar cheese (2 oz.)
  • 1/4 cup diced cooked ham
  • 1 tablespoon chopped fresh dill or 1 tsp. dried dillweed
  • 3/4 cup fat free sour cream
  • 1egg, lightly beaten
  • 1 tablespoon Dijon-style mustard
Directions
  1. Preheat oven to 375F. Line a baking sheet with parchment (if you've got that parchment on one side and foil on the other kind of paper, you want the parchment side up. You probably already know that, but I'm going to forget and I'm putting this note here to remind myself); set aside. 
  2. In a large bowl combine flour, whole wheat flour, baking powder, sugar, baking soda, and salt. Using a pastry blender or two knives, cut in butter until mixture resembles coarse crumbs (I absolutely need to get one of those pastry cutters for this sort of thing. It's a colossal pain in the ass to do this step with two knives). Stir in cheese, ham, and dill. Combine sour cream, egg, and mustard; add all at once to flour mixture. Using a fork, stir just until mixture is moistened, Do not overwork (I assure you, this is not a directive that needs to be given to me).
  3. Turn dough out onto a lightly floured surface. Knead dough by folding and gently pressing it for four to six strokes or just until dough holds together (this is why I hate making scones. The dough will fight you every step of the way. It magically will be horrifyingly sticky, but not want to come together into a cohesive dough. I had to knead it way more than the recipe directed. They must employ some sort of dough wizardry over there to get it to hold in a half dozen kneads)
  4. Pat or lightly roll dough until 3/4 inch thick. Cut dough with a floured 2-1/2- to 3-inch biscuit cutter (biscuit cutter? Ain't nobody got time for that. I used the ring from one of my pint canning jars. That's about 2-3/4 inches). Reroll scraps as necessary, dipping cutter into flour between cuts (they are not kidding when they tell you to do this. Keep everything floured. Flour the cutter, flour the counter. Hell, you  probably should go ahead and flour the walls just in case)Place dough circles 1 inch apart on prepared baking sheet. 
  5.  Bake for 18 to 20 minutes or until golden (My batch took 20). Cool slightly on a wire rack. Serve warm. If desired, sprinkle with fresh dill. Makes 10 to 12 scones (if you are crafty, resourceful, and handsome like me, you used the canning ring. That means you'll probably end up with 16 scones).
Good times!

Wednesday, May 1, 2013

High Class Food Blogging

     I have made it a point to visit lots of different food blogs and pages. I like to find new recipes and tips and also to see what other people are doing to find success. I have noted that many of these blogs and pages have a level of polish and professionalism that mine does not possess. There is a great deal of thought that goes into the page design. The pictures of their food looks as if it belongs in a magazine. Everything is plated meticulously. Everything is Just So. I ask myself why mine does not look like that. On reflection, the answer is fairly obvious.
Besides that.
     I cook the way I live. I'm not out to impress anybody with what I do. If my ramblings and working in the kitchen impress or inspire, super. I'm not going to doll it up though. I make messes. I have huge disasters and meltdowns in the kitchen. However, I'm having fun. That's what I want people to see.

Maybe not this much fun, though.
     I don't play around with my pictures. I'm not going to tidy the plate every time. I'm not setting up a shot where I have a color coordinated table that looks like it's straight out of Better Homes and Gardens. I'm not going to use fancy fonts. I'm not going to use fancy web design. Why? I'm lazy. What you see in the pictures is exactly what I was about to eat, and probably right where I'm going to eat it.

     Don't get me wrong. I'm not bashing on these other sites. I love that sort of stuff. I am an avid follower of dozens of them. They are a great source of information and inspiration. Their presentation is truly amazing. It's probably why they have such large followings. You don't have to be an artist to appreciate art.  It's humbling to put my stuff up against theirs. After sifting through the good looking sites, I'm always amazed when my prattling and quick photographs attract followers.
Mr. Norris approves.
     All I hope is that the people who are following are enjoying themselves. You see me sign off with the same tag line after every blog post. You know why I do this. It's certainly not for the fame and fortune. It's for one thing.

Good times!