Wednesday, April 30, 2014

Pumpkin Pie Pudding

     I'm sure if you checked your cabinets right now, you would find a can of pumpkin lurking about. Go ahead and check. I'll wait.

     You found one, didn't you? If not, you just didn't look hard enough. I assure you, it's in there. The point of this exercise is to find that can and be rid of it in the simplest way possible that doesn't involve just throwing it in the trash. With a couple more ingredients, you can chuck it all in the slow cooker and have pumpkin pie pudding! All right, it's not really that exciting, but it does taste exactly like the filling of a pumpkin pie. This shouldn't be a shocker because if you check the ingredients, that's basically what you have thrown in the slow cooker. Stop complaining and cover it with whipped cream. As always, any notes or changes are in blue.


Pumpkin Pie Pudding
via Fix It and Forget It Lightly
Ingredients

  • 15-ounce can pumpkin
  • 12-ounce can evaporated skim milk (just used regular evaporated milk. I can't stand skim)
  • 3/4 cup Splenda (calories or tumors...hmm. I went with 3/4 cup granulated sugar instead)
  • 1/2 cup low-fat buttermilk baking mix (didn't have the low-fat variety. Just used regular buttermilk mix)
  • 2 eggs, beaten or 6 egg whites (I don't feel like storing a half dozen egg yolks and I'm certainly just not going to shitcan them. I went with the 2 egg option)
  • 2 teaspoons pumpkin pie spice
  • 1 teaspoon lemon zest (I was feeling lazy and didn't want to zest a lemon that I actually had on hand. I used dried lemon peel from a jar instead)
Directions
  1. Spray slow-cooker with non-stick cooking spray (this inside)
  2. Combine all ingredients in slow cooker. Stir until lumps disappear.
  3. Cover. Cook on LOW 3 hours.
  4. Serve warm or cold.
Good times!

Sunday, April 27, 2014

Lemon-Chile Seafood Delight

     Some days I really want something light, but full of flavor. I also want it quickly and with minimal effort. This recipe is the culmination of those desires. It came together in about a half an hour. Aside from the rice I served it on, this dish is phenomenally low on calories. The lemon and sriracha gave this dish a nice kick. The Wife certainly enjoyed it, so I'll call it a winner. When naming it, I decided to go with one of those goofy sounding names you find in Chinese restaurants. I thought "Monkeys Chasing the Heaven's Gate on Fire" was good, but it sounded too much like something you'd buy at a fireworks stand. Anyway, give it a try if you want. Hopefully you will like it as much as we did. As always, notes are in blue.

Lemon-Chile Seafood Delight
Ingredients

  • 12 ounces shrimp, tails removed (I used frozen shrimp, since fresh is prohibitively expensive right now. If you use fresh, make sure to cook them until they are pink. Also, save the tails to use later to make shrimp stock!)
  • 1 pound imitation crab meat ("Crabuluxe," as we call it. Feel free to use real crab meat if you want. Make sure to have the butler get the Ferrari waxed while he's out picking it up.)
  • 2 tablespoons vegetable oil
  • 1 pound fresh broccoli 
  • 1 can (14 ounce) stir-fry vegetables, drained
  • 3 cloves garlic, finely chopped
  • 1" piece of fresh ginger, peeled and grated
  • 1 tablespoon Sriracha (we used our own home-made Sriracha)
  • 1 teaspoon fish sauce (use Worcestershire sauce if you don't have fish sauce. Use soy sauce if you don't have either of those. If you have none, just stop and go out for a pizza.)
  • Slurry of 2 tablespoons corn starch mixed with 2 tablespoons cold water
Directions
  1. Steam broccoli until it starts to get tender. You still want a little snap on it. 
  2. Heat oil in a large pan to medium-high heat. Add garlic and ginger, stir for a minute or two or until garlic begins to turn golden. 
  3. Add the stir-fry veggies and sriracha. Stir and let cook for another 3-4 minutes.
  4. Add the lemon juice, fish sauce and seafood. Stir to mix and let cook for 2-3 more minutes (longer if you are using fresh seafood)
  5. Add broccoli and slurry. Remove from heat and stir until sauce thickens. Serve over rice. Thank me at your convenience. 
Good times!

Thursday, April 24, 2014

Vegetable Frittata

     Frittatas are just wonderful. There's so much you can do with them. You can pretty much dump anything in a frittata and it will be good. You could probably load one with Cap'n Crunch and have a winner on your hands. Actually, that doesn't sound bad. I may have to give that one a spin. This particular frittata is loaded with veggies and is much healthier, coming in at only 150 calories per serving. Consider that for a second. You could eat the entire damned pan and be out for only 900 calories. That's value! Fair warning, the veggies will build up some water, so you'll need to drain this a bit before serving. As always, any notes or changes are in blue.


Vegetable Frittata
via Betty Crocker: The 300 Calorie Cookbook
Ingredients

  • 2 tablespoons butter or margarine
  • 1 medium onion (1/2 cup) chopped
  • 1 clove garlic, finely chopped
  • 1 medium bell pepper (1 cup), chopped
  • 2 small zucchini (2 cups), chopped
  • 1 small tomato (1/2 cup), chopped
  • 1/4 teaspoon salt
  • 1/4 teaspoon pepper
  • 6 eggs or 1-1/2 cups fat-free egg product (wow, when they make it sound so appetizing, how can I go with anything else than actual eggs. Maybe I can go find some artificial imitation ersatz margarine substitute, too!)
  • 1/4 cup grated Parmesan cheese
Directions
  1. Heat oven to 350F (180C, Gasmark 4)
  2. In a 10-inch ovenproof skillet (cast-iron is perfect here), melt butter over medium high heat. Add onion and garlic; cook 3 minutes, stirring frequently. 
  3. Stir in bell pepper, reduce heat to medium. Cook about 2 minutes, stirring occasionally, until crisp-tender (for whatever reason, the term "crisp-tender" just pisses me off to no end. I think maybe it smacks of pretentiousness. It could just be that I'm hateful. Anything's possible)
  4. Stir in zucchini, tomato, salt and pepper. Cook 4 minutes, stirring occasionally.
  5. In a small bowl, beat eggs with wire whisk or fork (or chopsticks if you feel like showing off) until blended; pour over vegetable mixture.
  6. Bake uncovered 10 to 12 minutes or until center is set. Sprinkle with cheese. Cut into wedges. (Or just stand at the stove and grimly shovel forkful after forkful into your mouth straight from the skillet. I'm not here to judge). 
Good times!

Tuesday, April 22, 2014

Peanut Butter & Jelly Muffins

     Who doesn't love peanut butter and jelly? I suppose people with severe peanut allergies, so if you're one of those people, you might as well move along. I had been considering this recipe for some time, but kept putting it off because I never had the jelly component on hand. Naturally, I bought grape jelly when the title of the recipe called for "strawberry spreadable fruit," which is clearly not the same thing. Turns out I also didn't have crunchy peanut butter, but I feel that's for the best. I think that would have added an odd texture. In the end, I went ahead with the jelly, and as you can see, it leaked a bit and made strange colored crevasses in the muffins. Despite the odd looks, the muffins are damned tasty. I'm calling them a win and will make them again. As always, any notes or changes are in blue.

Peanut Butter & Jelly Muffins
via Taste of Home Everyday Light Meals
Ingredients
  • 2 cups all-purpose flour
  • 2 teaspoons baking powder
  • 3/4 teaspoon baking soda
  • 1/4 teaspoon salt
  • 2 eggs
  • 3/4 cup apple juice concentrate (none on hand. I used apple juice from concentrate, which I feel is certainly close enough)
  • 1/2 cup reduced fat chunky peanut butter (I only had smooth on hand, so I went with that)
  • 1/4 cup fat-free milk (I used 2%, same as always)
  • 3 tablespoons butter, melted
  • 1/3 cup 100% strawberry spreadable fruit (grape jelly is almost exactly the same thing, so I used grape jelly. Plus, the recipe specifically says jelly, not spreadable fruit)
Directions
  1. In a large bowl, combine the flour, baking powder, baking soda and salt. Combine the eggs, apple juice concentrate, peanut butter, milk and butter; stir into dry ingredients just until moistened (it's going to take a bit of work to get the peanut butter to completely incorporate into the batter. I had to run mine in the Kitchenaid until everything was evenly distributed)
  2. Coat 12 muffin cups with nonstick cooking spray. Spoon half of the batter into cups (somebody at Taste of Home needs to work on their sentence structure. This makes is sound like I should fill all the cups, using half the batter. What they mean is "fill each muffin cup halfway with batter. You're welcome. I consider it my civic responsibility to prevent people from making schmucks of themselves). Spoon about 1-1/4 teaspoons spreadable fruit into the center of each muffin (if you use grape jelly it will be about 1 teaspoon per muffin. Go figure that one out); top with remaining batter.
  3. Bake at 350F (180C, Gasmark 4) for 15-20 minutes or until a toothpick comes out clean (these took 20 minutes, and if you manage to poke the toothpick through the jelly/fruit spread, there's no chance it will come out clean. Aim for the actual muffin part. Also, if you use grape jelly, it's going to leak out a bit and may give your muffins some exciting coloration). Cool for 5 minutes before removing to a wire rack to cool completely. 
Good times!


Saturday, April 19, 2014

Chicken Bacon Pockets

     Every now and then I find a recipe that you can't possibly dislike. Well, I suppose you could, but it probably means you're deficient in some way. This particular recipe combines all sorts of good stuff. It's got chicken, bacon and canned dough. What's not to love? For me, it was the possibility of being bland. The judicious application of barbecue sauce and some green onion fixed that. I'm calling this recipe a winner. This is a super weeknight quick meal. If you make it using crescent rolls, you'll get four. If you use biscuit dough, you should get five, but they'll be a bit smaller. As always, notes and changes are in blue.


Chicken Bacon Pockets
via 101 Things To Do With Bacon
Ingredients

  • 4 ounces cream cheese, room temperature (as always, we used neufchatel, to keep the fat down)
  • 2 tablespoons milk
  • 2 cups cooked, chopped chicken
  • 8 strips bacon, cooked and crumbled (and don't you dare throw the grease away. Save it in a jar in the fridge for later. It's a key ingredients in Bootleg Cheddar Bay Biscuits)
  • 1/4 teaspoon pepper
  • 1/4 cup barbecue sauce (not in original recipe, we decided this would be a bit bland without some form of extra kick)
  • 2 tablespoons finely chopped green onions (also not in the original recipe)
  • 2 cans (8 ounces each) refrigerated crescent rolls (we used 1 can of 10 buttermilk biscuits)
  • 2 tablespoons butter or margarine, melted
  • 1 tablespoon sesame seeds (we used them, but omitting them will not notably change anything)
Directions
  1. Preheat oven to 350F (177C, Gasmark 4)
  2. In a bowl, mix the cream cheese and milk until smooth; add the chicken, bacon and pepper (and barbecue sauce, if using) and stir until combined.
  3. Unroll crescent rolls and separate dough into 8 rectangles, pressing along the diagonal to seal, creating 4 "pockets" (we took 2 biscuits at a time and rolled them together into a large disc. You'll get 5 of these discs)
  4. Equally divide filling and spoon onto the bottom half of each dough rectangle. Fold dough over the filling, pinch the edges to seal, and crimp the edges with a fork. (we loaded the center of each disc, then pulled the dough up around the filling. We then flipped the entire thing over, so the seam side was down. It looked kind of like a big dumpling)
  5. Brush each pocket with melted butter and sprinkle with sesame seeds.
  6. Transfer to a baking sheet and bake for 15 minutes or until golden brown. Makes 4 servings (5 if you use biscuits)
Good times!

Thursday, April 17, 2014

Slow Cooker Apple Butter BBQ Ribs

     Cooking bone-in meat in a slow cooker is always an exciting prospect. The end result more often than not looks terrifying, with meat and gristle and bone all in a heap in the bottom of the cooker. I'm also leery about using really nice spareribs for a slow cooker recipe. However, this recipe gave me the opportunity to use up some surplus apple butter and bbq sauce I canned last season. I bit the bullet and gave it a try. Despite the fact that I entirely missed a step, the ribs were quite tasty. The Wife really liked them because she didn't have to fight to get the meat off the bone. She would never be able to survive in the wild. I don't know that I'd make this a lot, but it was certainly good and I would consider making it again if the grill and smoker were not available outside. As always, any notes and changes are in blue.


Slow Cooker Apple Butter BBQ Ribs
via Super-Fast Slow Cooking
Ingredients
Directions
  1. Sprinkle ribs with salt and pepper (as mentioned, we used the Uncle Joe's)
  2. Place ribs on rimmed baking sheets. Bake at 350 (180F, Gasmark 4) for 30 minutes; drain. Slice the ribs into serving size pieces and place in the slow cooker. (holy shit. I didn't even see this step when I made these. I just chucked the frozen rib sections into the slow-cooker. I'm not even joking. If you don't believe me, watch the video below.)
  3. Add remaining ingredients. Cover and cook on low for 8 hours.

Bonus Video! 
Good times!

Tuesday, April 15, 2014

Sausage and Peppers Diavolo

    Fra Diavolo is one of my favorite ways to enjoy pasta. The simple combination of olive oil, garlic and red pepper is just fantastic. It's just the right combination of richness and heat. I figured that base could be used for any number of recipes. I'm pretty sure I've had chicken diavolo before. Maybe not. I'm not 100% sure. I might have hallucinated it. Regardless, I had a lot of bell peppers left over from the garden last season, so we decided to dig some out of the freezer and use them in this recipe. I figured combining sausage and peppers with pasta diavolo was a sure thing. I was right. This was delicious. If you don't like it, obviously you cooked it wrong or possibly have a damaged palate. I forgive you. This time. As always, any notes are in blue.


Sausage and Peppers Diavolo
Ingredients

  • 12 ounces Farfalle (that's what we cooking types call bow-tie pasta. Nothing impresses your dinner guests like pretentiousness) 
  • 1 pound Italian sausage, casings removed (the choice of sweet or hot sausage it up to you. Either will work here)
  • 1 yellow bell pepper, chopped
  • 1/2 red bell pepper, chopped
  • 1/2 red onion, chopped
  • 1/2 cup olive oil (use extra virgin if you happen to have a surplus of virgins in your house)
  • 4 cloves garlic, finely chopped
  • 1 teaspoon red pepper flakes (you can use less if you're a wuss)
  • 1/4 cup grated Parmesan cheese
  • 1/2 teaspoon dried basil 
  • grated Asiago cheese for garnish
Directions
  1. In a large, non-stick pan, brown Italian sausage and break into crumbles. On medium-high heat, this will take about 5-8 minutes. Make sure to drain off any excess oil. Add the garlic, onion and peppers about half way through.
  2. Cook pasta according to directions (the directions for the pasta, not the directions for anything else. Following instant pudding directions here would not be helpful)
  3. Drain pasta and return to pot. Add the sausage and pepper mix. Add the olive oil, red pepper, basil, and Parmesan. Toss to ensure everything is evenly coated.
  4. Throw a big helping on a plate and top with grated Asiago.
Good times!

Sunday, April 13, 2014

Vegetable Uber Quiche

     Ah, the much-maligned quiche.  Is it macho? It makes no difference to me. It uses a lot of eggs, and that's what really matters. I'm a big fan of anything that uses lots of eggs. The only thing that keeps me from making quiche with any regularity is the crust. That's why I love the idea of a crustless quiche. Granted, a crustless quiche is very much like a breakfast casserole. I guess that's another win. This particular quiche is loaded with all sorts of veggies. So many, that I have dubbed it an "Uber-Quiche." I'd like to think that all the veggies cancel out the eggs and cheese. As far as I'm concerned, eating this is like eating celery. With cheese. And a bunch of eggs. Whatever. It's delicious and I plan on making it again. Feel free to mess with the veggies used. If you're making it a point to do exactly what I say every time, you're accepting a fair amount of risk. As always, any notes are in blue.


Vegetable Uber-Quiche
Ingredients
  • 9 eggs
  • 1 cup milk
  • 1 heaping cup shredded cheddar-jack cheese
  • 1/2 pound butternut squash, peeled and cut into 1/2-inch cubes
  • 8 ounces button mushrooms, chopped
  • 1/2 medium red onion, chopped
  • 1 cup kale, spines removed
  • 1 lb potatoes, cut into 1/2-inch cubes
  • 1 yellow bell pepper, chopped
  • 1 tablespoon Greektown seasoning (available from The Spice House. If you don't have it available, it uses: salt, garlic powder, Tellicherry black pepper, onion powder, oregano and lemon peel)
Directions
  1. Preheat oven to 375F (190C, Gasmark 5)
  2. Spray a 9x13 inch baking dish with nonstick cooking spray.
  3. In a large bowl, mix all the vegetables to ensure an even distribution. Pour the vegetables into the baking dish and spread them in an even layer.
  4. In another bowl, whisk the eggs, milk and cheese (make sure to take the eggs out of the shells. That's very important). Pour mixture over vegetables in baking dish.
  5. Bake for 1 hour or until eggs are completely set.
Good times!

Sunday, April 6, 2014

Loaded Oatmeal Cookies

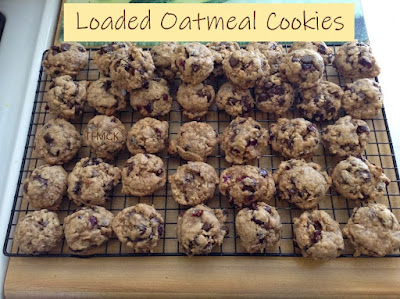
     Sometimes you find recipes in odd places. This particular recipe came by way of a book I found at a garage sale last fall. When I dropped fifty cents on Southern Recipes and Legends, I didn't expect to find any real gems. Mostly I thought the legends would be fun to read. Once you get past the shaky editing, you start to find some recipes that are genuine winners. A particularly good one was for Bonnie Doone Plantation Thanksgiving Cookies. That's a hell of a mouthful to say. The cookies are also a hell of a mouthful. They are packed with all sorts of goodies. There's chocolate, oats, cranberries, raisins, walnuts (if you want them). I wound up renaming them Loaded Oatmeal Cookies. They are super easy to make and the recipe yields over 3 dozen cookies. As always, any notes and changes are in blue.

Loaded Oatmeal Cookies
aka Bonnie Doone Plantation Thanksgiving Cookies
via Southern Recipes and Legends by Nancy Rhyne

Ingredients
  • 2 cups all-purpose flour
  • 3/4 cup granulated sugar
  • 3/4 cup brown sugar
  • 1 teaspoon baking powder
  • 1 teaspoon vanilla extract
  • 1 egg
  • 2-1/2 cups rolled oats
  • 1 cup raisins
  • 2 cups cranberries, pitted and mashed slightly (we substituted 1 cup of craisins)
  • 1 cup chocolate chips
  • 1 cup melted butter
  • 1 cup chopped walnuts (omitted)
Directions
  1. Preheat oven to 375F (190F, Gasmark 5)
  2. Combine all ingredients (I certainly hope you have a Kitchenaid or something similar, because this batter will be stiff. Mixing it by hand is going to be a chore). 
  3. Drop by teaspoon (I assure you, you don't want to do this. Go by tablespoons. You'll still end up with 40 or so cookies) onto a greased cookie sheet. 
  4. Bake for 10-12 minutes (this is pretty accurate. Do not go by the consistency of the tops of the cookies; they will be very soft right out of the oven. Lift one up and check the bottom. If it's golden brown, it's done. The cookie will set up once it cools off).
Good times!


Bootleg Cheddar Bay Biscuits

     Red Lobster is one of those restaurants I like despite the fact I should know better. You just can't say no to unlimited shrimp or crab legs. One of my fondest memories is going to Red Lobster with The Wife and watching her eat crab legs. She would just bend the legs until BANG! Crab meat on the table. Crab meat on the wall. Crab meat in her hair. Crab meat on my glasses.
It was similar to this, but with crab meat.
Truly, it was inspiring. Naturally, any trip to Red Lobster would be punctuated by cramming as many Cheddar Bay Biscuits into our bodies as was possible. Then we'd ask for a bunch extra and a to-go box. If we didn't leave with a dozen biscuits, we weren't trying hard enough. Eventually, I figured I should just figure out how to make them myself and save the trip and inevitable hammersmash of crab meat. I searched the interwebs and found a couple recipes (the main biscuit recipe and a Biscuit knockoff) that I combined and modified into what we feel is a damned close approximation of the Cheddar Bay Biscuit. Don't eat these right away. Give them about an hour for the butter to settle in. Then pop one in the microwave one for about 30 seconds and tell me it's not the real deal. As always, changes and notes are in blue.

Bootleg Cheddar Bay Biscuits
 Ingredients
  • 3 cups all-purpose flour
  • 1-1/2 tablespoons baking powder
  • 1/2 tablespoon salt
  • 1/2 cup solid bacon grease (every home-made Biscuit recipe I saw said to use shortening. I used bacon grease because I felt it would add a nice flavor. Also, it's all I had on hand. I'm not making a special trip for shortening) 
  • 3/4 cup milk
  • 4 tablespoons butter
  • 1 teaspoon garlic powder
  • 1 heaping cup grated cheddar cheese
For Brushing on Top
  • 2 tablespoons melted butter
  • 1/4 teaspoon dried parsley
  • 1/2 teaspoon garlic powder
  • pinch of salt
Directions
  1. Preheat oven to 400F (200C, Gasmark 6)
  2. Mix flour, baking powder and salt in large bowl (generally you are instructed to sift these items into the bowl, to which I say, "bite me.")
  3. Cut in bacon grease until mixture starts to make large crumbs.
  4. Add milk, cheese, 1 teaspoon garlic powder. Mix until combined (I used the Kitchenaid for a few seconds. Don't overdo the mixing, though)
  5. Drop 1/4 cup portions (I just used an ice cream scoop) of the dough onto an ungreased cookie sheet. Bake 15-17 minutes or until tops of the biscuits turn light brown.
  6. In a small bowl, mix the melted butter, parsley, 1/2 teaspoon garlic powder and salt.  When the biscuits come out of the oven, brush the butter mixture over the tops (use it all. To not use all this mixture would be a mortal sin).
Good times!

Tuesday, April 1, 2014

Double Banana Cake

     My first foray into layer cakes was for The Wife's birthday a couple years ago. I found the recipe in an issue of Bon Appetit and figured I'd give it a whirl. I would consider it a fair first effort. The thing looked pretty rough and weighed a damned ton. However, it tasted fantastic. There's just something about a layer cake that impresses me. I'd like to think that it all started with some guy saying, "I like cake so damned much, I'm going to just start stacking them on each other and frosting the whole thing. Pancreas be damned!" Fair warning, I consider all layer cakes to be PITAs, so be ready to put in some work. As always, notes and changes are in blue.

Double Banana Cake
via Bon Appetit
Ingredients

Cake
  • 1 1/2 cups (3 sticks) unsalted butter plus more for pans, room temperature (since I never have actual butter on hand, margarine was used)
  • 3 3/4 cups all-purpose flour
  • 1 1/2 teaspoons baking soda
  • 1 1/4 teaspoons kosher salt
  • 2 1/4 cups sugar
  • 6 large eggs
  • 3 cups coarsely mashed very ripe bananas (about 6 large)
  • 3/4 cup sour cream
Frosting
  • 1 cup (2 sticks) unsalted butter, room temperature (still using margarine)
  • 4 cups powdered sugar (good lord, I hope you have a strong pancreas)
  • 1/2 cup heavy cream
  • 1 teaspoon vanilla extract
  • 1/2 teaspoon kosher salt
  • 2 ripe but not mushy bananas, cut crosswise into 1/8-inch slices
Directions

Cake
  1. Preheat oven to 325°. Butter two 8"-diameter cake pans with sides 2" high. Line bottoms of pans with parchment paper rounds (I left my parchment square shaped. I didn't have a compass handy and didn't feel the difference in shape would alter the flavor). Whisk flour, baking soda, and salt in a large bowl. Using an electric mixer, beat 1 1/2 cups butter and sugar in another large bowl until light and fluffy, 2–3 minutes. Add eggs one at a time, beating to blend between additions. With mixer on low, gradually beat in flour mixture, scraping sides of bowl. Mix in bananas, then sour cream. Divide batter between pans.
  2. Bake cakes until a tester inserted into the center comes out clean, 50–55 minutes. Let cool for 20 minutes in pans on wire racks.
  3. Invert cakes onto wire racks; let cool completely. Remove parchment. Using a serrated knife, trim off rounded tops (Nope. I went ahead and stacked those sumbitches as is).
Frosting
  1. Using an electric mixer, beat first 5 ingredients in a large bowl until light and fluffy, 6–7 minutes.
  2. Place 1 cake on a plate. Spread 1 cup frosting over. Arrange banana slices on top. Top with second cake. Spread a thin layer of frosting over top and sides of cake; chill for 30 minutes. Spread remaining frosting over top and sides of cakes (Protip: Maybe wait a while for the cakes to cool off before putting on the frosting. I didn't, which explains why my cake looks like it has eczema).
Here's an alternate cake recipe if you prefer rhubarb
Good times!