Showing posts with label cilantro. Show all posts

Monday, August 30, 2021

Cucumber-Jalapeno Hot Sauce

 Holy shit did the garden throw a lot of cucumbers at us. There's only so many cucumber sandwiches, or tomato/cucumber/onion salad you can eat. I decided to use the vast surplus along with the bumper crop of jalapenos were also blessed with. The end result was a rock-solid hot sauce. It starts with an unmistakable cucumber flavor. Then the heat builds quickly but then levels off with a nice sweet finish. This would be great with fish or chicken. Or, as The Wife prefers, unceremoniously shoveled into her gob with Aldi Lime Nacho Chips. To each their own. This recipe will yield about 2-1/2 pints of sauce. 

Cucumber-Jalapeno Hot Sauce
aka Green Meanie

Ingredients

  • 2 decent sized cucumbers, peeled, seeded, and chopped
  • 12 jalapenos, chopped (I suppose if you're a HUGE BABY you could seed them to cut down on the heat, but then why are you even looking at a hot sauce recipe?)
  • 1 medium onion, chopped
  • 1/4 cup lime juice
  • 3/4 cup water
  • 2 cups white wine vinegar
  • 1 tablespoon dry cilantro
  • 1 teaspoon salt
  • 1 tablespoon garlic powder
  • 1 teaspoon amchoor (dried mango) powder
Directions
  1. In a medium pot, combine all ingredients. Bring to a boil. Reduce to a simmer for about 10 minutes.
  2. Pour mixture into a blender or use an immersion blender to blend until as smooth as possible.
  3. Feel free to strain the sauce if you want something closer to a liquid-only hot sauce, or leave it as-is for something closer to a thin salsa.
  4. If you plan on canning this sauce, we went with 5 half pint jars, 1/4" headspace, and 12 minutes in the boiling water bath. As always please go to the National Center for Home Food Preservation and brush up on canning so you don't accidentally kill anyone.
Good times!


Wednesday, January 6, 2016

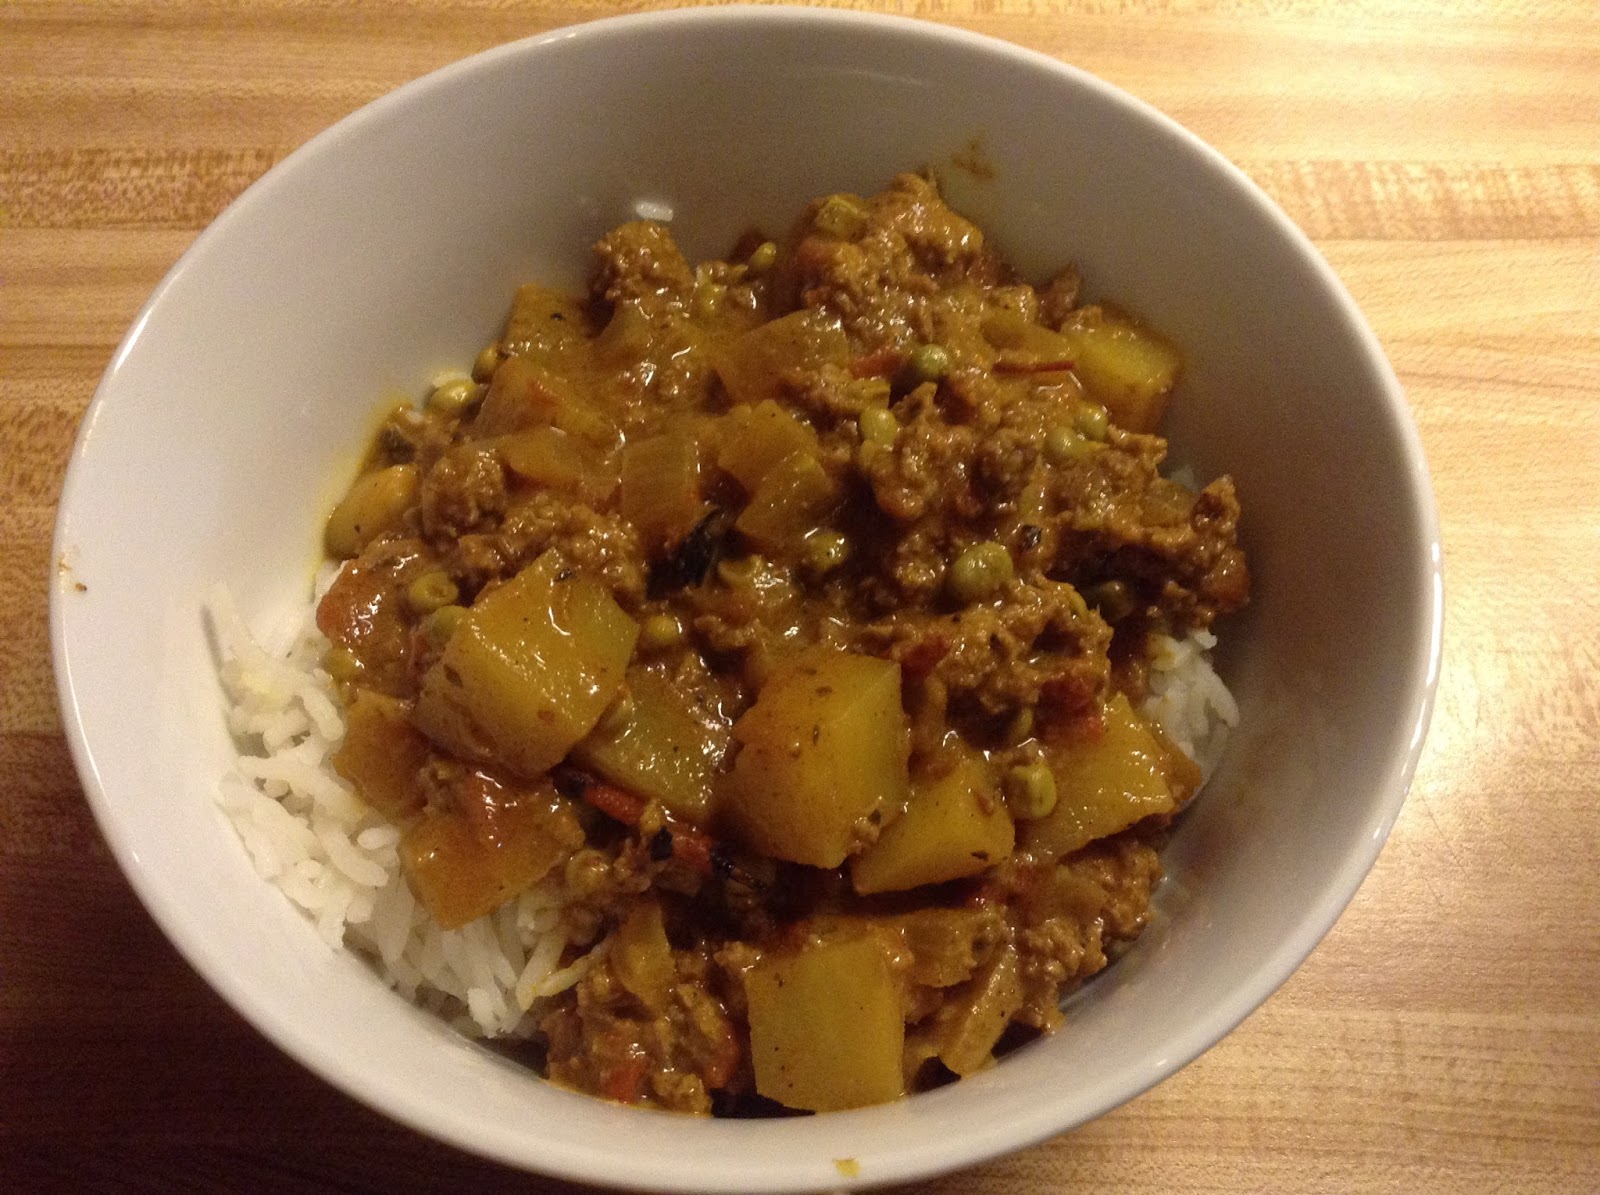
Indian Spiced Stew

     I have to give thanks to my Mother-In-Law (henceforth, MIL). When The Spud was born, she bought a house 20 minutes away and moved down here to provide day care while The Wife and I worked. Since she's in the area, we have her over for dinner regularly. This particular visit, she inexplicably brought a pound and a half of cooked ground turkey. I was considering Indian food for dinner and decided to go with that theme with the turkey. This turned out to be a really good stew. We had it over some basmati rice and it made for a good, filling winter meal. If you're not a fan of carbs over carbs, you can certainly serve it without rice. No matter what, serve it with naan so you can slop up the dregs! As always, notes are in blue.

Indian Spiced Stew
Ingredients

  • 1-1/2 pounds ground turkey (feel free to use ground beef or pork, you're not going to hurt my feelings. I used turkey because my mother-in-law (MIL) brought it for me to use up)
  • 2 medium potatoes, cut into 1/2" cubes
  • 1/2 large red onion, chopped
  • 3 cloves garlic, minced
  • 1" fresh ginger, grated finely
  • 1/2 cup frozen peas
  • 1 can (14.5 ounce) diced tomatoes, undrained (I used fire-roasted tomatoes.)
  • 1 teaspoon cumin seeds (if you don't have the seeds, just use the same amount of cumin powder)
  • 1 teaspoon ground coriander
  • 1/2 teaspoon turmeric
  • 1/2 teaspoon cayenne (add more if you want a bigger kick. I was cooking for The Wife and MIL and kept the heat down)
  • 2 teaspoons garam masala
  • 2 tablespoons freshly chopped cilantro (or 1 teaspoon dried)
  • 2 teaspoons curry powder
  • 1/2 cup plain yogurt
  • 1 cup water
  • 3 tablespoons olive oil
  • 1/4 cup red wine (if you don't want the booze, just use water here)
  • If you want more heat, chop up a hot green chili pepper or two 
Directions
  1. Brown meat. Drain any grease and set aside.
  2. In a deep pan (I used a 3 quart cast-iron deep pan. A Dutch oven would work well here too). heat oil. Add garlic, ginger, onions,peas and potatoes. Sautee for around 10 minutes. 
  3. Add in reserved meat and everything else except for the yogurt. Mix it up and set to simmer. 
  4. Simmer, covered, for about 20-25 minutes or until potatoes are tender. 
  5. Add yogurt and cook for another 5 minutes.
Good times!

Wednesday, June 18, 2014

Black Bean and Rice Enchiladas

     Call me a purist, but I like my enchiladas filled with meat. When I see fillings like beans and rice I tend to wonder why somebody would put the side dishes inside my main course. However, The Wife wanted to try this recipe and if The Wife ain't happy, nobody's happy. After making these, I will grudgingly admit they are pretty good. Granted, they would be much better if there was shredded chicken or ground beef in there. Next time I may add that along with the regular filling. We made a few notable changes and it resulted in a pretty spicy enchilada. These even served as a breakfast with some scrambled eggs and hot sauce. All in all, we'll call this one a winner and likely add it into the rotation. As always, notes and changes are in blue.

Black Bean and Rice Enchiladas
via Taste of Home Everyday Light Meals

Ingredients
  • 1 green pepper, chopped (we used a yellow bell pepper)
  • 1 medium onion, chopped
  • 3 garlic cloves, minced
  • 1 tablespoon olive oil
  • 1 15-ounce can black beans, rinsed and drained
  • 1 14.5-ounce can diced tomatoes with green chiles (didn't have this. We used a can of fire roasted tomatoes and added a couple teaspoons of chopped pickled jalapenos)
  • 1/4 cup picante sauce (I never have picante in the house. I doctored up a sauce from a leftover can of chipotle peppers in adobo)
  • 1 tablespoon chili powder
  • 1 teaspoon ground cumin
  • 1/4 teaspoon crushed red pepper flakes
  • 2 cups cooked brown rice
  • 8 flour tortillas (8-10 inch size), warmed
  • 1 cup salsa
  • 1 cup shredded cheddar cheeze
  • 3 tablespoons chopped fresh cilantro
Directions
  1. In a large, nonstick skillet, saute pepper, onion and garlic in oil until tender. Add the beans, tomatoes, picante, chili powder, cumin and red pepper flakes; bring to a boil. Reduce heat; simmer uncovered until heated through and mixture thickens. Add rice; cook 5 minutes longer or until heated through.
  2. Coat a baking dish with nonstick cooking spray.
  3. Spoon a rounded 1/2 cup of the filling down the center of each tortilla. Fold sides over fill and roll up (sides? How does a circle have sides? Maybe the top and the bottom side, but I don't think that's what they mean. Possibly the edge? Fold the edges over? That sounds right. I'm guessing they must have failed geometry) Place the rolled-up tortillas in the baking dish. Spoon salsa over each tortilla. Cover with foil and bake at 350F (180C, Gasmark4) for 25 minutes.
    Here's The Wife hard at work assembling the enchiladas.
    Her tiny little hands are perfect for this sort of precision work.
  4. Uncover and sprinkle with cheese and cilantro. Bake 1-2 minutes longer or until cheese is melted.
Good times!

Saturday, June 7, 2014

All-Purpose Curry Sauce

     Let me preface this recipe by stating that it is not truly "all-purpose." While it would go great on eggs, I'd probably think twice before putting it on your ice cream. I do admit to dipping a pancake in this sauce and it was not bad in a French-fries-in-a-McDonald's-chocolate-shake sort of way. The sauce was pulled from a recipe for fish in a curry sauce. I wasn't really keen on the idea of curried fish at the time, so I wound up using this to cover some chicken tenders. This is a really tasty sauce. I used a sweet curry, so the more delicate eaters should have no complaint. If you want heat, use hot curry powder or throw in some cayenne. All I want is for you to be happy. Is that so much to ask? As always, notes are in blue.


All-Purpose Curry Sauce
via Madhur Jafrey's Quick & Easy Indian Cooking
Ingredients

  • 2-1/4 cups milk
  • 4 tablespoons butter (as usual, we went with margarine)
  • 1/4 cup good curry powder (our good curry powder was a sweet curry powder from The Spice House)
  • 2 tablespoons all-purpose flour
  • 3 tablespoons finely chopped fresh cilantro (our garden is chugging right along, so we actually had fresh on hand!)
  • 2-3 teaspoons fresh lemon juice (no fresh on hand, I used the lemons to make limoncello. I had to use bottled)

Directions

  1. Melt butter in a small saucepan over medium heat. Add curry powder, stir for a minute to incorporate. Add flour, stir for 2 more minutes (fundamentally, you're making a roux here. Don't let it get too hot or it will burn and then you're screwed and have to start over).
  2. Using a whisk, beat in the milk. Bring the heat to medium-high. Bring to a boil, whisking constantly. When the mixture hits the boil, add the cilantro and lemon juice. Lower the heat so the mixture comes off the boil. Stir for a couple more minutes and then remove from the heat. The sauce should be creamy.
Good times!

Wednesday, March 26, 2014

Smothered Beef (or Pork, or Lamb if you're a Rockefeller)

     "Smothered" foods always struck me as unfortunately named. "Smothered beef" conjures images of someone in a field holding a pillow over a cow's face. This particular smothered dish comes by way of Madhur Jaffrey. This is just packed with all sorts of wonderful flavors and made for a tremendous meal when served over some basmati rice. If you haven't given Indian food a try, I can't recommend it enough. As always, any notes or changes are in blue.

Smothered Beef 
labdhara gosht
via Madhur Jaffrey's Quick and Easy Indian Cooking
Ingredients
  • 1 pound boned shoulder of lamb (AHAHAHAHAHA! I'll have the butler get that out of the fridge as soon as he's done wiping my ass with hundred dollar bills. I used stewing beef. Pork will work, too) cut into 1 inch cubes
  • 1 small onion, peeled and finely chopped
  • 1 inch piece fresh ginger, peeled and finely chopped (we just grated it to save time)
  • 1 medium sized tomato, peeled and finely chopped (can't be bothered peeling. We just chopped it)
  • 1/2 cup finely chopped cilantro
  • 1-2 fresh, hot green chiles, cut into fine rings (leave the seeds in there, you big baby)
  • 1/4 teaspoon ground turmeric
  • 2 teaspoons garam masala
  • 1 teaspoon ground cumin
  • 1/4 cup plain yogurt
  • 1 tablespoon tomato paste
  • 3/4 teaspoon salt, or to taste
  • 3 tablespoons vegetable oil
  • 4 cloves garlic, peeled and finely chopped
  • 1/2 cup water
  • Freshly ground black pepper
Directions
  1. Put all the ingredients except the oil, garlic and black pepper in a bowl and mix well (I love recipes that are basically "throw all the shit together and apply heat.")
  2. Put the oil in a Dutch oven and set over medium high heat. When the oil is hot, add the garlic and stir until the pieces turn medium brown.
  3. Throw in the meat mixture and stir a couple times. Add the 1/2 cup water. Bring to a simmer and cover. Cook for about 90 minutes, or until the meat is tender. 
  4. Uncover and turn heat to high until sauce is thick. Sprinkle in black pepper to taste.
Good times!

Sunday, January 26, 2014

Chicken Makhani

     The first Indian meal my wife ever had was Chicken Makhani. I took her out to an Indian restaurant. She was a little leery, thinking everything would be spicy and overwhelming. She tried the makhani and it began her love affair with Indian food. I've been cooking Indian around once a week now. One of The Wife's demands is that I replicate the restaurant's makhani. This recipe comes very close. We had to do some tinkering. The restaurant used yogurt, so we swapped it in here. We also kept it mild.  I was super pleased with the results here. The sauce was creamy and extremely flavorful. This is a good place to start if you have never had Indian food. There are quite a few notes and changes made in this recipe, so read carefully if the text is blue.

Chicken Makhani
via Madhur Jaffrey's Quick & Easy Indian Cooking
Ingredients

  • 1/4 teaspoon sugar
  • 1/2 teaspoon ground cumin
  • 1/2 teaspoon garam masala (I stopped making it myself and just started buying it by the jar. In the end, it costs almost the same and is way less of a hassle)
  • 3/4 teaspoon salt (as I watch my salt intake, I cut this back to 1/2 teaspoon)
  • 1/4-1/2 teaspoon cayenne pepper (we like the heat, so we went with the 1/2 teaspoon. I wouldn't ramp it up much more than that because you'll start drowning out the other flavors)
  • 1 tablespoon tomato paste (we used 2 tablespoons)
  • 3/4 cup heavy whipping cream (we subbed 3/4 cup plain yogurt)
  • 1 tablespoon fresh lemon juice (we used bottled)
  • 2 tablespoons chopped, fresh cilantro
  • 1 fresh, hot green chile, finely chopped, with seeds (since we were trying to duplicate a restaurant recipe, we omitted the hot chile. The makhani we had was mild)
  • 3 tablespoons vegetable oil
  • 1/2 teaspoon cumin seeds
  • 1/2 teaspoon black or yellow mustard seeds
  • 2 packages (10 ounces each) frozen peas (omitted)
  • 1-1/2 pounds boneless chicken
Directions
  1. Combine sugar, ground cumin, garam masala, salt, cayenne and tomato paste. Slowly add 2 tablespoons water, mixing as you go. Add the cream (or yogurt, if that's what you're using) slowly and mix. Put in the lemon juice, cilantro and green chile (if using). Mix again and set the cream sauce aside
  2. Put the oil in a large frying pan and set over medium-high heat. When the oil is hot, put in the cumin and mustard seeds. IF YOU WANT TO SKIP THE PEAS AND USE CHICKEN, SKIP STEP #3 AND GO TO STEP #4. 
  3. After a few seconds, the mustard seeds will begin to pop. When this happens, put in the peas. Stir and fry the peas for 30 seconds
  4. Add the chicken and stir and fry until cooked through.
  5. Add the cream sauce. Cook on high heat for about 1-1/2 to 2 minutes or until the sauce has thickened (if you used yogurt instead of cream, it's going to be plenty thick already. Just cook it until everything is heated through). Stir gently as you cook. 
Good times!

Tuesday, January 21, 2014

Too Damned Easy Ceviche

     I discovered ceviche at our favorite Mexican restaurant. As you know, I count all of my calories, so I was looking for something that wouldn't break the bank. I found their Ceviche Bowl. It was just vegetables and shrimp with some crackers on the side. I had it and was hooked. I figured there's not much to making it they way they do, so I'd try to make it at home. For the $12 they charged at the restaurant, I can buy enough ingredients to make four! I know that many versions of ceviche use fish that is cooking in the acids of the citrus, but I'm keeping it simple and just parroting what I got in the restaurant. As always, any notes are in blue. 

Too Damned Easy Ceviche
Ingredients

  • 12 ounces frozen shrimp, defrosted and tails removed (Don't throw the tails away! Boil them in some water and make yourself some shrimp stock to freeze for another day!)
  • 2 avocados, cut into into 3/4" cubes (if you did this without first pitting the avocado and scooping it from the shell, just put everything away and go order a pizza)
  • 1/2 large red onion, chopped
  • 2 medium roma tomatoes, chopped
  • 1 medium cucumber, peeled and diced
  • 1 tablespoon lime juice (the stuff from the little plastic lime is fine)
  • 2 tablespoons chopped fresh cilantro
  • 2 medium jalapenos, diced (if you're a wuss and can't handle the heat, throw the seeds away. If you are a stud like myself, leave them in)
  • 1 teaspoon salt (I actually had some pink Himalayan salt on hand and went with that)
Directions
  1. Put all ingredients except avocado and salt in a large bowl. Toss to incorporate ingredients (I will not be held responsible for overenthusiastic tossing)
  2. Add avocado and sprinkle salt. Lightly toss to incorporate (I held the avocado back because it tends to get mushed up if you toss it too much. Ideally you want the cubes of avocado to remain cube-shaped. This is one of the few times where I actually worry about presentation. To me, ceviche should taste and LOOK clean)
  3. Serve up in a small bowl or goblet with nacho chips (or as I've seen in several restaurants, with packs of Saltine crackers)
Good times!

Friday, January 3, 2014

Crab and Spinach Enchiladas


     After the holidays, I'm glad I have cookbooks like the Betty Crocker 300 Calorie Cookbook.  I'm not one for cleanses or detoxes. I just try to eat more sensibly and get back to my standard 1600 calorie a day intake. Recipes like these enchiladas are great because they are filling, but super-low in calories. Each of these enchiladas come in at around 300 calories. Have two of these and some black beans and a bit of rice and you've got a great meal in the 600 calorie range. As always, and notes or changes are in blue.

Crabmeat and Spinach Enchiladas
via Betty Crocker 300 Calorie Cookbook
Ingredients
  • 1 cup chunky-style salsa (if you can use home-made, you'll save yourself some unneeded preservatives and sodium)
  • 1/4 cup chili sauce (if you want to do a bit of fusion here, use Sriracha)
  • 1/2 teaspoon ground cumin
  • 1/4 cup chopped fresh cilantro (I used 1 tablespoon of dried. If you can't stand cilantro, you could always swap in parsley or basil)
  • 1 pound refrigerated chunk-style imitation crabmeat (as I call it, "Crabuluxe")
  • 2 cups frozen cut leaf spinach, thawed and squeezed to drain
  • 1 cup (4 ounces) shredded Pepper Jack cheese
  • 8 flour tortillas
  • 1 cup (4 ounces) shredded cheddar cheese
Directions
  1. Heat oven to 350F. Spray 13x9 inch glass baking dish with cooking spray (I can't imagine anything cataclysmic is going to happen if you don't use glass. However, if you use Corningware and subsequently die, please don't blame me)
  2. In a small bowl, mix salsa, chili sauce, cumin and cilantro.
  3. In a medium bowl, break up crabmeat and combine with spinach, Pepper Jack cheese and 1/4 cup of the sauce mixture. Spread about 1/2 cup of the sauce mixture over the bottom of the baking dish (because spreading the mixture under the baking dish would just be stupid).
  4. Top each tortilla with about 2/3 cup of the crabmeat mixture; roll up. Place tortillas, seam side down, in baking dish. Top with remaining sauce. Sprinkle with cheddar cheese.
  5. Spray sheet of foil with cooking spray. Cover dish with foil, sprayed side down (I'm going to tell you that if you need to be instructed to put the sprayed side down, maybe you should just order out instead) Bake 35-40 minutes or until thoroughly heated. 
Good times!

Wednesday, January 1, 2014

Slow Cooker Black Bean and Sausage Stew

     Black beans are great. They're versatile and super filling. I usually have three or four cans on hand at any given time. I also love smoked sausages. There's nothing like gaining six pounds in water after chowing down one of those sodium bombs.  When black beans and smoked sausages collide, good things happen.

Yup. Just like this, but with way more giggling.
     This particular recipe came out of the Slow-Cooker Magic in Minutes book. It's a fairly easy recipe, but does require moving some ingredients in and out of the cooker, which I absolutely hate. It's a small complaint, since this recipe is tasty and filling. It also benefits greatly from the addition of some hot sauce. Tabasco is great here. As always, any notes or changes are in blue.
Slow Cooker Black Bean and Sausage Stew
via Slow Cooker Magic in Minutes

Ingredients
  • 3 cans (15 ounces each) black beans, rinsed and drained
  • 1-1/2 cup chopped onions
  • 1-1/2 cup chicken broth
  • 1 cup sliced celery
  • 1 cup chopped red pepper (for whatever reason, I didn't have red pepper available when I made this and went with green pepper. It worked fine.)
  • 4 cloves garlic, minced
  • 1-1/2 teaspoons dried oregano
  • 3/4 teaspoon ground coriander (did you know that coriander is the seeds of cilantro? You do now! Never let it be said this isn't an educational blog)
  • 1/2 teaspoon ground cumin
  • 1/4 teaspoon ground red pepper
  • 6 ounces cooked turkey sausage, thinly sliced (I went ahead with the smoked pork sausage for that extra 62,000mg of sodium. Plus, I didn't slice it thinly. MADNESS. Also, feel free to use more sausage if you'd like. Probably not more than a pound, though)
Directions
  1. Combine all ingredients in slow cooker, except sausage. Cover and cook on LOW for 6-8 hours.
  2. Transfer about 1-1/2 cups bean mixture from slow cooker to blender or food processor, puree mixture (I have said it before and I'll say it again. I hate it when a slow cooker recipe has me taking stuff in and out of the cooker. I just want to throw it in and forget about it. This is time that could be spent drinking or smoking cigars)
  3. Return blended mixture to slow cook. Stir in sausage. Cover and cook on LOW an additional 10-15 minutes.
Good times!

Thursday, August 29, 2013

Molho Sauce via Hot Sauce!

     I'm so happy the wife got me the Hot Sauce! cookbook. I've been using it to go through the boatload of peppers that have been coming out of the garden. Normally, I'd just be packing them in vinegar and calling it a day. Now I can start putting them to much better use. This particular sauce is apparently regularly found in Brazilian and Portuguese kitchens. It is pretty versatile. Molho is a rich, thick sauce that can be added to foods or used as a topping. The heat is fairly mild when you first make it. The longer it sits, the more heat it gets. The heat is not up front like many sauces. It builds slowly through the oil. As always, notes or changes are in blue. 


Molho
via Hot Sauce!
Ingredients

  • 1/2 cup olive oil
  • 1 medium yellow onion, thinly sliced
  • 2 garlic cloves, minced
  • 1 medium ripe tomato, peeled, seeded and chopped
  • 2 tablespoons red wine vinegar
  • 3 fresh serrano chiles, chopped (no serrano on hand, we went with jalapeno. The heat and flavor profile are similar)
  • 1 teaspoon minced fresh cilantro
  • salt
Directions
  1. Heat the oil in a saucepan over medium heat. Add the onion, stirring until it softens. Add the garlic, stir for a minute, then reduce the heat to low and add the tomato and vinegar. Add the chiles, cilantro and salt to taste. Bring sauce to a boil, then remove from the heat.
  2. When cool, pour into a blender and puree (you can also use an immersion blender if you have one. If you don't have either, I'm not sure what you're going to do. Sorcery is not out of the question)
  3. Transfer to a bottle. If not consuming right away, store in the refrigerator. If storing for longer periods, store in a cool, dark place (I processed mine for 15 minutes per half pint in a boiling water bath. I'm not sure how it will hold for the long haul. There's not much vinegar in there to get the acid up. If I kill myself with food poisoning, I'll let you know right away. In the meantime, check out the National Center for Home Food Preservation for more information. Anything they say will certainly supersede anything I tell you here. When you're canning, better to be safe than vomiting uncontrollably in front of your horrified family)
Good times!

Saturday, July 27, 2013

Pique Sauce via Hot Sauce!

     We're still looking for fast and simple ways to use up the peppers that are starting to pile up. Naturally, I turned to Hot Sauce! for some inspiration. I found a base recipe for Pique, a Puerto Rican style hot sauce that couldn't be easier to put together. If you've eaten at Steak & Shake, you've no doubt seen that jar of peppers and vinegar on the table. Fundamentally, that's Pique. It's just peppers and some herbs floating in white vinegar. There's a lot of freedom to pick and choose the peppers and herbs. It's also nice because it's not likely to spoil, seeing as the liquid is entirely vinegar!
Pique
via Hot Sauce! by Jennifer Trainer Thompson

Ingredients

  • 10-12 fresh chiles (try different colors, lengths, and shapes, such as green serrano, red Tabasco, and yellow habanero) (we went with cayenne on one batch and jalapenos for another)
  • 6 cloves of garlic, peeled
  • 4 cups distilled or white wine vinegar
  • 5 or 6 sprigs mixed fresh herbs (we used lemon basil and oregano with the cayenne and cilantro and parsley with the jalapenos)
  • Whole peppercorns in assorted colors
Directions
  1. Bring a pot of water to a boil. Cut off the stems and a bit of the top of the chiles (or if you prefer the look of the stem, make a slice in the chiles) so the vinegar can get inside (we like the look of the whole pepper and went with the slice)
  2. Add the chiles and garlic to the boiling water, leaving them there for a few minutes to soften up the chiles. Divide the garlic and chiles between sterilized bottles that will hold 6 cups total. 
  3. Heat the vinegar to just below boiling in a non-reactive saucepan.
    Remember our talk on reactive pans?
    Pour the vinegar into the bottles. Add a few sprigs of herbs to each for flavor and looks (add the peppercorns at this step if you're using them), making sure to push them down below the surface of the vinegar (or just add the herbs first and pour vinegar in carefully). 
  4. Seal the bottles and allow to sit for 2 weeks in a spot that's not too sunny, turning occasionally (the bottles, not you) before using. The longer the sauce sits, the hotter it gets. 
Good times!

Wednesday, July 24, 2013

Jalapeno Sauce via Hot Sauce!

     Our garden is producing peppers at such a rate that we have had to get creative in using them up. I can only freeze so many peppers. It was only a matter of time before I turned to a book the wife got me for Christmas. She knows I love hot sauces, so she figured she'd be irresponsible and give me a manual on how to make them at home. That manual, Hot Sauce!, is indispensable to someone starting out making hot sauces. Up to this point, I have only ever really made a couple pepper pastes, fondly called Master Ridley, Latimer (bonus points if you understand why I used these names), and a concoction known as Shrieking Anus Paste. It was time to branch out. My first attempt at a new recipe would be the Jalapeno Sauce from the book. It made sense since the garden is dropping a dozen large jalapenos a day. So how is this sauce? It has a very bright flavor, almost like salsa verde, but with a fierce punch of heat right up front. The flavor and heat play well together.
This is a fairly accurate depiction of my wife trying out the sauce.
     In the end, the overall flavor of the sauce is more than worth the initial burn. I popped a can of this when a friend came over for dinner. He and my wife ate over half a pint of this stuff, just scooping it up with nachos. The thickness of the sauce will vary from batch to batch, depending on the size of the peppers you use. The larger the peppers, the more this will lean toward a very thin salsa. Smaller peppers and it becomes more of a straight sauce. As always, any changes or notes will be in blue.

Jalapeno Sauce
via Hot Sauce! by Jennifer Trainer Thompson
Ingredients

  • 12 fresh jalapeno chiles, stemmed and cut into chunks (use bigger peppers if you want a thicker sauce)
  • 1 medium yellow onion, peeled
  • 2 cups distilled white vinegar
  • 1 cup water
  • 2 garlic cloves, peeled
  • Juice of 1 lime
  • Pinch of salt
  • 1/2 cup fresh cilantro leaves (we worried the cilantro would overpower the sauce, so we went with a little over 1/4 cup)
Directions
  1. Combine all of the ingredients in a blender and puree.
    Fire in the hole!
  2. Transfer the puree to a nonreactive saucepan (if you're not familiar with the term, enameled or stainless steel pans are nonreactive. What happens if you use a reactive pan?) 
    It's probably better if you don't use a reactive pan.
    Bring to a boil, then lower the heat and simmer for 10 minutes.
  3. Let cool, then pour into bottles. You can eat it right away or place in sealed bottles for future use (we packed ours in half pint jars and processed in a boiling water bath for about 15 minutes. Again, read up on canning if you haven't done it before. I will continue to state that I'm not responsible when you inevitably poison yourself.)
Good times!


Wednesday, April 10, 2013

On Sowing and Hoeing

     Spring has sprung and it's time to start up the garden again. When we first moved, we started with a smallish patch of garden and grew a few veggies for fun. Each year the garden got a little bigger and encroached further into sections of the lawn. That's fine. Less to mow. Regardless, we found that despite the tremendous amount of work in maintaining a garden, we really enjoyed it. If you have any space at all, a garden is extremely rewarding.  Since we live in central Illinois we don't even have to guess when it's time to get started. I just watch the farmers. Last weekend I saw that the tractors were out tilling and fertilizing. We did the same. So what are some of the benefits of gardening?

Getting Your Lazy Butt Out of the House
This is a big one for me. Left to my own devices in the summer, it's likely I would spend all my time sitting on the patio smoking cigars and drinking whiskey. 
Me (on left) enjoying a smoke with a couple guys from the neighborhood.
Maintaining a garden requires a fair amount of energy on the part of the gardener. Breaking sod, tilling new soil, pulling weeds, clearing debris, putting in fencing and plant supports can be exhausting. Plus, once summer gets into full swing you'll be watering, cutting, weeding, harvesting, replanting and who knows what else all under heat and sun. You will burn calories. You will be tired. You will not regret it.

It's Mentally Rewarding
There's nothing like the sense of accomplishment you get when you see the garden start producing. Especially if you grew the plants from seed. I feel like a Pioneer. I have tilled the soil and sown the seeds and brought food up from the ground! Plus there's the good feeling of knowing that if the economy ever collapses, you'll at least have a big rack of canned foods to eat.

You Get Fresh Food
This is why we have the garden. We want the food. We want to need vegetables for our recipes and be able to just walk outside and get them. We want to turn all that produce into jellies, pickles, sauces and all sorts of wonderful canned goods. 
     Granted, it's not all flowers and sunshine. Literally. Gardening is not without its downside. I would be doing you a disservice to not delve into the seedier side of gardening. (TWO puns in the same paragraph, now that's bounty!)

You're Probably Going To Hurt Yourself
There are a number of amusing ways to injure yourself while gardening. 
  • Back Injuries
    You're going to be bending, reaching, pushing and pulling all sorts of things. It's only a matter of time before you reach the wrong way and you spend the next week popping Flexerils. 
  • Burns
    There is always the threat of a nice sunburn, but let's not overlook the possibility of chemical burns if you're growing super-hot peppers! The wife can attest to skin irritation from simply planting the seeds.
  • Assorted Punctures, Incisions and Lacerations
    You will be dealing with many different gardening tools, all of which have the capacity to cause grievous bodily injuries if mishandled. I live in constant fear that I'm going to accidentally get my foot sucked into the tiller. Also, don't forget many plants have exciting prickers to rake across your hands and arms as you reach! Such fun!
Nature Is Unpredictable
 If you get a season of solid weather, your garden is going to blow up and you're going to be looking for people to unload surplus produce on.  Last year we had very little rain. This year looks to be a lot of rain. Provided we can get past the two potential frosts this week. High winds and heavy rains can knock down your plants and kill seedlings. It got so hot one day our cilantro all turned brown and died.
Actual photo of my cilantro last summer.
Sometimes, Nothing Works
You have to accept that sometimes, you'll fail.  No matter how much you try to do everything right, no matter how good the weather and soil is, stuff won't grow. For the last two years, despite our best efforts, we have been unable to grow cucumbers. We'll get a couple little malformed ones, but that's it. We have tried different spots, different seeds. Nothing works. 

     So what have we learned from all this? Gardening can be hard. It can be expensive. It can also be very rewarding. You just need to learn to take the good with the bad. Much like with the Chicago Cubs, there's always Next Season.

Good times!


Monday, February 25, 2013

Monday Recipe: Pork Mushroom Stir Fry

     Stir frying is always a favorite in my house. It's inexpensive, fast and generally simple. If I'm cooking mid-week, stir frying is always a viable option. This particular recipe calls for shiitake mushrooms. Those are not middle class mushrooms in my humble opinion. Would I love to cook with them? Absolutely. However, shiitake are going to set me back about $5-7.00 per pound wholesale. I can find plain old criminis for $1.00 per pound most days. What I'm going to lost in flavor I'm gaining in saving five bucks every time I make this dish.
     I wish I could remember where I found this recipe. Once I move a recipe into my personal recipe book, I generally lose track of the source. I should probably start making note of that sort of thing. Anyways, it likely came from Bon Appetit. If somebody finds the source, let me know and I'll give credit where credit is due.
 
Pork Mushroom Stir-Fry
Ingredients 
  • 1 lb. Pork cutlets, cut into 2 inch long, ¼ inch slices 
  • 1 tablespoon Asian sesame oil 
  • 1 tablespoon minced peeled fresh ginger 
  • 12 ounces shiitake mushrooms, stemmed, thickly sliced (I never have these in the house. I generally wind up using baby bellas, button or even just canned if nothing else is available.)
  • 8 ounces fresh green beans 
  • 1 half onion, chopped 
  • 1 cup fresh cilantro leaves, divided 
  • 5 tablespoons hoisin sauce 
  • 2 teaspoons chili-garlic sauce 
  • ¼ teaspoon Chinese 5-spice powder 
Directions 
  1. Sprinkle pork with salt and pepper 
  2. Heat oil in large nonstick skillet over medium-high heat. Add ginger and mushrooms. Stir-fry until mushrooms are tender (about 3 minutes). 
  3. Add pork, stir-fry about 2-3 minutes 
  4. Add green beans, onion, cilantro. Stir-fry 2-3 minutes 
  5. Stir in hoisin, chili-garlic sauce and 5-spice powder. Saute until beans are crisp-tender. 
  6. Serve over rice. Garnish with green onions and fresh cilantro, if desired.
Good times!