Showing posts with label thyme. Show all posts

Thursday, November 13, 2014

Clam Chowder

     I loves me some clam chowder. I fondly remember ordering at family restaurants and getting that sickly white, ultra-thick concoction that smelled faintly of a fire on a fishing boat. I couldn't get enough of that stuff. Then I grew up and realized that it wasn't really supposed to look or taste like that and I'm very lucky I didn't get food poisoning and die from dysentery.

Or snakebite. Always the damned snakebite.
     I was glad to find a recipe for clam chowder that I feel is a bit closer to the intended look and taste. I can't say for sure as I've never had clam chowder in New England. I imagine it would taste just like this, but everyone would be talking with funny accents about how they're going "to wahk theah dahg in Havahd Pahk aftah dahk." This soup was fantastic and will enter the regular rotation. As always, notes and changes are in blue.

Clam Chowder
via Best-Ever Soups
Ingredients

  • 3-3/4 oz salt pork or thinly sliced unsmoked bacon (let's just derail right away and use a half pound of bacon. BACON FTW!)
  • 1 large onion, chopped (we used a Vidalia, figuring the sweetness would work well here)
  • 2 potatoes, peeled and cut into cubes
  • 1 bay leaf (remember to remove bay leaves before serving! Leave that bay leaf in there and you'll choke like the St. Louis Blues in a Stanley Cup Playoff)
  • 1 fresh thyme sprig (none on hand. I used about 1/8 tsp. dried thyme)
  • 1-1/4 cups milk
  • 14 oz cooked clams, cooking liquid reserved (we used 3 cans at 6.5 oz each. Go big or go home. Unless you're already at home. Then maybe go outside)
  • 2/3 cup heavy cream
  • salt (I used pink Himalayan. Not even kidding), ground white pepper (a scant 1/8 tsp) and cayenne pepper (1/4 tsp)
  • Finely chopped parsley, to garnish
Directions
  1. Put the bacon (who are you fooling with the salt pork? We know you're using bacon) in a pan (we used the trusty enameled Dutch oven) and heat gently, stirring frequently, until the fat runs and the meat is starting to brown.
  2. Add the chopped onion and fry over a low heat until softened but not brown.
  3. Add the potato, bay leaf and thyme. Stir well to coat with fat, then pour in the milk and clam liquid; bring to a boil. Reduce heat and simmer for about 10 minutes or until the potatoes are tender but still firm. Lift out the bay leaf (OR CHOKE AND DIE) and the thyme sprig (if you used it) and discard them.
  4. Remove the shells from most of the clams (AHAHAHA, no. My butler was too busy synchronizing all of my Rolex watches. As previously stated, I used canned clams). Add all the clams to the pot and season to taste with salt, pepper and cayenne.
  5. Simmer gently for 5 minutes more, then stir in the cream. Heat until the soup is very hot, but do not allow it to boil. Pour into a tureen (the butler knows where the tureen is kept, but as mentioned, he was busy with my Rolexes. I used regular bowls). Garnish with chopped parsley and serve. 
Good Times!

Tuesday, December 17, 2013

Slow Cooker Spanish-Style Couscous

     I'm still on the fence about slow-cooker recipes that require you to do cooking outside of the slow-cooker. I just want to chuck everything in there and forget about it. I'll make exceptions for ground meat. Nobody wants slow cooked ground meat. That just sounds nasty. After this recipe, I'll also make an exception for couscous, because it takes almost no time to make. The Wife and I really enjoyed this recipe. We tinkered with the ingredients and came up with a winner. It was simple and with a switch to turkey, a healthy meal. As always, any notes and changes are in blue.


Slow Cooker Spanish-Style Couscous
via Crock-Pot Quick & Easy Recipes
Ingredients
  • 1 pound ground beef (we had a bunch of ground turkey patties in the freezer, so we used 1.5 pounds of those instead)
  • 1 can (14 ounces) beef broth (I don't keep cans of broth on hand. I just filled an empty can with water and dissolved a beef bouillon cube in it)
  • 1 green bell pepper, cut into 1/2 inch pieces (you should know by now The Wife doesn't like green peppers, so we went with red instead)
  • 1/2 cup pimiento stuffed green olives, sliced
  • 1/2 onion, chopped
  • 2 cloves garlic, minced
  • 1 teaspoon ground cumin
  •  1/2 teaspoon dried thyme
  • 1 teaspoon Pilsen Latino Seasoning from the Spice House
  • 1-1/3 cup water (this is for the couscous. DON'T put it in the slow cooker!)
  • 1 cup uncooked couscous (we found a really good roasted garlic and olive oil couscous at ALDI)
Directions
  1. Brown meat in a large skillet over medium-high heat, stirring to break up meat (I've never seen a recipe tell you to break up the meat before. Are there people out there just chucking a big wad of meat in the pan and hoping for the best?) Drain fat.
  2. Combine broth, bell pepper, olives, onion, garlic, cumin, thyme and meat in slow-cooker. Cover; cook on LOW 5 hours or until bell pepper is tender. 
  3. Bring water to a boil over high heat in a small saucepan. Stir in couscous. Cover; remove from heat. Let stand 5 minutes. Fluff with fork (don't forget to take the cover off before fluffing or you may encounter some difficulties). Spoon couscous onto plates; top with beef mixture (use a slotted spoon for getting the beef mixture out. There's going to be a fair amount of liquid left in the slow cooker).
Good times!

Tuesday, December 3, 2013

Herbed Cheese Scones

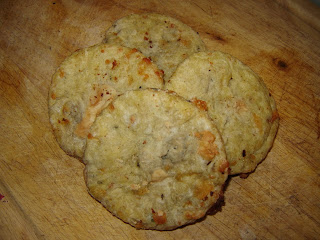
     I loves me some scones. I used to think scones were just something stodgy people from England grimly chewed while they drank their tea. Unless someone proves otherwise, I'm going to continue thinking that. However, I have found that they are versatile and tremendously easy to make. Many people are surprised when I tell them I've never made a sweet scone. All the scones I've made to this point are savory. Granted, I've only made one other kind of scone, ham and cheddar. This particular recipe came out of Bon Appetit magazine. I made a lot of changes, so I have no idea what the original recipe tastes like. Mine were great, so I imagine theirs is ok. As always, any notes and changes are in blue.


Herbed Cheese Scones
via Bon Appetit
Ingredients

  • 1 tablespoon baking powder
  • 1-1/2 teaspoons kosher salt
  • 1/2 teaspoon paprika
  • 4 cups all-purpose flour, plus more
  • 1 cup (2 sticks) chilled, unsalted butter, cut into pieces (I'm going to be honest. I don't ever use unsalted butter. I don't even use less salt most times. I live dangerously)
  • 8 ounces provolone cheese, grated (no provolone in the house. I figured blue cheese would work in this recipe, so I went with 6 ounces blue and 2 ounces of butterkase cheese)
  • 2 tablespoons finely chopped chives (we used green onions in place of the chive)
  • 1 tablespoon finely chopped fresh rosemary (we used 1 teaspoon dried)
  • 1 tablespoon finely chopped fresh thyme (we used 1 teaspoon dried)
  • 4 large eggs
  • 3/4 cup heavy cream, plus more
Directions
  1. Pulse baking powder, salt, paprika, and 4 cups flour in a food processor until combined (HAHAHAHAHAHA. No.) add butter and pulse until the texture of coarse meal with a few pea-size pieces of butter remain (I just cranked the Kitchenaid with the regular blade. I learned not to go straight to 5 or you are cleaning up the counter. And the walls.)
  2. Transfer mixture to a large bowl and mix in cheese, chives, rosemary and thyme. Make a well in the center; add eggs and 3/4 cup cream. Using a fork, blend eggs and cream, then slowly incorporate dry ingredients until a shaggy dough forms.
    Wrong Shaggy.

    Zoinks! Still the wrong Shaggy.
    Be careful not to overwork dough (Overwork is not something that happens much with me)
  3. Turn out dough on a lightly floured surface and press into an 8" square about 1" thick (I didn't make mine into a square. It was more of a "splat"). Using a floured chef's knife, cut into 16 squares and divide between two parchment-lined baking sheets (I am openly defying the recipe at this point. I used the ring from a quart jar lid to cut CIRCULAR scones. NOW WHAT, BON APPETIT?) Wrap with plastic and chill 2 hours (the scones, but if you want to kick back for a couple of hours, go right ahead)
  4. Preheat oven to 400F. Brush tops of scones with cream and bake, rotating baking sheets halfway through, until golden brown on tops and bottoms. This will take about 20-25 minutes (I went 30 just to be difficult)
Good times!

Friday, November 29, 2013

Bacon and Lemon Herbed Turkey

     Nothing says Thanksgiving like a well-made turkey perfectly carved and served up on a fancy platter. One out of three isn't bad. I can give you well-made. The rest is up to you. I know many people love that crispy golden skin on a turkey. I don't really care about that. For me, the skin is there to help store all sorts of good things to flavor the meat. I've messed around with a couple versions of this type of turkey, but I feel this is the final iteration. I am very pleased. The meat is suspiciously tender and is infused with hints of lemon, bacon and herbs. This, my dear friends, is a winner. As always, any notes are in blue.
Bacon and Lemon Herbed Turkey
Ingredients

  • 1 turkey (we used a 13 pound bird for this recipe)
  • 1 pound thick cut bacon (use whatever kind you want. Applewood smoked, hickory, whatever)
  • 1 lemon, thinly sliced
  • 2 sticks butter, separated
  • 1 tablespoon dried Italian herbs (basil, oregano, thyme, marjoram, rosemary and sage)
  • 1 large onion, quartered
  • Uncle Joe's Rub Down
Directions
  1. Make sure the bird is defrosted and all the fun stuff is removed from inside. (I'll normally throw those spare parts in the roaster with the bird and serve them to the dogs later. I'll save the neck to throw at the unruly neighborhood children)
  2. Take your hand and slide it between the skin and the meat of the bird. Gently work your hand around to separate the skin from the meat the best you can without tearing the skin. (This whole process feels genuinely wrong. I always apologize to the bird when I do this)
    I know we've only just met...
  3. Mix one of the sticks of butter with the herbs until the herbs are evenly distributed through the butter. Start grabbing handfuls and get your hand back in under the skin. Spread the butter around under the skin the best you can. 
  4. Gently lift the skin and lay the lemon slices between the meat and skin. Do the same with a quarter pound of the bacon (It's going to get crowded under the skin. Don't worry too much about having it be neat and tidy under there. The important part is to get it evenly distributed without tearing the skin)
  5. Take the other stick of butter and the onion and put it in the cavity of the bird.
  6. Shake a coat of Uncle Joe's Rub Down over the skin of the bird (feel free to use any rub or seasoning mix you like. I'm just partial to this stuff)
  7. Take the remaining bacon and use it to cover the bird (I absolutely can't be bothered to make a bacon weave)
    See? No weave and it looks fine. I can't be bothered with frippery.
  8. Load the bird into a roaster and cover it with a tinfoil tent (if you have time, feel free to make yourself a hat to block government mind-control rays. It never hurts to be careful)
  9. Load the bird into an oven preheated to 325F. Cook until a meat thermometer reads an internal temperature of 165F (This took about 4 hours for our bird. It may take more or less time depending on your stove, size of the bird, altitude, relative humidity, astrological sign, etc. You could always use the old trick of seeing if the leg just pulls off. That usually means the turkey is done. Or has leprosy. It's not an exact science)
  10. Once the bird has reached the required temperature, take it out and let it rest for 15 minutes or so (You've already violated it quite a bit. Give it a moment or two before you attack it with the knife. This is a good time to make sure everything else for your meal is done, or to have a cocktail or six)
  11. Take the bacon off the top of the bird and set it aside for later snacking. Pull the skin off the bird and clear off the remaining bacon and lemon from under the skin. (Do not be alarmed when you see that you do not have a golden, crisp skin. It's going to be pretty squishy. Just pull it off. You want to get at the now tender and delicious meat).
  12. Inexpertly maul the turkey and throw the meat on a platter. Eat until sleepy.
Good times!

Wednesday, June 26, 2013

Couscous and Vegetable Salad via 400 Calorie Fix

     If this week's weather is any indication, the summer is going to be horrifyingly hot and humid. If you're like me, on days like this you want to run the stove as little as possible. When the weather gets like this I also don't want super heavy meals. Like I said last week, salads are a great alternative. This week's recipe comes from the book 400 Calorie Fix. This particular recipe is about as healthy as you can hope for. A 1-1/2 cup serving is only 260 calories. If you wanted to bulk it up, you could add some tuna or chicken.

Couscous and Vegetable Salad
via 400 Calorie Fix

Ingredients

  • 1-1/2 cups water
  • 1/4 teaspoon salt
  • 1 teaspoon + 1 tablespoon olive oil
  • 1 cup whole wheat couscous
  • 1 can (15 ounces) chickpeas, rinsed and drained, 3 tablespoons of liquid reserved
  • 1/2 cup frozen peas, thawed
  • 1 medium carrot, coarsely shredded
  • 1 small tomato, chopped
  • 1 small red or yellow pepper, chopped (we went with red. The wife's not a huge fan of green peppers)
  • 2-1/2 tablespoons currants (we didn't have any. We also weren't sold on currants being a good idea in here)
  • 2-1/2 tablespoons finely chopped fresh chives
  • 1-1/2 tablespoons pistachios or pine nuts (we used pistachios. Any time we have a choice between pistachios and pine nuts, I'm using pistachios)
  • 1-1/2 tablespoons lemon juice (spring for a fresh lemon here. The bottled stuff doesn't have the fresh taste you want in this dish)
  • 1/4 teaspoon dried thyme
  • 1/4 teaspoon dried oregano
  • Angostura Bitters (optional)
Directions
  1. Bring water, salt and 1 teaspoon of the oil to a boil in a medium saucepan over high heat. Stir in the couscous. Remove from heat and cover. Let stand for 5 minutes or until liquid is absorbed. Fluff with fork.
  2. Transfer the couscous to a large bowl. Add the chickpeas (setting aside the liquid), peas, carrot, tomato, pepper, currants (not for me), chives and nuts. Toss gently until mixed.
  3. Whisk together lemon juice, thyme oregano, bitters, reserved chickpea liquid and remaining tablespoon of oil in a small bowl (why do recipes always make restrictions on bowl size? What if I wanted to use a big bowl for this? Who's going to stop me. I'll tell you straight up, I used a medium sized bowl. I have no regrets). Mix and pour over the salad. Toss to mix well. 
  4. Cover and refrigerate for 30 minutes to blend the flavors.
Good times!

Monday, June 17, 2013

Rustic Round Herb Bread

     I've got another bread recipe for you today, and you shouldn't be surprised at all when I tell you it came from Taste of Home Everyday Light Meals. Eventually I'm going to go through all the baking recipes and I'll be screwed. I'll have to start looking elsewhere for new and exciting breads to make on Sundays. This particular bread was a lot less time intensive since there is no rising to be done. As always any notes or changes are in blue.
Rustic Round Herb Bread
via Taste of Home Everyday Light Meals
Ingredients
  •  2 cups all-purpose flour
  • 1 cup (4 ounces) shredded reduced-fat cheddar cheese (there's nothing really holding you back from picking a different cheese. I imagine Swiss would give a nice mellow taste.)
  • 1 tablespoon sugar
  • 2 teaspoons baking powder
  • 1/2 teaspoon baking soda
  • 1/2 teaspoon salt
  • 1/2 teaspoon rubbed sage
  • 1/2 teaspoon dried thyme
  • 1/2 teaspoon dill weed
  • 3 tablespoons cold butter
  • 1 egg
  • 1/2 cup fat-free plain yogurt
  • 1/2 cup fat-free milk (as always, I just used 2%)
  • 1/2 teaspoon poppy seeds (this is something I never have in the house. So little of what I cook actually calls for it, I never am willing to shell out the dough for a jar. I did, however have a jar of sesame seeds, so I substituted a little more than 1/2 teaspoon of those instead.)
Directions
  1. In a large bowl, combine the first nine ingredients; mix well. Cut in butter until mixture resembles fine crumbs (nope, still haven't bought a pastry blender. Once again I went at it with a couple of butter knives.)
  2. In another bowl, whisk the egg, yogurt and milk. Stir into dry ingredients until just moistened (what they neglect to tell you is that the dough will be insanely sticky. You're going to need a scraper to get it all out of the bowl for the next step.)
  3. Spoon into a 9" round backing pan coated with nonstick cooking spray (only coat the inside. Coating the outside would be wasteful and foolish.) Sprinkle with poppy seeds (or whatever has been substituted for poppy seeds. Or don't sprinkle anything over the top if you don't want. You're not going to hurt my feelings.)
  4. Bake at 400F for 20-25 minutes or until golden brown (mine took 30.) Cool in pan on a wire rack. Cut into wedges.
Good times!

Monday, October 15, 2012

Maple Braised Butternut Squash with Fresh Thyme (via Bon Appetit)

     As we close in on Thanksgiving, I figure the logical thing to do would be to give you some of my favorite recipes for the big meal. For me, side dishes are everything. Don't get me wrong, I love turkey. I have pretty much nailed down my turkey recipe. However, that bird doesn't shine without a brace-load of good side dishes. You know what I'm talking about. The potatoes, casseroles, stuffings, and such that are really where the damage to the waistline gets done.

     While I do have plenty of the standard side dishes, I do like to entertain other options. This butternut squash recipe is one of them. The wife is a huge squash fan, and when I found this recipe, I knew I had a winner. This really is an easy recipe, and fairly inexpensive. I used dried thyme and had no complaints. The dish is a good substitution for sweet potatoes. I will say you need to watch the time and temperature while you're cooking this or it can get a touch mushy (I have kindly included a picture of said mushiness from the first time I made it). Either way, it's simple and tasty. Good times!

Maple Braised Butternut Squash with Thyme (via Bon Appetit)

Ingredients
¾ stick (6 tablespoons) butter
1 3-3 ½ pound butternut squash, peeled, deseeded and cut into 1” cubes
1 ¼ chicken broth (low-sodium)
1/3 cup pure maple syrup
1 tablespoon fresh minced thyme (or 1 tsp dried)
1 teaspoon coarse kosher salt
¼ teaspoon (or more) black pepper

Directions
  1. Melt butter in heavy large deep skillet over high heat. Add squash, saute 1 minute.
  2. Add broth, syrup, thyme, salt and ¼ teaspoon pepper; bring to a boil. Cover, reduce heat to medium and cook 8-10 minutes, until squash is almost tender.
  3. Using slotted spoon, transfer squash to large bowl. Boil liquid until thickened, 3-4 minutes.
  4. Return squash to skillet. Cook until tender, turning occasionally, 3-4 minutes. Season with more pepper, if desired.
Good times!