Showing posts with label green onions. Show all posts

Monday, April 25, 2022

Crab Rangoon Pizza

 I'm not sure where the inspiration came for this one. Probably from the bag of fake crab that had been in the freezer for an uncomfortable amount of time. Apparently, I'm not the first person to come up with this idea, but by the time I had figured that out, it was too late. The recipe was already scrawled on the back on an envelope. The Wife and I were both really surprised how good this was. Even The Spud condescended to take a tiny bite before going back to her crackers and cheese. I can't say the flavor was 100% authentic to a restaurant crab rangoon. You'd probably need to go a little heavier on the cream cheese. I don't recommend that, as it would make the topping way too thick. However! You could do it and just bump up the rest of the ingredients. Then forget about the flatbread as a crust, turn the topping into a dip, and use the bread for dipping. DAMN, I AM A GENIUS. I do recommend hitting it with a little hot sauce or crushed red pepper, it really brings it together. Let me know what you think, as long as it's positive. As always, notes are in blue.

Crab Rangoon Pizza
or Dip If You're So Inclined

Ingredients

  • 4 ounces cream cheese, softened
  • 1/2 pound artificial crab meat aka "crabuluxe," roughly chopped (don't even think about using real crab meat here. You know damned well the crab rangoon you're getting from the local place is using the fake stuff)
  • 2 green onions, finely sliced
  • 1 teaspoon ponzu sauce
  • 1 teaspoon fish sauce 
  • (in the event you don't have either of those, you could probably get away with equal amounts of soy sauce or Worcestershire sauce)
  • 1 teaspoon garlic powder
  • 1 cup shredded mozzarella cheese
  • 1/4 cup shredded cheddar cheese
  • 1 artisan flatbread, 7 ounces (ALDI has them. If you can't get to an ALDI, find something comparable at your local store)
  • Optional: sriracha, or hot sauce of your choice. Even crushed red pepper would work
Directions
  1. Preheat oven to 425F (220C, Gasmark 7)
  2. In a bowl, put in everything except the shredded cheese and the flatbread. Mix thoroughly.
  3. Place the flatbread on a baking tray. Evenly spread the cream cheese mixture over the bread.
  4. Sprinkle the shredded cheeses evenly over the top of the cream cheese mixture.
  5. Put in the oven for 10 minutes, or until cheese is completely melted.
  6. If you're using optional hot sauce/peppers, throw it on and get to work!
Good Times!


Sunday, July 6, 2014

Sauerkraut and Dill Potato Salad

     Is there any side dish that screams "summer" more than the ubiquitous potato salad?  Probably, but for today we will say "no!" I love potato salad in all forms. American, German, Amish, Venusian. Just slap it on my plate and I'm good to go. This particular potato salad came about on the 4th of July. We didn't really have any side dishes for our grilled meats, so I decided to go with potato salad. We had potatoes. I considered making Dill Pickle Potato Salad, but then decided I needed to add sauerkraut. It just seemed like a good idea. It was. This is a rock solid potato salad that went great with brats and steaks. Give it a try and tell me what you think! Unless you think it sucks. Then I don't want to hear about it. As always, notes are in blue.

Sauerkraut and Dill Potato Salad
Ingredients

  • 5 medium potatoes, washed and scrubbed, then cut into 1" cubes (peel them if you want. We didn't. As for potato type, we used plain old Idahos)
  • 1 jar (24 ounces) jarred sauerkraut, drained
  • 4 large green onions, chopped
  • juice of 1 small lemon
  • 2 teaspoons dill weed
  • 4 tablespoons mayonnaise
  • black pepper to taste
Directions
  1. Boil potatoes in lightly salted water until easily pierced with a fork (don't overcook the potatoes, or they'll break up when you go to mix the salad. The Wife called the consistency we wanted, "not quite baked potato"). Allow to cool for a few minutes
  2. In a large bowl, combine the potatoes with all the other ingredients. Mix gently to incorporate all the ingredients. Chill in the refrigerator at least 30 minutes.
Good times!

Saturday, April 19, 2014

Chicken Bacon Pockets

     Every now and then I find a recipe that you can't possibly dislike. Well, I suppose you could, but it probably means you're deficient in some way. This particular recipe combines all sorts of good stuff. It's got chicken, bacon and canned dough. What's not to love? For me, it was the possibility of being bland. The judicious application of barbecue sauce and some green onion fixed that. I'm calling this recipe a winner. This is a super weeknight quick meal. If you make it using crescent rolls, you'll get four. If you use biscuit dough, you should get five, but they'll be a bit smaller. As always, notes and changes are in blue.


Chicken Bacon Pockets
via 101 Things To Do With Bacon
Ingredients

  • 4 ounces cream cheese, room temperature (as always, we used neufchatel, to keep the fat down)
  • 2 tablespoons milk
  • 2 cups cooked, chopped chicken
  • 8 strips bacon, cooked and crumbled (and don't you dare throw the grease away. Save it in a jar in the fridge for later. It's a key ingredients in Bootleg Cheddar Bay Biscuits)
  • 1/4 teaspoon pepper
  • 1/4 cup barbecue sauce (not in original recipe, we decided this would be a bit bland without some form of extra kick)
  • 2 tablespoons finely chopped green onions (also not in the original recipe)
  • 2 cans (8 ounces each) refrigerated crescent rolls (we used 1 can of 10 buttermilk biscuits)
  • 2 tablespoons butter or margarine, melted
  • 1 tablespoon sesame seeds (we used them, but omitting them will not notably change anything)
Directions
  1. Preheat oven to 350F (177C, Gasmark 4)
  2. In a bowl, mix the cream cheese and milk until smooth; add the chicken, bacon and pepper (and barbecue sauce, if using) and stir until combined.
  3. Unroll crescent rolls and separate dough into 8 rectangles, pressing along the diagonal to seal, creating 4 "pockets" (we took 2 biscuits at a time and rolled them together into a large disc. You'll get 5 of these discs)
  4. Equally divide filling and spoon onto the bottom half of each dough rectangle. Fold dough over the filling, pinch the edges to seal, and crimp the edges with a fork. (we loaded the center of each disc, then pulled the dough up around the filling. We then flipped the entire thing over, so the seam side was down. It looked kind of like a big dumpling)
  5. Brush each pocket with melted butter and sprinkle with sesame seeds.
  6. Transfer to a baking sheet and bake for 15 minutes or until golden brown. Makes 4 servings (5 if you use biscuits)
Good times!

Monday, December 30, 2013

Tuna Ranch Melt Pinwheel

     Sometimes you come across a recipe so hilariously Middle Class, it begs to be made. This is the sort of recipe you know will end up at pot lucks or brunches across the Midwest. The ingredients are Middle Class staples: Bisquick, tuna, ranch dressing, American cheese. I kid you not when I tell you the wife and I had to wait a few minutes to eat this because we were laughing so hard when this came out of the oven. In its defense, this recipe is super cheap and easy to make, and comes in at around 250 calories per serving. As always, any notes or changes are in blue.

Tuna Ranch Melt Pinwheel
via Betty Crocker 300 Calorie Cookbook
Ingredients

  • 1-1/2 cups Bisquick Heart Smart Mix (that didn't happen. I just used the ALDI brand baking mix)
  • 1/3 cup boiling water
  • 1 can (12 ounces) chunk light tuna in water, drained
  • 1/4 cup ranch dressing
  • 3 tablespoons finely chopped green onions
  • 1 small tomato, cut into 6 slices
  • 3 slices American cheese, cut in half diagonally (I'm going to have to insist you go with American cheese, because this thing looks hysterical when it's done. While Muenster or Swiss would probably taste good, you'd be missing out on the aesthetics of the Road Cone Orange you get with American)
Directions
  1. Heat oven to 450F. In a medium bowl, stir baking mix and boiling water until soft dough forms. Gather dough into a ball.
  2. Place dough on lightly floured surface. Roll dough into 13 inch round. Place on ungreased 12 inch pizza pan (if you have a pizza stone, it works great here). Pinch edge to form 1/2 inch rim. Bake 6-8 minutes or until light brown.
  3. Meanwhile, in a medium bowl, mix tuna, dressing and onions. Spread tuna mixture over crust (don't forget to take the crust out of the oven first). Arrange tomato and cheese slices alternately in a pinwheel pattern on tuna mixture. Bake 1-2 minutes longer or until cheese is melted. Cut into wedges.
Good times!

Tuesday, December 3, 2013

Herbed Cheese Scones

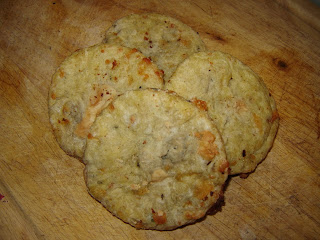
     I loves me some scones. I used to think scones were just something stodgy people from England grimly chewed while they drank their tea. Unless someone proves otherwise, I'm going to continue thinking that. However, I have found that they are versatile and tremendously easy to make. Many people are surprised when I tell them I've never made a sweet scone. All the scones I've made to this point are savory. Granted, I've only made one other kind of scone, ham and cheddar. This particular recipe came out of Bon Appetit magazine. I made a lot of changes, so I have no idea what the original recipe tastes like. Mine were great, so I imagine theirs is ok. As always, any notes and changes are in blue.


Herbed Cheese Scones
via Bon Appetit
Ingredients

  • 1 tablespoon baking powder
  • 1-1/2 teaspoons kosher salt
  • 1/2 teaspoon paprika
  • 4 cups all-purpose flour, plus more
  • 1 cup (2 sticks) chilled, unsalted butter, cut into pieces (I'm going to be honest. I don't ever use unsalted butter. I don't even use less salt most times. I live dangerously)
  • 8 ounces provolone cheese, grated (no provolone in the house. I figured blue cheese would work in this recipe, so I went with 6 ounces blue and 2 ounces of butterkase cheese)
  • 2 tablespoons finely chopped chives (we used green onions in place of the chive)
  • 1 tablespoon finely chopped fresh rosemary (we used 1 teaspoon dried)
  • 1 tablespoon finely chopped fresh thyme (we used 1 teaspoon dried)
  • 4 large eggs
  • 3/4 cup heavy cream, plus more
Directions
  1. Pulse baking powder, salt, paprika, and 4 cups flour in a food processor until combined (HAHAHAHAHAHA. No.) add butter and pulse until the texture of coarse meal with a few pea-size pieces of butter remain (I just cranked the Kitchenaid with the regular blade. I learned not to go straight to 5 or you are cleaning up the counter. And the walls.)
  2. Transfer mixture to a large bowl and mix in cheese, chives, rosemary and thyme. Make a well in the center; add eggs and 3/4 cup cream. Using a fork, blend eggs and cream, then slowly incorporate dry ingredients until a shaggy dough forms.
    Wrong Shaggy.

    Zoinks! Still the wrong Shaggy.
    Be careful not to overwork dough (Overwork is not something that happens much with me)
  3. Turn out dough on a lightly floured surface and press into an 8" square about 1" thick (I didn't make mine into a square. It was more of a "splat"). Using a floured chef's knife, cut into 16 squares and divide between two parchment-lined baking sheets (I am openly defying the recipe at this point. I used the ring from a quart jar lid to cut CIRCULAR scones. NOW WHAT, BON APPETIT?) Wrap with plastic and chill 2 hours (the scones, but if you want to kick back for a couple of hours, go right ahead)
  4. Preheat oven to 400F. Brush tops of scones with cream and bake, rotating baking sheets halfway through, until golden brown on tops and bottoms. This will take about 20-25 minutes (I went 30 just to be difficult)
Good times!

Sunday, December 1, 2013

Sweet Potato Wedges with Chile Cream

     Sometimes you find a recipe so simple, you can't believe it can be so good. I'm fairly sure I dug this one up a few years ago from Bon Appetit magazine. Regardless, it's a rock solid recipe. I've served it as a side dish in the past. This year I served it as a snacketizer. There's plenty of room for personal interpretation as far as the chipotle pepper sauce goes. You can use hot or mild sauce depending on how big a wuss you are. Actually, I've found that the Taco Bell Bold & Creamy Chipotle Sauce is a fine addition to this recipe. Don't judge me. As always, any notes are in blue.
Sweet Potato Wedges
with Chile Cream
Ingredients:
  • 1/3 cup sour cream
  • 3 tablespoons finely chopped green onions, divided
  • 2 teaspoons chipotle hot pepper sauce
  • 2 teaspoons fresh lime juice (or use the stuff in the plastic lime, I won't tell anyone)
  • 3 pounds medium sweet potatoes, cut lengthwise into ¾ inch wedges, with skin (when I serve them as a snacketizer I cut those wedges in half width-wise)
  • 3 tablespoons olive oil
  • 1 ½ teaspoons ground cumin
Directions:
  1. Whisk sour cream, 1 tablespoon green onion tops, chipotle hot sauce and lime juice in small bowl; cover and chill.
    Sorry.
  2. Preheat oven to 425F. 
  3. Combine sweet potato wedges, oil and cumin in large bowl. Sprinkle with salt and pepper. Toss to coat. 
  4. Arrange potato wedges on a baking sheet. Roast until tender and browned in spots. About 20 minutes. 
  5. Season to taste with salt and pepper. 
  6. Place wedges on large platter. Drizzle chile cream over. Sprinkle remaining green onions over top. You can also serve the cream in a small bowl for dipping.
Good times!

Wednesday, November 13, 2013

Slow Cooker Thai-Style Peanut Chicken

     I'm on the fence about peanut butter based recipes. I do enjoy a good satay, but too much peanut butter can overwhelm me and make me run for some white bread and grape jelly. This recipe works around that by using an alarming amount of teriyaki sauce and red pepper flakes. This has, as the chefs would say, umami out the asshole. We swapped in chicken for the pork and were very happy with the results. As always, changes and notes are in blue.

Slow Cooker Thai-Style Peanut Chicken
via Taste of Home Slow Cooker
Ingredients

  • 2 pounds boneless pork loin chops (we decided to use an equal amount of chicken)
  • 1/4 cup teriyaki sauce
  • 2 tablespoons rice vinegar
  • 1 teaspoon crushed red pepper flakes
  • 1 teaspoon minced garlic
  • 1 tablespoon cornstarch
  • 1/4 cup cold water
  • 1/4 cup creamy peanut butter
  • Hot cooked rice
  • 1/2 cup chopped green onions
  • 1/2 cup dry roasted peanuts (omitted)
  • Lime juice, optional
Directions
  1. Place meat in a 3 quart slow cooker (we used a 2.5 quart cooker. NOW WHAT!). In a small bowl, combine the teriyaki sauce, vinegar, pepper flakes and garlic; pour over meat. Cover and cook on LOW for 6 hours or until meat is tender.
  2. Remove meat and cut into bite-sized pieces; keep warm (the meat, not you. I suppose you could put on a sweater if you're chilly). Skim fat from cooking juices, transfer juices to a small saucepan. Bring liquid to a boil. 
  3. Combine cornstarch and water and stir until smooth. Gradually stir into the pan. Bring to a boil; cook and stir for 2 minutes or until thickened. Stir in peanut butter and meat. 
  4. Serve with rice. Sprinkle with onions and peanuts (if you really want them). Drizzle with lime juice if desired.
Tie Peanuts...Get it?
Good times!

Saturday, September 14, 2013

Slow-Cooker Korean Barbecue Beef

     If you work in a school, you are regularly assaulted by students shilling overpriced stuff for fundraisers. I have the standing rule of buying one item from any given fundraiser. Just one. First kid who asks gets the sale. It will always be the single cheapest item in the catalog. It is usually one of those tiny, spiral-bound cook books. This particular cook book was the Crock-Pot Potluck For All Occasions cook book.  The recipe I decided to cook from it was Korean Barbecue Beef. I made a big change by using a roast instead of ribs and wound up putting the ingredients in the cooker in the wrong order. Regardless of my ineptitude, the resulting meal was very tasty and versatile. We originally served some up on rice, and have since made burritos and hoagies. As always, any changes or notes are in blue.
Korean Barbecue Beef
via Crock-Pot Potluck For All Occasions
Ingredients

  • 4 to 4-1/2 pounds beef short ribs (we used a 3 pound beef roast)
  • 1/4 cup chopped green onions
  • 1/4 cup tamari or soy sauce (I'll be honest. I have no idea what the hell tamari sauce is without Googling it. I just used soy sauce)
  • 1/4 cup beef broth or water (we went with water)
  • 2 teaspoons minced fresh ginger (no fresh ginger on hand. We used 1 teaspoon ground ginger)
  • 2 teaspoons minced garlic
  • 1 tablespoon packed brown sugar
  • 1/2 teaspoon black pepper
  • 2 teaspoons dark sesame oil
  • 2 teaspoons sesame seeds, toasted (put out sesame seeds to use and then promptly forgot to use them)
Directions
  1. Place meat in slow cooker. Combine green onions, soy, broth, brown sugar, ginger garlic and pepper in medium bowl; pour over ribs (naturally I missed the part about combining in another bowl and just threw everything in on top of the meat. I just wound up stirring it all up in the slow cooker). Cover; cook on LOW for 7-8 hours or until meat is fork tender.
  2. Remove meat from liquid. Cool slightly (that didn't happen). Trim excess fat and discard. Cut meat into bite sized pieces, discarding bones, if any.
  3. Let cooking liquid stand 5 minutes to allow fat to rise. Skim off fat and discard (look, that's not going to happen. I'm eating now. After the leftovers have sat in the fridge overnight I can just pry the layer of fat off the top). Stir sesame oil into cooking liquid (WHOOPS! I put the oil in at the start. No harm, no foul). Sprinkle with sesame seeds (as mentioned, I totally forgot to use the seeds)
Good times!

Saturday, July 13, 2013

Steamed Pork Buns (Char Siu Bao)

     Some days a simple idea completely explodes into a full-blown project. This was one of those days. I wanted to make a simple Chinese pork and cabbage soup. The thing is, when I have soup, I want bread to go along with it. Since this was a Chinese soup, I wanted a Chinese bread. I made the mistake of using the first recipe I found. I found a recipe for char siu bao. For thirty-plus years I just called them steamed pork buns. I figured I would give them a go. I loved them when I was a kid. Don't get me wrong, they came out great and tasted absolutely fantastic. The problem was that this recipe was a Colossal Pain In The Ass. I should have known I was in for trouble when the recipe book didn't have any pictures. What book you say? I set the Way-Back Machine and consulted my copy of The Frugal Gourmet Cooks Three Ancient Cuisines. I didn't let small problems like not having the right ingredients or even the right equipment stop me. Some people suggested baking these, but I grew up eating them steamed, so that's how I was going to make them, at least this time. They came out exactly as I remembered. Soft and chewy, the dough a bit sweet and the filling a bit savory. Was it worth the effort? I'd say so. The wife and I ate 10 of them between us for dinner. As always, changes and notes are in blue.

Steamed Pork Buns (Char Siu Bao)
via The Frugal Gourmet Cooks Three Ancient Cuisines
Ingredients
Bread Dough

  • 2 packages fast-rising yeast
  • 1 cup lukewarm water
  • 1 tablespoon sugar
  • 1 cup milk, lukewarm
  • 4-1/2 cups all-purpose flour
Filling
  • 1/2 pound Chinese Barbecued Strips (char siu), chopped into medium-small dice (I was feeling industrious, but not industrious enough to make a separate pork dish for this. I just browned up 1/2 pound ground pork)
  • 2 green onions, chopped (accidentally used some of the green onions I needed for a soup recipe. I wound up using 4 green onions here)
  • 1/4 cup fairly finely chopped Chinese celery cabbage (Napa) (this totally didn't seem like enough cabbage. I used a full cup)
  • 1 tablespoon hoisin sauce
  • 1/2 tablespoon oyster sauce (none in stock. I used an equal amount of black bean and garlic paste)
  • 1/2 teaspoon sesame oil
  • pinch of salt (omitted)
  • 1 tablespoon light soy sauce (I used regular soy sauce)
  • 1 teaspoon sugar
  • 1 tablespoon cornstarch dissolved in 1 tablespoon water or cold chicken stock
Directions
Dough
  1. Sprinkle yeast over the lukewarm water and then add the sugar. Allow to stand and then stir in the yeast (this was pretty amusing to watch. I stood there like a total dope watching the yeast foam up for about five minutes)
  2. Add the milk. Be careful that it is lukewarm or tepid, about 90F. Stir in the flour and knead until smooth (much like I always do, the recipe suggests using a Kitchenaid if available).
  3. Place the dough on a plastic countertop and cover with a large metal bowl. Allow to rise until doubled in bulk, around one hour. When properly risen, punch the dough down and allow to rise another 30 minutes (be ready, this dough inflates spectacularly when it rises. I lifted the bowl after an hour and feared I would be overwhelmed with dough). 
Filling
  1. While the dough is rising, prepare the filling. Combine all the ingredients in a wok, except for the dissolved cornstarch and chow (stir-fry) just until the mixture is hot (I didn't use a wok. I just stir-fried everything in my non-stick skillet) Thicken with cornstarch and allow the filling to cool.
    Totally not the filling the recipe calls for.
Construction
  1. Punch the dough down and knead for 1 minute. Roll the dough into a snake about a foot long and divide the dough into 24 pieces. Roll each piece into a ball and then roll out into a 4-inch circle.
  2. Fill each bun as you roll it. Place a little more than a teaspoon into the center of the dough circle. With your fingers, gather the sides of the dough around the filling in loose folds, meeting at the top. Pinch the dough so it will hold (I wasn't terribly detail-oriented at this point. I just sort of flattened out each ball by hand, dropped in the filling and pinched it closed) 
  3. Please make note of the lack of uniformity of size and the fact that I have not laid them on the waxed paper the right way. I can say with total sincerity that I gave not a single damn regarding these inconsistencies. 
  4. Place the filled bun upside down on a 2-inch square of waxed paper and place in a bamboo steamer (not only do I not own a bamboo steamer, I didn't turn those little bastards upside-down. Totally forgot. I have no regrets. They just sat on the counter for a while)
  5. When all the buns are finished, cover the steamer with the lid and allow the dough to rise until not quite doubled in size. In about 30 minutes, the dough should spring back slowly when pushed gently with your finger (yeah, still don't have a bamboo steamer. Fortunately, the kitchen was hot and humid as hell, so I'm counting it. The dough did spring back when pushed, so it was all good.)
  6. Steam them for 15 minutes (I totally faked the bamboo steamer. I took a big pot and filled it a quarter of the way with water and brought it to a boil. I then hung my Dollar Store Chef Basket over the boiling water. Working in batches of 6, I just loaded the dough balls on their wax paper into the basket and balanced the lid on top)
    It worked, too! So there.
Good times!