Monday, October 25, 2021

Best Ever (FIGHT ME) Slow Cooker Tomato Soup

 I don't normally bandy around the term "BEST EVER." It's trite. It's overused. It generally denotes a slow cooker recipe that is, in fact, not the best ever. HOWEVER, this recipe is, based solely on my experience with tomato soups, the BEST EVER. I will gladly fight anyone who says differently. How do I know it's the BEST EVER? I really fucking hate tomato soup and this was actually pretty good. I know The Wife enjoyed it immensely. The Spud enjoyed it, but all she's ever had was canned tomato soup from Aldi, so the bar was set pretty low there. Other than the caramelizing of onions, this recipe is super easy. Just remember not to add the cream until the end. As always, notes are in blue.

I can say without fear of contradiction, this is the
Best Ever*
Slow Cooker Tomato Soup

Ingredients

  • 1 quart canned tomatoes, undrained (we used our own canned tomatoes. If you don't have home canned, just use an equivalent amount of canned stewed tomatoes)
  • 1 can (14.5 ounce) fire roasted tomatoes, undrained
  • 1 quart reduced sodium chicken stock
  • 1 tablespoon dried basil
  • 2 teaspoons Ukrainian Village seasoning from the Spice House (if you can't or won't get the seasoning, use a mix of Kosher salt, garlic, onion, bell peppers, and pepper. No clue as to what ratios you'd use. That's why I'm using the seasoning). 
  • 2 tablespoons butter
  • 1 medium onion, sliced into half rings
  • 2/3 cup heavy cream
Directions
  1. In a pan, melt butter and sauté onions on medium heat until they caramelize, about 7-10 minutes. 
  2. Add the onions and everything else other than the cream into a slow cooker (I used a 5 quart)
  3. Cook on LOW for 4-1/2 hours.
  4. At the end of the 4-1/2 hours, use and immersion blender to completely blend the soup. It should be completely smooth. (if you don't have an immersion blender, you're going to have to transfer the soup to a blender and do it in batches)
  5. Once the soup is blended, add the cream and stir. 
Good Times? THE BEST

*In the highly unlikely event you don't feel this soup is the BEST EVER, it is likely due to some sort of failing on your part. Probably an unrefined palate or some sort of taste bud injury from a microwave burrito.

Sunday, September 12, 2021

'Nero Fiddles Hot Sauce

 We are about halfway through September and the garden is still throwing habanero peppers like it's mad at us. The Wife is making noises about giving some of them away, and that just won't do. So I decided to make a hot sauce recipe that uses two dozen peppers a batch. I did. This one is a real roller coaster ride. It's like a Saturday morning with a six-year old in the house. It starts off nice and pleasant and then all of a sudden all hell breaks loose. That's the best way I can describe it. More specifically, it's got a bright, slightly fruity taste. I have no idea what I'm going to do with it. I could probably make some absolutely deadly hot-wings. Possibly add a few drops to a Bloody Mary. Maybe just drink it straight if I wanted to scream for a while. Basically a lovely flavor plays around in your mouth as you burn.

This recipe will yield 1-1/2 pints of sauce. If you own a Insta-Pot Ace blender, you can actually do everything but the canning step in the blender by running the puree program. 

Give it a spin and tell me what you think, as long as it's positive. As always, notes are in blue.

'Nero Fiddles Hot Sauce

Ingredients

  • 2 dozen habanero peppers, stems removed (don't you even think about removing the seeds, you big baby)
  • 2 red bell peppers, chopped
  • 1 white onion, chopped
  • 2 teaspoons chopped fresh sage
  • 1/2 teaspoon salt
  • 1 cup white vinegar
  • 1/4 cup lime juice
  • 1/4 cup white tequila (if you don't do alcohol, just omit and split the difference between more vinegar and lime juice)
Directions
  1. Put all the ingredients in a blender. Blend until smooth.
  2. Pour contents of blender into a non-reactive pot. Heat to a simmer for about 10 minutes. 
  3. Return to the blender (or use an immersion blender) to ensure everything is totally liquefied. 
  4. If you're not going to can this sauce, you're done. 
    Fire in the hole!
  5. If you are canning, fill three half pint jars to 1/4 inch headspace and secure lid and ring. Process in a boiling water bath for about 12-15 minutes. As always, review canning procedures at The National Center for Home Food Preservation to make sure you don't accidentally poison anyone. 
Good times!


Monday, August 30, 2021

Cucumber-Jalapeno Hot Sauce

 Holy shit did the garden throw a lot of cucumbers at us. There's only so many cucumber sandwiches, or tomato/cucumber/onion salad you can eat. I decided to use the vast surplus along with the bumper crop of jalapenos were also blessed with. The end result was a rock-solid hot sauce. It starts with an unmistakable cucumber flavor. Then the heat builds quickly but then levels off with a nice sweet finish. This would be great with fish or chicken. Or, as The Wife prefers, unceremoniously shoveled into her gob with Aldi Lime Nacho Chips. To each their own. This recipe will yield about 2-1/2 pints of sauce. 

Cucumber-Jalapeno Hot Sauce
aka Green Meanie

Ingredients

  • 2 decent sized cucumbers, peeled, seeded, and chopped
  • 12 jalapenos, chopped (I suppose if you're a HUGE BABY you could seed them to cut down on the heat, but then why are you even looking at a hot sauce recipe?)
  • 1 medium onion, chopped
  • 1/4 cup lime juice
  • 3/4 cup water
  • 2 cups white wine vinegar
  • 1 tablespoon dry cilantro
  • 1 teaspoon salt
  • 1 tablespoon garlic powder
  • 1 teaspoon amchoor (dried mango) powder
Directions
  1. In a medium pot, combine all ingredients. Bring to a boil. Reduce to a simmer for about 10 minutes.
  2. Pour mixture into a blender or use an immersion blender to blend until as smooth as possible.
  3. Feel free to strain the sauce if you want something closer to a liquid-only hot sauce, or leave it as-is for something closer to a thin salsa.
  4. If you plan on canning this sauce, we went with 5 half pint jars, 1/4" headspace, and 12 minutes in the boiling water bath. As always please go to the National Center for Home Food Preservation and brush up on canning so you don't accidentally kill anyone.
Good times!


Monday, August 23, 2021

Pickle Dip

 Some time ago I happened on a wondrous product at our Sam's Club. It was a Taste of the South Fried Pickle and Ranch Dip. It was delicious and reasonably priced. However, our Sam's is almost 30 minutes away. It wasn't always practical to pick it up. I decided to replicate the recipe. I'll be damned if I didn't come really close. This is an excellent dip for veggies or chips, or as a filler for those cute little spiral roll ups. You could just be a savage and spoon it straight into your gob. Nobody will know. Fair warning, much like the original, the pickles cause the dip to break down and get watery after a day or two. Just stir it a few times and you're back in business. Try it. It's killing you not to. 

I'd like it pointed out I did not make any "pickle dip" jokes in this post. I'm growing as a person. I guess if you want a pickle dip joke you'll have to insert it yourself. DAMMIT I WAS SO CLOSE.

Pickle Dip

Ingredients

  • 1 pint jar of pickles. 
  • 1 lb container sour cream
  • 4 ounces cream cheese (we used neufchatel), softened
  • 1/4 cup Ranch dressing
  • 1/4 cup Italian style bread crumbs
  • 1 teaspoon garlic powder
  • 1 teaspoon onion powder
  • 1/8 teaspoon turmeric
  • 1/2 teaspoon dill weed
Directions
  1. Take the pickles from the jar and chop them as finely as you can. Reserve the pickle juice from the jar, you may need it later.
  2. In a large bowl, add all the ingredients (except the reserved pickle juice) and whisk the living shit out of it until everything is incorporated.
    If I didn't have a whisk, I'd be in a real "pickle."
    Sorry.
  3. Give it a taste, if it's not pickly enough for you, (picklishious? pickletastic?) add a couple splashes of pickle juice. Don't get crazy or the dip will get thin.
Good times!


Tuesday, August 17, 2021

Summer Vegetable Quiche with Potato Crust

 So the garden is totally out of control. We are being buried alive in vegetables and are desperately doing everything we can to stay ahead of it. I have to be honest. I'm getting really fucking tired of squash and zucchini. This was a moment of inspiration. I'd seen similar recipes, and decided to do something similar. There's really not much to say. It uses up a bunch of veggies, is easy to put together, and tastes pretty good. I like mine with a liberal splash of Tabasco sauce. If you're desperate to use up some veggies, this is a pretty solid way to go. It works for pretty much any meal of the day. Give it a try and let me know what you think, unless it's critical, then don't tell me. As always, notes are in blue.

Summer Vegetable Quiche with Potato Crust

Ingredients

I may have used jarred garlic when I made this. Don't judge me.

  • 1 bag (24 ounce) frozen O'Brien style hash brown potatoes
  • 1 cup finely chopped zucchini
  • 1 cup finely chopped yellow squash
  • 1/2 cup finely chopped onion
  • 3 cloves garlic, finely chopped
  • 3 cups of chopped kale, stems/spines removed
  • 1 cup shredded white cheddar cheese (honestly pretty much any cheese would work here)
  • 3 eggs
  • 1/2 cup evaporated milk
  • 2 teaspoons Italian seasoning
  • 3 tablespoons olive oil
  • salt
Directions
  1. Preheat oven to 425F (220C, GasMark 7)
  2. Defrost the potatoes and squeeze out as much moisture as humanly possible. Seriously, squeeze the shit out of it like it owes you money. Get physical. Consider it therapy. Give a primal scream as you do it. 
  3. Grease a 9" cast iron skillet (or a pie pan if you don't have the cast iron) Take the potatoes and form a even layer to serve as the crust. Bake for 25 minutes or until the potatoes start to brown.
  4. While the crust is cooking, in a large pan, heat oil over medium heat. Add garlic and onions. Sauté for 3-5 minutes, or until the onion starts to get translucent. 
  5. Add the zucchini and squash and sauté about 5-7 minutes or until tender.
  6. Add the kale and sauté until the kale is wilted
    Wilting in progress.
  7. In a bowl, add eggs, evaporated milk, cheese, and seasonings. Beat until all is mixed evenly.
  8. When crust is done, remove from oven and lower temperature to 350F (177C, GasMark 4).
  9. Spread vegetable mixture evenly in crust. Slowly pour in milk/egg mixture. Lightly move the mixture around with a spatula to make sure the liquid and cheese is fully incorporated.
  10. Cook for 30 minutes or until top is starting to brown.
    It occasionally looks like I know what I'm doing!
    You can poke it with a knife and if it comes away clean, you're done. 
Good times!


Saturday, July 24, 2021

Three Cheese Summer Squash Pasta Bake

 Normally we plant way too many yellow squash and zucchini plants each year. This year we cut way back. Two zucchini and three yellow squash plants. Then they went batshit insane. We're getting about 900 pounds of produce daily. There's only so many pints of pickled zucchini and squash you can make. There's only so much zucchini bread. I wound up finding a really good recipe for a squash/zucchini pasta in a cream sauce. A real banger of a recipe. Then the book I found it in got put away. When I went to look for it, it was gone. Completely gone. Nobody could find it. Much swearing was done. That didn't help. I wound up just saying screw it and making it up myself. I ended up making a pretty tasty alfredo-style sauce that worked really well in a bake. The Wife was much impressed. It was declared a great success and we all had pickled limes. Then Beth got Scarlet Fever and died...Sorry, I drifted into Little Women there. 
Give it a spin and tell me what you think, as long as it's flattering. As always, notes are in blue. 

Three Cheese Summer Squash Pasta Bake

Ingredients

  • 2 zucchini, cut into 1/4" cubes (about 4 cups)
  • 2 yellow squash, cut into 1/4" cubes (about 3 cups)
  • 1 cup chopped tomatoes
  • 1/2 cup seeded and chopped red banana (or bell) peppers
  • 1/2 red onion, finely chopped (about 1/2 cup)
  • 4 cloves garlic, finely chopped
  • 1/4 cups fresh basil, finely chopped
  • 3 tablespoons olive oil
  • 1 pound of pasta of your choice
  • 1 pint heavy cream
  • 1/2 cup grated Parmesan cheese
  • 1/2 cup shredded mozzarella cheese
  • 1/2 cup shredded Swiss cheese
  • 1/2 teaspoon garlic powder
  • 1/4 teaspoon red pepper flakes
  • salt and pepper
Directions
  1. Cook pasta to a little harder than al dente (basically short the time by a couple extra minutes. The pasta is going to cook in the oven with the sauce for a while and you don't want it to get super soft.)
  2. Preheat oven to 375F (190C, Gasmark 5) 
  3. In a large, oven proof pot, heat the oil over medium heat (we used our trusty 6 quart enameled cast iron Dutch oven. If you don't have an oven safe pot, you'll just have to transfer everything to a greased Pyrex baking dish before putting it in the oven)
  4. Add the zucchini, squash, peppers, onion, and garlic. Sauté about 4 minutes.
  5. Add the tomato and sauté another 4 minutes. Salt and pepper to taste
  6. In a saucepan, add the cream, cheeses, garlic powder, and pepper flakes. Heat on medium heat, stirring regularly so as not to scorch anything.
  7. When the cheeses are completely melted into the sauce, add salt and pepper to taste.
  8. Pour the sauce into the pot with the vegetables. Add the pasta and toss to coat everything. Put the pot in the oven for 12 minutes (this is where you'd transfer everything to a baking dish first, if your pot isn't oven safe)
  9. Remove from oven and toss to make sure everything is evenly coated. 
Good Times were had by all. 
Except Beth. She died from Scarlet Fever. 

BONUS LINK TO RECIPE VIDEO:


Tuesday, July 13, 2021

Radish and Turnips with Spicy Greens

 Summer is in full swing and we have a garden bigger than is reasonable. We filled in a 20'x40' in-ground pool and converted it into a vegetable garden. We'll post up some pictures soon. It's pretty inspiring. This year we are growing things we have not tried before. For instance, turnips and radishes. We took our first tentative harvest of them and set about figuring out what to do with them.

Not particularly inspiring, but there you have it.

We figured turnip and radish greens were edible, so we just figured we'd just sauté up the lot of them. Garlic seemed like it would work with the flavors of these veggies. The horseradish was a last minute inspiration. The recipe came together quickly and cooks easily. It makes enough for two. Is it good? I guess that largely depends on your palate. It is definitely spicy. The Wife said she enjoyed it quite a bit. I thought it was OK, but that's pretty how our recipe assessments usually go. In the end, I'd say it's worth a try. It would certainly pair with barbecue or Cajun food. Give it a try and tell me what you think. I'll ignore anything critical. As always, notes are in blue.

Radishes and Turnips with Spicy Greens

Ingredients

  • 6 radishes, thinly sliced
  • 4 small turnips, thinly sliced
  • Greens from the radishes and turnips, stems removed and greens cut into 1" ribbons
  • 6 cloves garlic, chopped
  • 1 tablespoon prepared white horseradish
  • 2 tablespoons olive oil (we actually used bacon grease, but olive oil keeps this vegetarian)
  • Salt and pepper
Directions
  1. In a large pan or wok, heat the oil/grease over medium heat.
  2. Add the garlic and sauté for 2-3 minutes, not letting the garlic get brown
  3. Add the radishes and turnip and sauté for 5-7 minutes, until they become just a little tender
  4. Add the horseradish and greens, and sauté until the horseradish is incorporated and the greens have wilted.
  5. Salt and pepper to taste 
Good Times!


Sunday, June 13, 2021

Thank Heavens, Another Slow-Cooker Beef Stew Recipe aka Okayest Ever Slow-Cooker Beef Stew

Last week, the school year drew to a close and the Wife and I breathed a heavy sigh of relief. We have the whole summer ahead of us and things are returning to some vague semblance of normalcy. We thought, "what could we possibly do to help drive things back to that wonderfully boring normal?" SLOW COOKER BEEF STEW was the resounding answer. And I'm not going to blow beef scented smoke up your asses and claim it's "Best Ever" because it's not. It's good. It's serviceable. It is mind numbingly easy to make and will fill you up. That's it. That's all I can say. I've got months of content I owe you, so expect a treasure like this every now and then. Much like this recipe, this post is vaguely satisfying filler until I can make something more substantial. As always, any notes are in blue.

Okayest Ever Slow Cooker Beef Stew

Ingredients
  • 1 pound beef stew meat
  • 1 bag (about 1 pound) mixed frozen stew vegetables (i.e. carrots, celery, onions, potatoes)
  • 1 can (10.5 ounces) cream of mushroom soup
  • 1 can (14.5 ounces) diced tomatoes, drained
  • 1 onion, chopped
  • 1 large potato, cut into 1" cubes
  • 1 tablespoon Worcestershire sauce
  • 1 teaspoon garlic powder
  • 1/2 teaspoon black pepper
  • 1 cup water (in retrospect, I suppose I could have just not drained the tomatoes and omitted this step, but I justify it in the reduction of sodium)
  • 1 heaping tablespoon corn starch
  • 2 tablespoons cold water
Directions
  1. Unceremoniously dump everything but the last two ingredients into a slow cooker. Don't even bother browning the meat. That's where we are right now. We're just getting shit done.
  2. Cook on HIGH for 4-1/2 hours because I don't have the patience to wait for 8-10 hours on LOW. 
  3. Take the corn starch and water in a small bowl and whisk it together until the corn starch is completely dissolved. At the end of the strew cooking time, stir in the corn starch slurry until things thicken up. 
  4. That's it. Slop it in a bowl and grimly shovel it down in silence.
Good times!


Friday, March 5, 2021

Taco Hotdish

 Ah, the hot dish. A Midwest tradition. Well, specifically an Upper Midwest tradition, but a tradition nonetheless.  The concept is simple, it's basically a tater-tot based casserole. You get a baking dish, put in a layer of meat mixed with cream soup and possibly some vegetables, and layer tater tots over the top. Pop it in the oven and *POOF* comfort food. There's really no limit to the variations of a hotdish, which is why I ended up making a taco version. I used Dos Rios heat and eat taco meat, but you're under no obligation. Shockingly, my 5 year old daughter would NOT eat this. She loves tacos, but is morally opposed to tater tots. I'm not sure where that defect came from. My attempt to serve it to her ended up in an absolute scorcher of a tantrum. The Wife, though, declared it a success and gleefully went back for seconds. Give it a spin and see if it causes any tantrums in your home! As always, notes are in blue.

Taco Hotdish

Ingredients

  • 1 pound chub of Dos Rios Chile Verde taco meat (if you can't find it or don't want to use it, just use a pound of cooked ground beef with your taco seasoning of choice)
  • 1 16-ounce jar of salsa
  • 1 10.5-ounce can cream of mushroom soup
  • 1 16-ounce can of refried beans
  • Nacho chips, broken into small pieces
  • 1 bag of frozen tater tots  (you probably won't use them all, but better safe than sorry. Just make the leftover tots for a snack or something)
  • Shredded cheddar cheese (I intentionally did not put an amount because there is only one wrong amount of cheese to use and that is "not enough." You're just going to need enough shredded cheese to cover everything. EVERYTHING.
Directions
  1. Preheat oven to 350F (177C, GasMark4)
  2. Spray a 9x13" baking dish with nonstick cooking spray.
  3. Warm up the refried beans to make them easier to spread, and spread them in an even layer along the bottom of the baking dish
  4. Distribute enough nacho chips into the baking dish to cover the layer of beans.
  5. In a large bowl, combine meat, soup and 1 cup of the salsa. Mix to incorporate ingredient, then spread in a layer on top of this chips.
  6. Place an even layer of tots over the meat. Just lay them in neat, even rows so they cover everything.
  7. Spread remaining salsa over the tots.
  8. Cover the top with an absolute shit-ton of shredded cheese. Go wild. Use a whole brick. I won't tell anyone. 
  9. Put in oven for about 30-35 minutes or until cheese is melted and bubbly.
Good times!


Thursday, February 18, 2021

Slow Cooker Ham, Broccoli, and Cheese Soup

 I was just thinking to myself that the world can't possibly have enough slow cooker ham and potato soup recipes. This was a grave injustice that deserved remedy. That, and I had a bag of potatoes that was about to turn into compost if I didn't use them soon. This is about as utilitarian a soup as you'll ever find. There are no real surprises or innovations here, other than maybe the use of American cheese slices. This is just solid winter fare. This will fill you up and keep you warm. This is not the soup you need right now. It is the soup you deserve. I think that might have been from Batman. I don't know, it's been a long week. Anyways, it's easy to make and it's good. It's also flexible. Leave out the ham, add sausage. Go vegetarian and leave out the meet but add some carrots. Go wild. As always, notes are in blue.

Slow Cooker Ham, Broccoli, and Cheese Soup

Ingredients

  • 8 cups cubed (about 1/4") potatoes (peel them if you want, we never bother)
  • 1 cup sweet onion, finely chopped
  • 1 lb. frozen broccoli
  • 4 ounces cream cheese (we use neufchatel)
  • 1 lb. ground ham (this may be a problem to find. We use ground ham from Toohill Seed & Beef Service. If you can't find it or are unable to order it, substitute an equivalent weight of ham you chop up yourself.)
  • 8 slices American cheese (if this seems horrifying, just substitute 8 ounces of shredded cheddar or Velveeta)
  • 3 cups water or chicken stock
  • 1 cup milk
  • 1 tablespoon Gateway to the North seasoning from the Spice House. (if you can't/won't get this spice blend, you can make do with whatever spices you enjoy)
Directions
  1. In a large (5-6 quart) slow cooker, add the potatoes, then layer the cheeses over the potatoes. 
  2. Add all other ingredients over the cheese.
  3. Cook on LOW for 7 hours, stirring every couple hours.
Good Times!


Monday, February 1, 2021

Slow Cooker Zesty Taco Soup

You are all probably aware of how excited we were about getting a big box of goodies from Dos Rios Taco Meat. We were especially excited about the Chile Verde flavor, since it's not available right now in our area. Keep in mind there's absolutely nothing stopping you from browning up your own ground beef and adding your own seasoning, but I am inherently lazy and am enamored of the concept of heat and eat meat (say that five times fast). This recipe is literally just dumping ingredients into a pot and heating them until it is hot enough to serve. That's the magic. This soup has a little bit of a zing to it as the meat has some jalapeno already in it. Much like anything I cook in the slow-cooker, this is not much to look at. However, it smells and tastes wonderful. This is absolutely a perfect dish for the wet and cold weather we've been having lately. If you live somewhere that is warm and dry, I don't want to hear about it. I'm not sure what else to tell you. If you use the Dos Rios meat, there's virtually nothing to do with this recipe other than throw everything into a pot and applying heat. Granted, that's really all cooking is, but here you at least won't have to cook and drain the beef. Since I'm a swell guy, I included stovetop cooking instructions. I just keep on giving. As always, any notes are in blue.

Slow Cooker Zesty Taco Soup

Ingredients
  • 1 lb. Dos Rios Chile Verde Taco Meat, defrosted
  • 1 can (15 ounces) black beans, drained and rinsed
  • 1 can (10.5 ounce) cheddar cheese soup (you could certainly use nacho cheese soup if you had it on hand. We had cheddar, so that's what we used)
  • 1 can (14.5 ounces) fire roasted tomatoes, undrained
  • 1 can (15. 5 ounces) white hominy, drained
  • 8 ounces (about half a jar) salsa (we went with a hot, thick and chunky Chi-Chi's salsa. Feel free to use whatever floats your boat)
  • 1-1/4 cup chicken stock (you could use just water, but we've really been enjoying using stock)
  • Optional: sour cream and black olives to garnish after cooking.
Directions
  1. Put everything in a large (around 5 quart) slow cooker. 
  2. Stir to combine.
  3. Cook on LOW for 5 hours. 
  4. Add any garnishes
OR
  1. Put everything in a large (around 5 quart) Dutch oven
  2. Stir to combine
  3. Cook on the stovetop on medium heat until it starts to simmer, stirring occasionally.
  4. Add any garnishes
We worked the numbers, and it looks like this is about 275 calories per cup. (This does not take into account any sour cream you add)

Good times!


Product Review: Jen's Family Table Bolognese Classic Pasta Meat Sauce

 Disclaimer: This product was provided to me by the company. However, the review is based entirely on the merit of the product. 

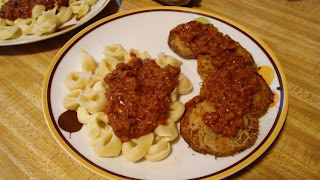
I received this Bolognese sauce along with some other meat chubs from Dos Rios Taco Meat and Jen's Family Table. I will admit I was a little taken aback at the concept of heat and eat meat sauce. My pasta sauce takes hours to make and is undeniably the Best Ever. Could a frozen chub compete? Would it be fair to compare them? No, it wouldn't. My sauce is made for people I know with tastes that I am familiar with. The people at Jen's Family Table are cooking for a vast number of people they have never met before. That's when I decided what I'd compare it to: The meat sauce you get at a family restaurant. You know what I'm talking about, that brownish-red meat sauce that tastes vaguely like cinnamon. This set the bar extremely low, since I absolutely hate that style of meat sauce. So with that in mind, here we go:

The Wife was in a rush to eat and had already emptied out the chub.

The packaging is simple and efficient. There is no question as to what you're getting here. Let's take a look at the back:

Nutritionally, it's not bad at all. If you ate the whole pound, you'd be out 455 calories. This is an important consideration for me, since I try to limit my intake to 1600 calories a day. Calorie-wise, this is a guilt free sauce for me. The sodium is a bit up there, but that's down to the nature of the product. I don't think it can be helped and honestly, the sauce does not taste salty at all. 

With that out of the way, let's talk ease of preparation. This is where this product truly shines. It's precooked. If it's defrosted, you're only looking at a few minutes in the microwave for a piping hot sauce. You could certainly warm it up on the stovetop as well, but we were all about speed tonight. It was literally just emptying the chub into a bowl and slapping it in the microwave for about two and a half minutes.

Now comes the important part; how does it taste? I was pleasantly surprised to find there was no cinnamon flavor at all. This was, as advertised, a "thick and meaty" sauce! You could actually taste the spices. Nothing overpowering, but there was definitely something going on. We felt that it stood on its own and did not need anything extra.  We decided to serve it over some cheese tortellini and The Wife's Eggplant Parmigiana. 

Winner, winner, chi...wait. That won't work.

This sauce held up wonderfully. It clung well to the tortellini and eggplant and did not break down during the meal. The Wife and I both agreed this is certainly a product we'd keep in the freezer for a quick midweek meal. I would definitely use it in my lasagna to cut down on prep time. 


Thursday, January 14, 2021

Too Damned Easy Taco Sloppy Joe

 Sometimes inspiration hits in an unlikely way. In my case inspiration usually comes by way of desperation. Midweek meals are always a challenge during the school year, which is why we usually do a few slow-cooker meals on Sunday and just eat them during the week. However, that strategy often leads to waste, as we get tired of the lack of variety during the end of the week. So if we're cooking midweek, it has to be simple. This week, we could not decide between tacos or Sloppy Joe. I decided in a fit of laziness to combine them. This was made easier by the amazing product Dos Rios Fully Cooked and Seasoned Taco Meat


I kid you not. This stuff is $2.50 for a 1lb. chub at our local grocery. You can barely find ground beef at that price. You don't need to season it, you don't need to drain it. It's precooked so you only need to defrost and heat it up. With the addition of two more ingredients you have a sandwich filler, a tortilla filler, a great topping or dip for nachos. Hell, add it your scrambled eggs. Without further delay I present to you (with, as always, notes in blue):

Too Damned Easy
Taco Sloppy Joe

Ingredients:
  1. 1 pound chub of Dos Rios taco meat (if you don't have it or can't find it, I weep for you. You're going to have the extra steps of cooking and draining ground beef and adding taco seasonings)
  2. 1/2 cup salsa of your choice (we went with Chi-Chi's Thick and Chunky Hot Salsa)
  3. 1/2 cup shredded cheddar cheese
Directions:
  1. In a saucepan, add all ingredients. 
  2. Heat at medium heat while stirring regularly. 
  3. Keep stirring over medium heat until cheese is melted through.
  4. That's it. You're done. Go eat.
Good Times!


Monday, January 11, 2021

Slow Cooker Potato, Beer, Bacon and Cheese Soup

 The time has come for soup weather. It's been hovering around freezing for a couple weeks now, so we're dragging out soup recipes and coming up with new ones. This recipe came about because we had a bag of potatoes that had all sorts of exciting things growing off of them and were close to achieving sentience. We found a slow cooker recipe for potato soup and quickly butchered it. The result was a gallon of tasty and filling soup. If you don't drink, it is still good without the beer. Or use non-alcoholic beer if that's an option. It's up to you. I'm not going to be checking on you to see if you followed the recipe exactly. Apologies for the pic, this soup does NOT photograph well. As always, notes are in blue.

Slow Cooker Potato, Beer, Bacon, and Cheese Soup
(looks much better in real life)

Ingredients

  • 6 cups potatoes, cut into small cubes (I used russets, didn't peel them, and cut them into about 1/4" squares)
  • 2 cups minced onion
  • 1/2 cup carrots, cut into thin slices
  • 1/2 pound bacon (feel free to leave it out if you don't do meat)
  • 1 can (10.5 ounces) cream of broccoli soup (you could certainly use just about any cream soup here, though cream of potato might be overkill)
  • 5 cups chicken stock (or vegetable stock if you're not into meat)
  • 1/4 teaspoon black pepper
  • 1 tablespoon Taylor Street Seasoning from Spice House (I know many of you won't have this, or don't want to order it. That's fine. You can just add garlic, Romano cheese, and basil to taste.)
  • 1 can (12 ounces) evaporated milk
  • 1 cup dark beer (I used Budweiser Black Lager. Pick your favorite. Use non-alcoholic if you prefer. Or leave it out if you don't drink. I imagine you could through a couple dashes of Worcestershire sauce in there to get that deeper flavor)
  • 4 ounces shredded cheddar cheese (about 1 cup)
  • 1 teaspoon dried parsley
Directions
  1. In a pan, cook bacon until crisp. Drain and set aside.
  2. In a large (6 quart) slow-cooker, add the potato, onion, carrot, bacon, soup, stock, pepper and seasonings. 
  3. Set the cooker to HIGH for about 6.5 hours. Stir once about halfway through the time.
  4. After the 6.5 hours, stir in the evaporated milk, beer, cheese, and parsley. Leave on HIGH and cook another 30 minutes or until the potatoes are soft.
Good times!